


Dresser Drawer Recycled Garden Project

Updated: Mar. 21, 2024

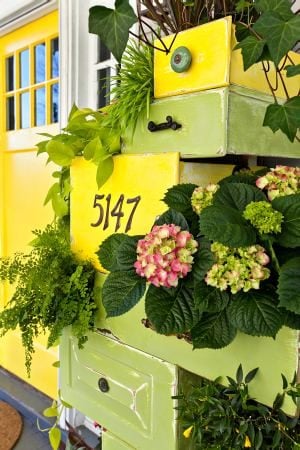
Looking for vertical garden ideas? Try using dresser drawers! We’ll show you how with this recycled garden project.
This fun planter project combines two of the hottest trends: recycled garden items and vertical gardening! I love drawers. Small ones, big ones, skinny ones, shallow ones—I’ll take them any way I can find them. So when I see a big old ugly dresser in an alley or a thrift store, all I can think about is what I’m going to do with the drawers. Like many gardeners, I’m always looking for new vertical garden ideas, so stacking these drawers seemed like the perfect way to go! Whether you put this display in your garden, or on a front porch as I’ve done here, it will add interest and color to your space.
Materials:
- Drawers
- Handles
- Wood scraps
- Screws and screwdriver
- Drill
- Sandpaper
- Exterior-grade paint and primer
- Plants
- Potting soil
- Finish nails, brads or staples (optional)
- Lawn-and-leaf bags (optional)
- House numbers (optional)
Step-By-Step Instructions:
Step 1
Stack the drawers so that you have a solid foundation and ample planting spaces. I used two matching drawers screwed together on the bottom to provide a wide, sturdy base. From there, I cantilevered all the boxes in opposite directions, using the center of the bottom boxes as my visual guide. This is attractive, plus balancing the drawers this way provides stability.
Step 2
Once you know how you’re going to arrange the drawers, make feet out of wood scraps and screw them onto the bottom drawer or drawers. For my feet, I used a salt-treated 4-by-4 cut into 3-in. lengths. If using two drawers for the bottom, screw those together first, then attach the feet, including a fifth one for support where the two base drawers meet. Adding feet ensures that water will drain freely away from the unit, preventing rot. Just make sure the feet are chunky enough to support the weight of the unit.
Step 3
Drill drainage holes in the bottoms of all the drawers. The size of the hole is not critical; a drill bit of about a quarter inch worked for me. You’ll need about 10 holes per drawer to get good drainage.
Step 4
Sand, prime and paint each drawer individually with exterior-grade coatings. You can paint the inside of the drawers as well, or you can shellac them to seal the wood to prevent decay. You can also leave the interiors unfinished and line them with plastic lawn-and-leaf bags if you prefer, but coating them in some way will definitely prolong their life.
Step 5
Now is a good time to attach any decorative handles, house numbers or other embellishments to the drawer faces. You also may want to experiment with the placement of the drawers at this point, or draw your planned design on paper first.
Step 6
Starting from the bottom, attach each drawer to the one below. I found the easiest way to do this was to cut a piece of scrap wood the width of the lower drawer to support the drawer that will go on top. Secure the support board to the inside of the lower drawer with screws. Rest the next drawer on top of this support board and the perimeter of the drawer below, and then secure it with screws, brads, pneumatic staples or finish nails—whatever is readily available and works for you. Repeat with all the drawers.
Step 7
To ensure that your drawer garden won’t pull apart as soon as you move it, cut at least two lengths of wood to the height of the finished unit (not including the legs); a 1- x 3-in. or 1- x 4-in. strip of wood is ideal. Screw these to the back of your unit, making sure to include each drawer. This provides rigid bracing and additional strength to the finished piece.
Step 8
Time to plant! You can put potted plants in your unit or take them out of the pots and plant directly in the drawers. I found a mixture of upright grasses, hanging vines and dramatic blooms to be a lovely combination.
Originally Published: September 20, 2013