
Many areas of the United States are suffering from extreme drought and your garden may also be showing signs of it as well.
So, if you plants are in need of more supplemental water, what do you do? Do you haul out your hose to water your thirsty plants? Unfortunately, when you water your plants with a hose, a lot of the water from the hose often comes out too quickly for the soil to absorb and much of the water runs off and doesn’t water your plants deeply enough.
So, other then using a hose or sprinklers, what can you do for your thirsty plants?
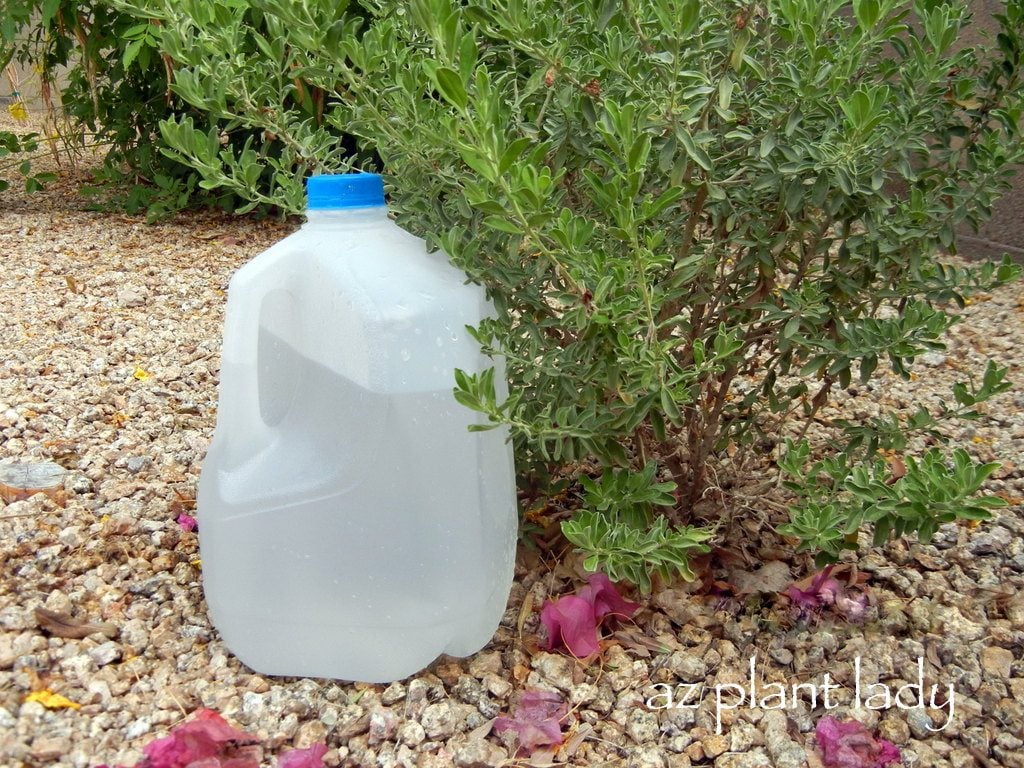
How about making your own drip-watering container? This is the perfect way to slow-water your plants and recycles your old milk jugs. It is also an easy way to apply liquid fertilizer to your plants too!
Making your own drip-watering container is super easy and the only things you need are a clean plastic milk jug and a sharp nail. That’s it!
What you need to do is to make tiny holes on the bottom of your milk container. Here is how you do it…
– Take a sharp nail and heat it up using a lighter or the burner on your stove (be careful not to burn your fingers when you do this part ;-).
– Make four holes equally spaced on the bottom of your milk jug. You may need to reheat the nail after each hole, which helps the nail to pierce the plastic easily.
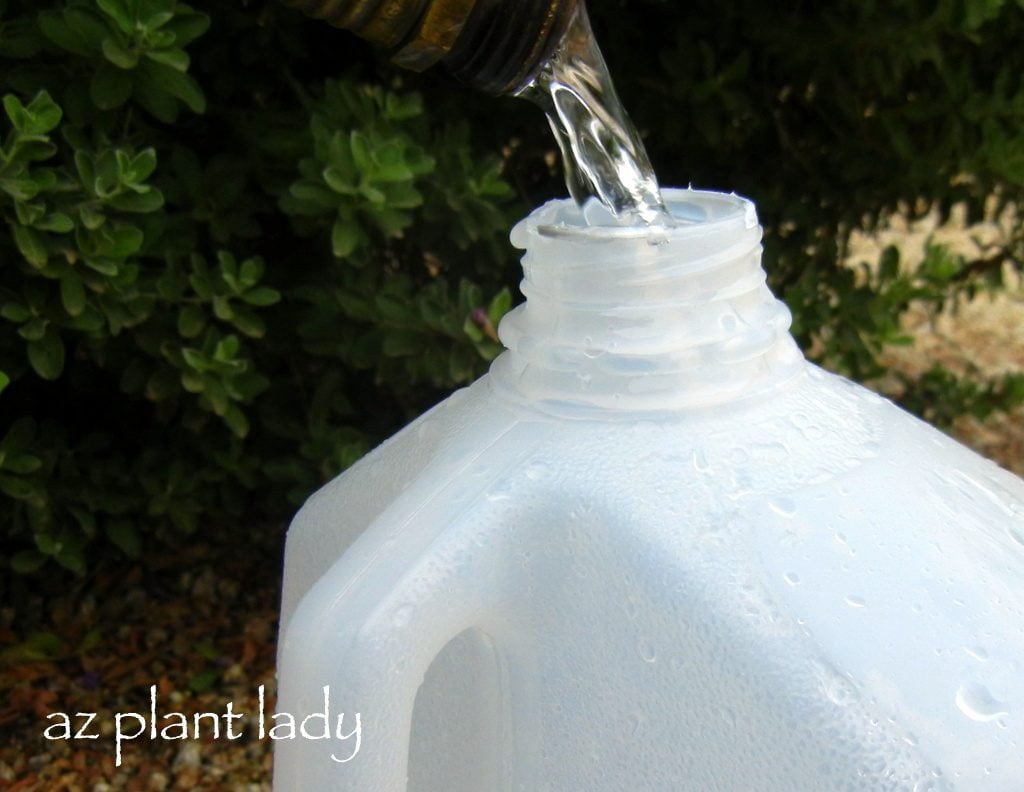
– Place your milk jug next to the plant you want to water in your garden and fill it with water from your hose. If the hose doesn’t reach your plant, simply fill it with water at the source, put the cap on and turn it upside down (so the water doesn’t come out the holes) until you reach your plant and then set it down.
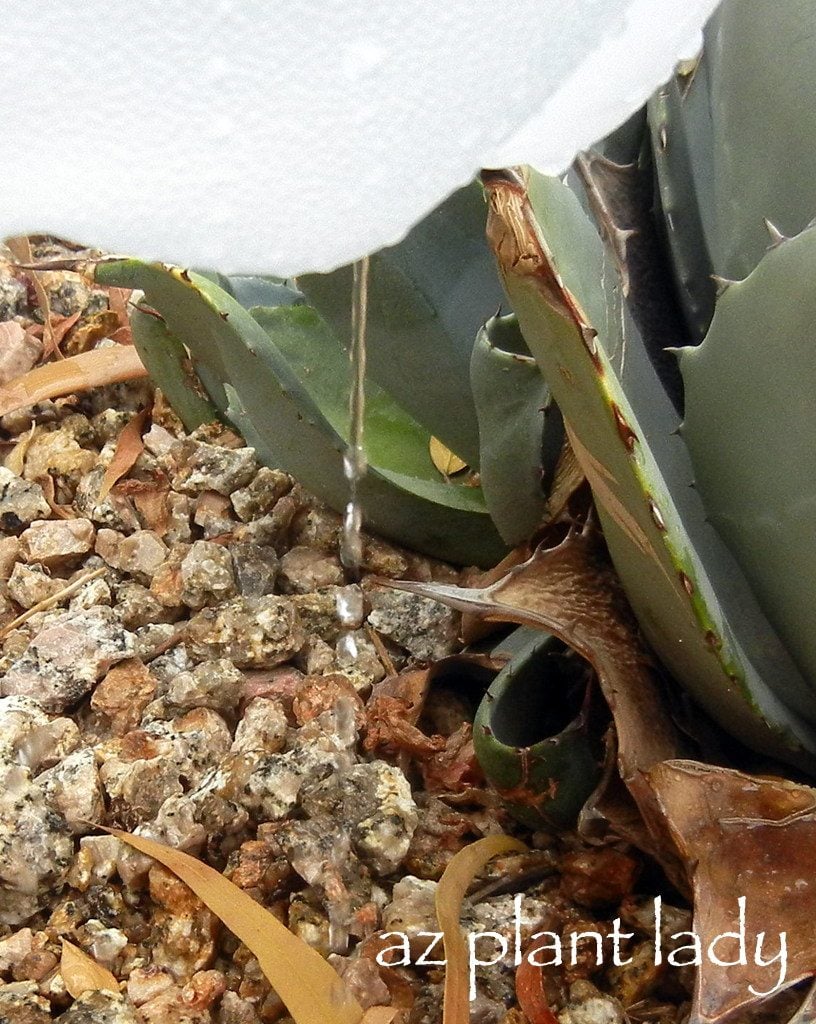
– Water will slowly drip out into the soil around your plant, which allows the water to deeply penetrate the soil without runoff.
Your plants will appreciate the extra water and you’ll save time and water by not standing over your plants watering with your hose.
**In my garden, I like to deep water my succulents using this method too!
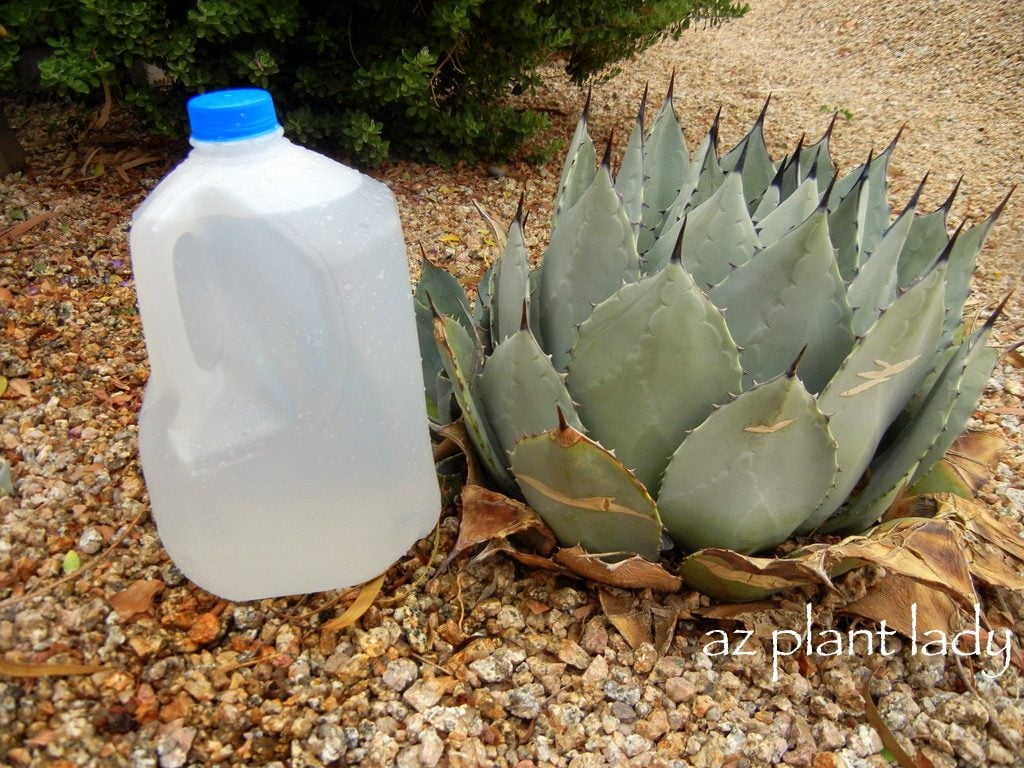
For a more permanent solution, you can make holes on the sides of a milk jug and bury it entirely next to your plant, just leaving the mouth of the jug exposed. Leave the cap on and unscrew it and fill with water when needed.
Milk jugs are incredibly versatile and have many uses. Check out this Birds & Blooms article for more ideas: “Uses for Milk Jugs”
Recently, while I was on vacation in Northern Arizona, I was admiring some beautiful perennial plantings along the street.
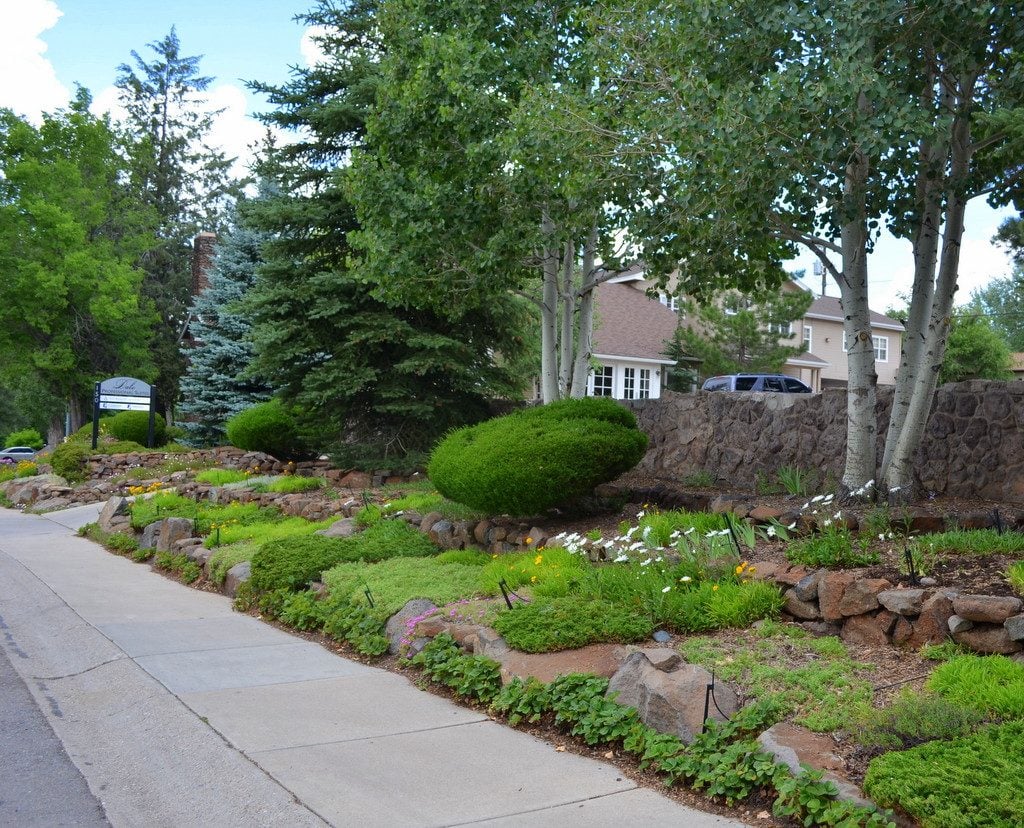
I really liked the overall design of this area and how they used plants with contrasting colors and textures. Much of the area was planted with a variety of different ground covers. However, I was drawn to the ground cover that was planted right next to the sidewalk.

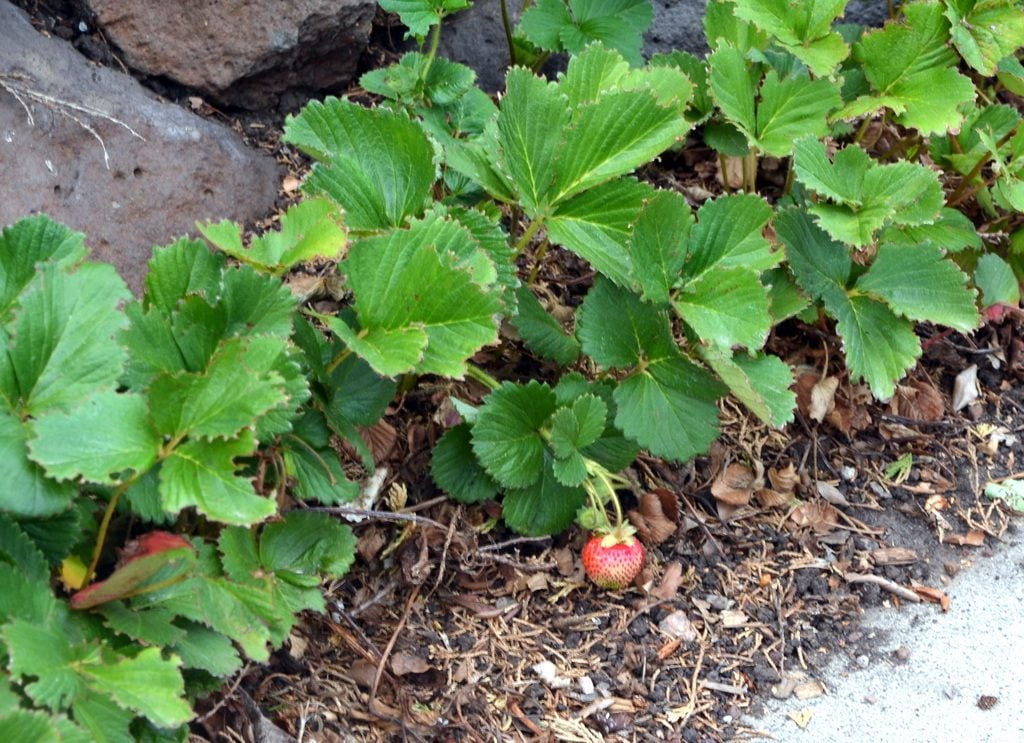
I looked closer and was pleasantly surprised to discover that they were strawberry plants.
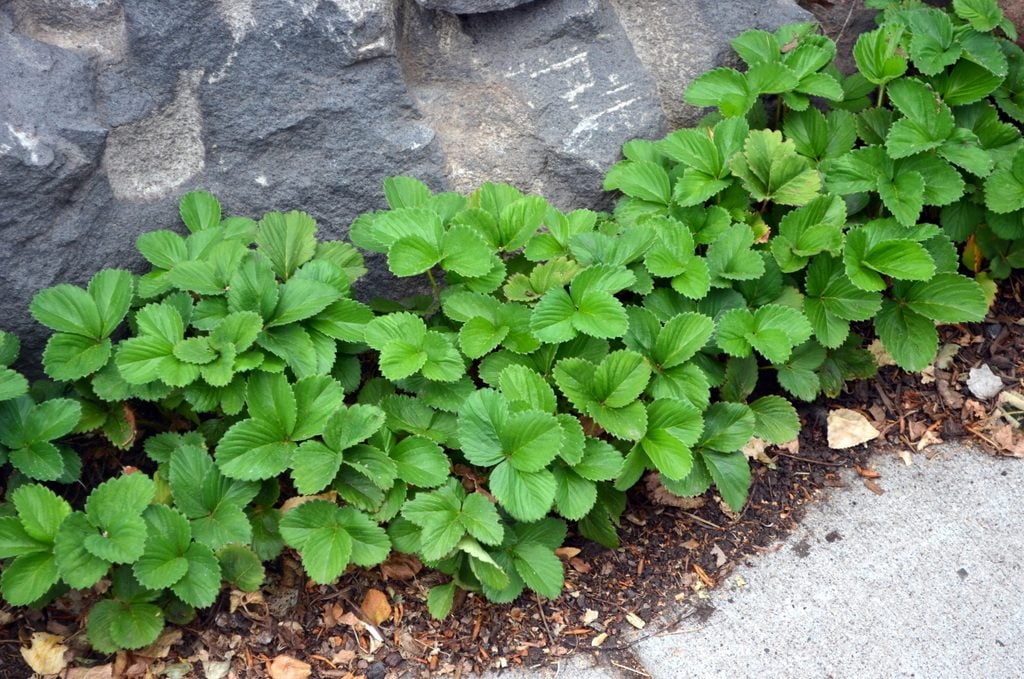
I love the idea of using edible plants in place of ornamental plants. Now, I absolutely love eating strawberries and the idea of also growing them as a ground cover in the garden makes perfect sense. As a small child, I remember my grandfather’s large strawberry patch in his back garden in Germany.
How to Grow Strawberries
Strawberries are perennial plants that will survive for a few years if cared for properly. ‘Everbearing’ and ‘Day-Neutral’ strawberries work best as ground cover compared to other types of strawberries. They can be grown in most climates. To learn which varieties grow best in your state, check out “Strawberry Varieties by State”.
Strawberries require fertile, well-drained soil and will spread from the original (mother) plant. Plant in spring once the soil can be worked. After planting, apply an all-purpose 10-10-10 fertilizer or if you prefer the organic approach—apply blood and bone meal instead. Keep soil moist, but not water-logged and apply mulch around the strawberry plants.
One of my favorite vegetables to grow is garlic.
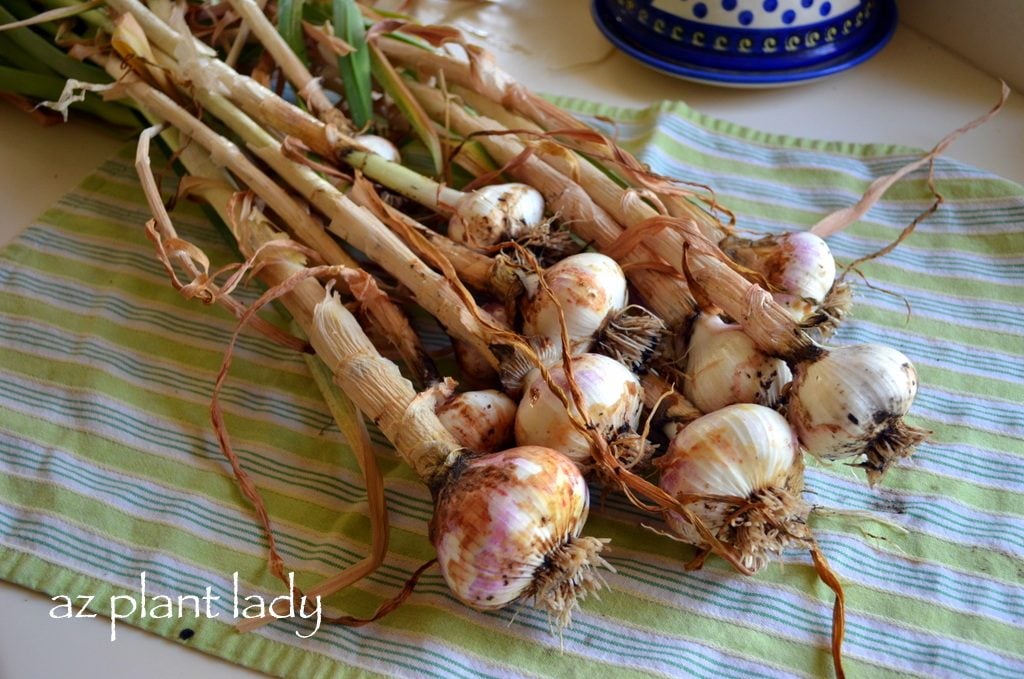
Besides loving to eat food with lots of garlic in it, I also like to use garlic to help repel and kill damaging insects in my garden.
It isn’t only vampires that don’t like garlic – bugs don’t like it either. Garlic is toxic to bugs and it also helps to bacteria and harmful fungus from harming your plants.
Making your own garlic spray is a great organic tool for a healthy vegetable garden. So are you ready to battle damaging insects with garlic? Here is how to make your own garlic spray:
Garlic spray is made up of four ingredients: garlic, mineral oil, dish soap and water.
- Add the 4 cloves of minced garlic to a tablespoon of mineral oil and let sit for 1 day.
- Strain out the minced garlic and add the oil and 1 teaspoon of dish soap to a pint of water.
- This ‘garlic mixture’ is in a concentrated form and must be diluted before use. Fill a spray bottle with 1 pint of water and then add 2 tablespoons of your concentrated ‘garlic mixture’. Shake to mix and you are ready to use your garlic spray.
- Be sure to test your spray on a small hidden part of your plant(s) and wait for a day or two to make sure that there is no damage to the leaves. If there is yellowing or other damage, you can further dilute your garlic spray.
- Spray where you see insect damage or where you see the bad bugs themselves. Bugs like to hide underneath leaves, so be sure to spray there as well as on the top and stems. (Garlic spray works especially well against aphids).
Backyard tip: Garlic spray will also kill beneficial insects, so use wisely.
So make some of your own garlic spray to get rid of the bad bugs in your garden. It’s effective, inexpensive, organic and easy to make!
To learn how to plant and grow you own garlic, check out the following posts:
In the last of my series of posts on easy and inexpensive Fourth of July outdoor decorations, I’m featuring these tin can American flag planters, which are quick, easy, and use recycled materials to boot!

Though of course you create planters like this using paint, what makes this project so simple and fast is the use of colored electrical tape, which you should be able to find at your local home improvement store. Scotch 3M sells a pack of five colors, but you can buy individual rolls too. I also used silver star stickers (the package was $1 at the dollar store), and three aluminum cans of the same size (mine originally held Spaghettios, I must confess).

Start with the red and white striped cans first. Measure your can to see how wide your tape rows need to be. Remember that you’ll need thirteen (13) rows, seven (7) red and six (6) white. You can overlap the tape to make the rows the correct width; no need trim the tape to the right width. Start at the bottom of the can and work up, one row at a time. When you reach the top row, tuck any extra tape over the rim of the can.

For the red, white, and blue can, tape three red rows and three white rows, and finish with blue. Apply the star stickers around the can, spacing them neatly (you probably wont be able to fit all 50). Press the stars firmly into place, including the edges. I was worried that the stars might come off easily, especially when wet, but they are surprisingly durable.
Before you add plants, be sure to turn the cans over and poke some drainage holes in the bottoms using a screwdriver and hammer. You can also skip the holes and use the cans as vases; I’m thinking they’d look great with Shasta daisies or mixed wildflowers. I planted mine with Salvia farinacea, one of my favorite butterfly nectar plants.
Remember that we have more great Fourth of July decorating ideas here on our blog, over on our website, and on our Pinterest boards:
- Fourth of July: Decorated Outdoor Votive Holders
- Fourth of July: Pinwheels and Flowers
- Plant a Patriotic Container
- Pinterest: Garden Decor
- Pinterest: Recycled Backyard
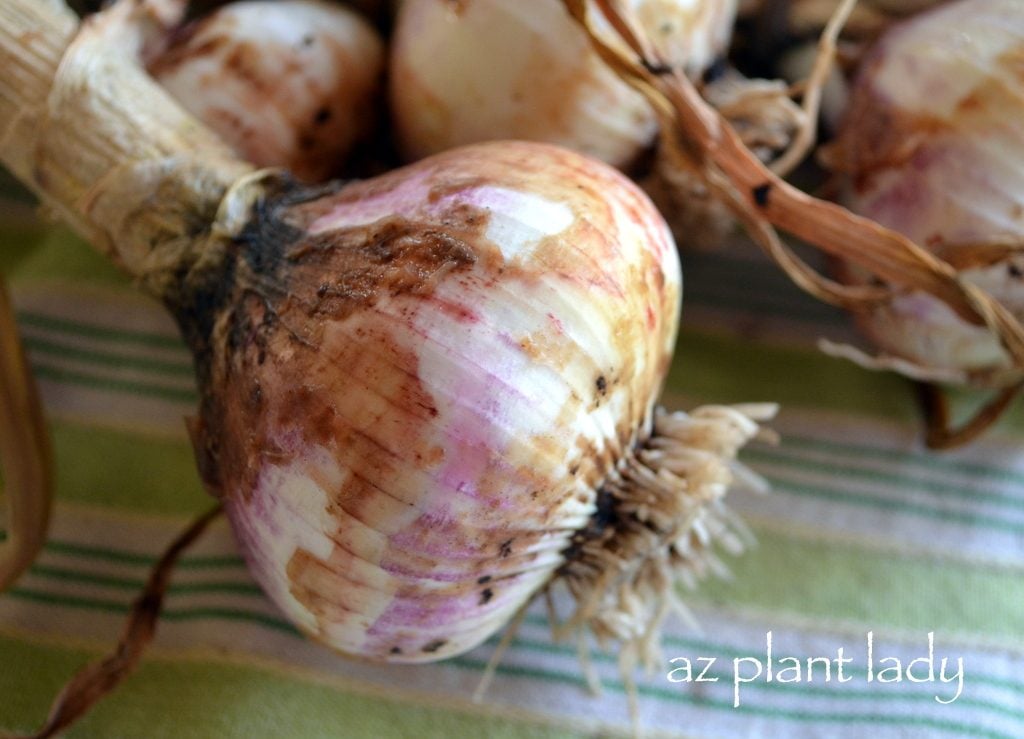
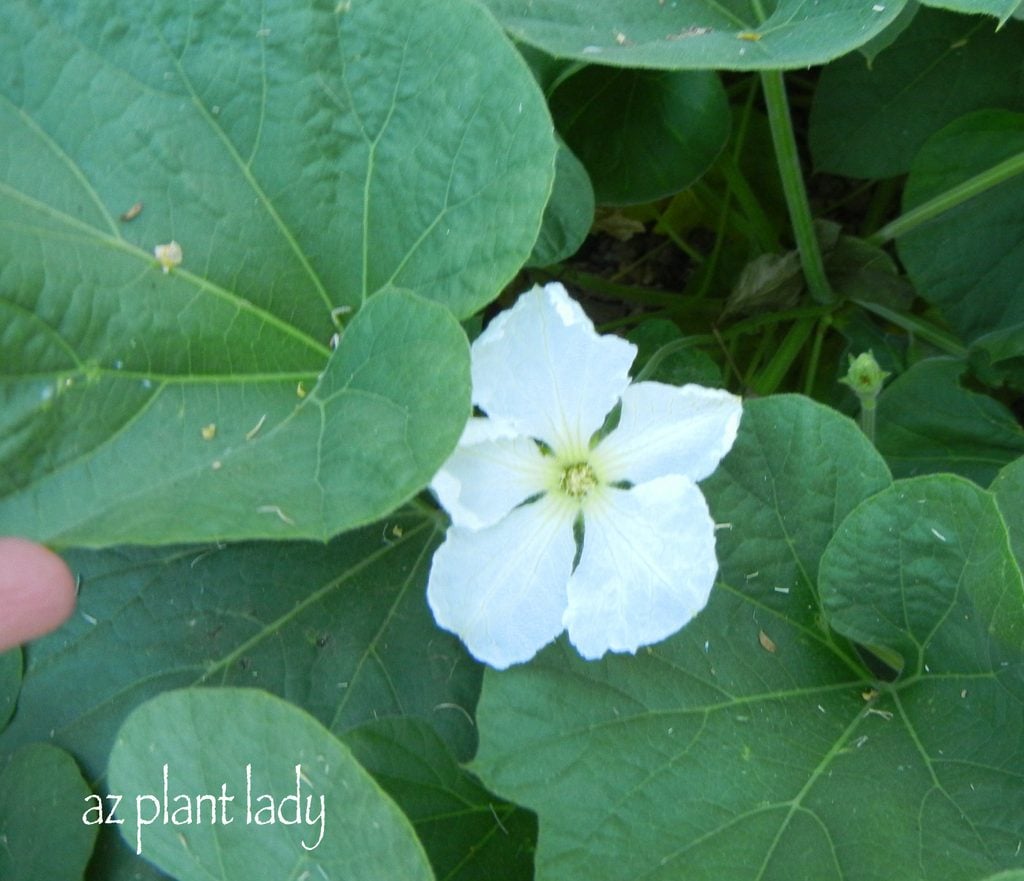
Did you know that you can grow birdhouse gourds? It is surprisingly easy to grow gourds and transform them into birdhouses. I kept one for myself and gave others away as gifts.
It all starts with a pretty, white flower.
Growing Birdhouse Gourds
Plant your gourd seeds out in the garden, once the danger of frost is over in spring. They sprout easily and grow quickly.
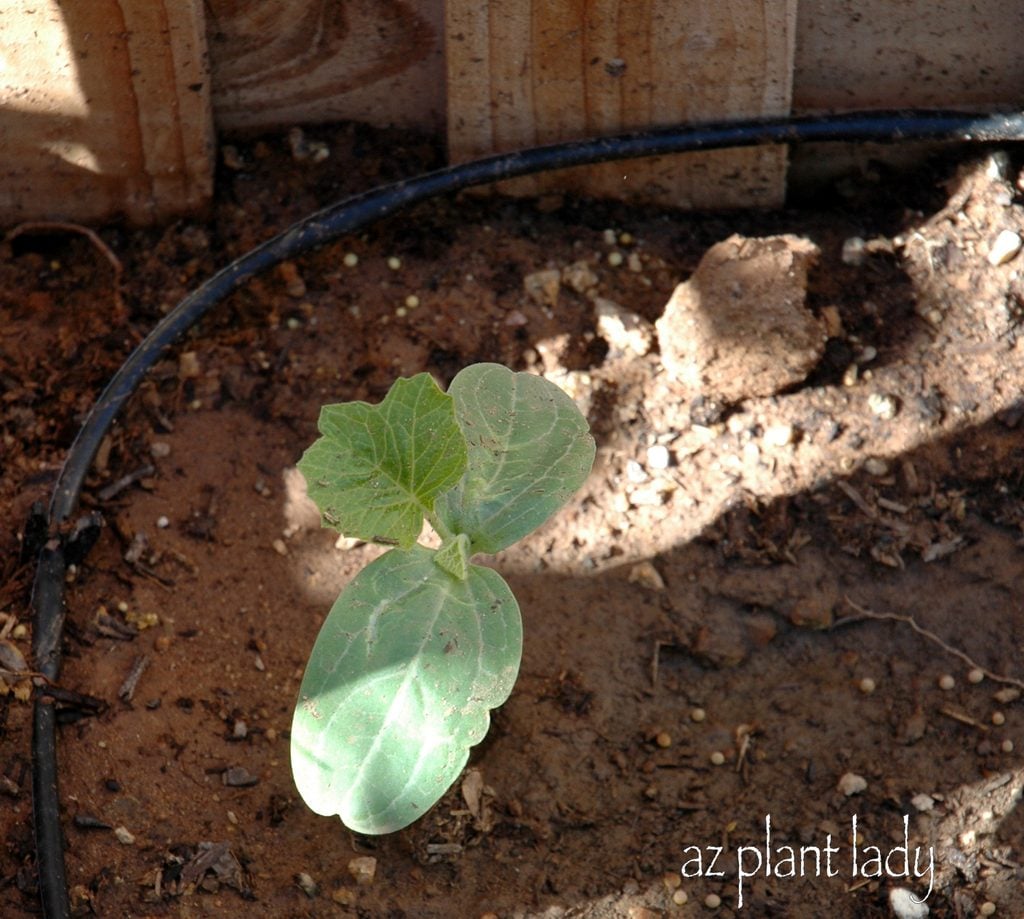
Beware – this tiny little seedling grows quickly. They can take over your garden if you aren’t careful.
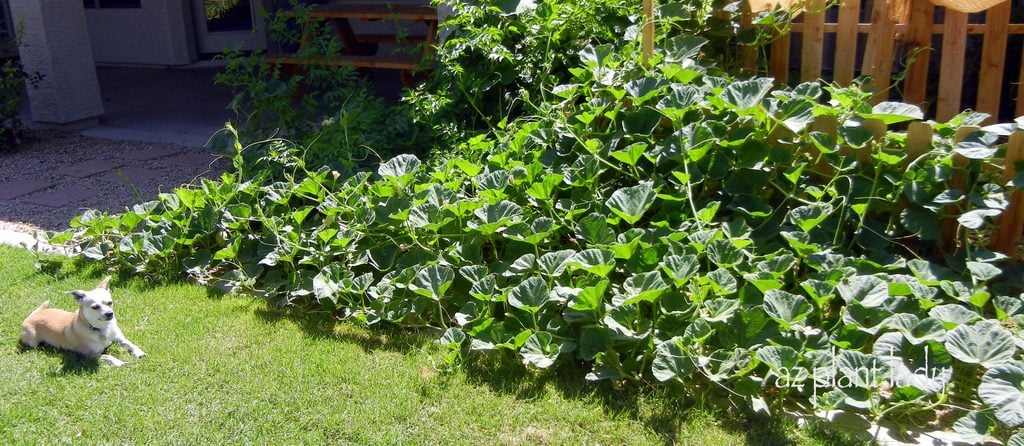
I must admit that this is my ‘rampant’ gourd vine that I grew last year. As you can see, it grew out of the vegetable garden and onto my lawn.
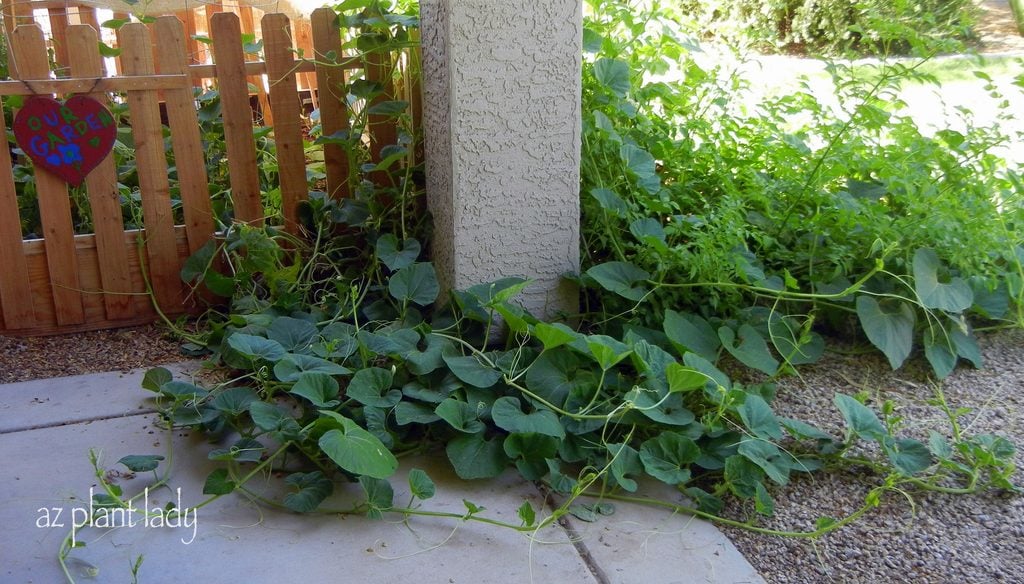
It even took over part of my patio. Even experienced and horticulturists sometimes don’t always follow directions. In the future, I will always allow the right amount of room for my gourds to grow.
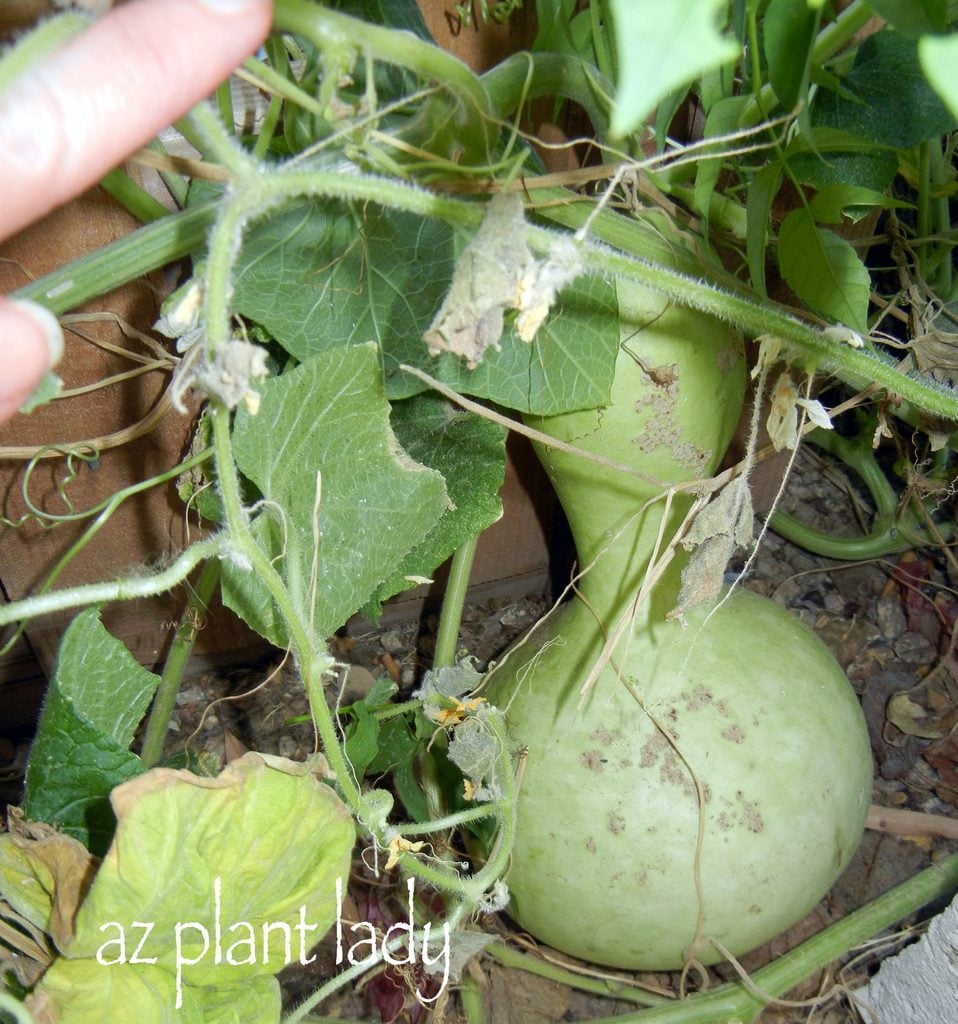
This is the first gourd that I discovered ripening on my vine. Then, I started looking underneath the other large leaves and found 16 more growing!
Once they began to dry, I harvested them and put them on a pallet to dry. This process takes months and the gourds will slowly turn from light green to a pale beige. During this time, the gourds may discolor on the outside and even grow some mold, which you can simply wipe off.
The gourds are ready when you shake them and can hear the seeds inside.
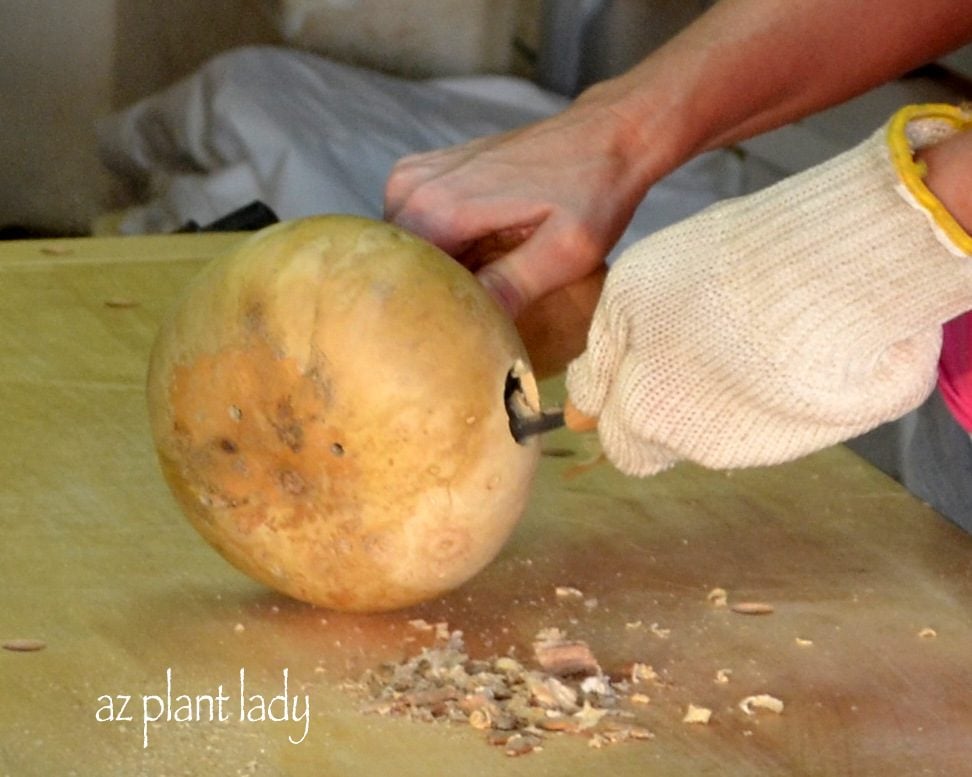
Fast forward 8 months from date of harvest.
How to Turn a Gourd into a Birdhouse
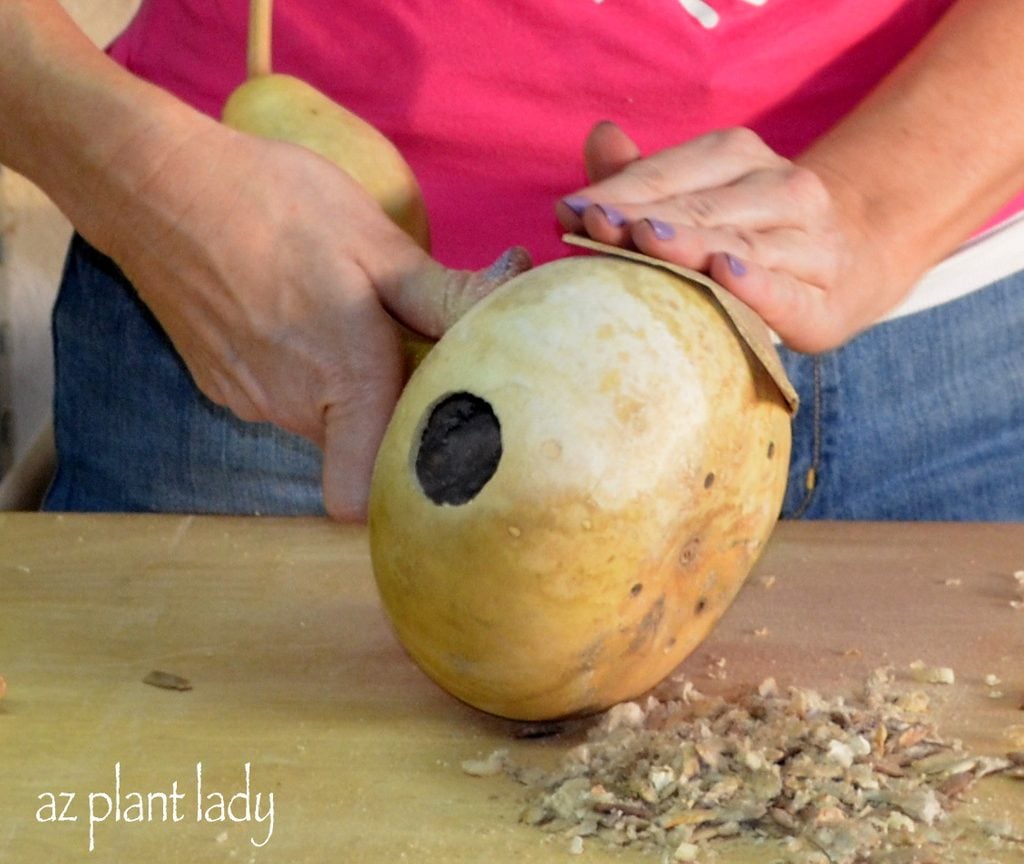
First, I drilled a 1/2 inch diameter hole where the main hole was to be. Then, I carved the hole to the size I wanted.
The diameter you make the hole depends on which kind of bird you want to take up residence in your new birdhouse.
- Downy Woodpecker, Nuthatch, Titmouse – 1 1/4 inches
- Bluebird, Swallow, Wren – 1 1/2 inches
- House Finch – 2 inches
- Northern Flicker – 2 1/2 inches
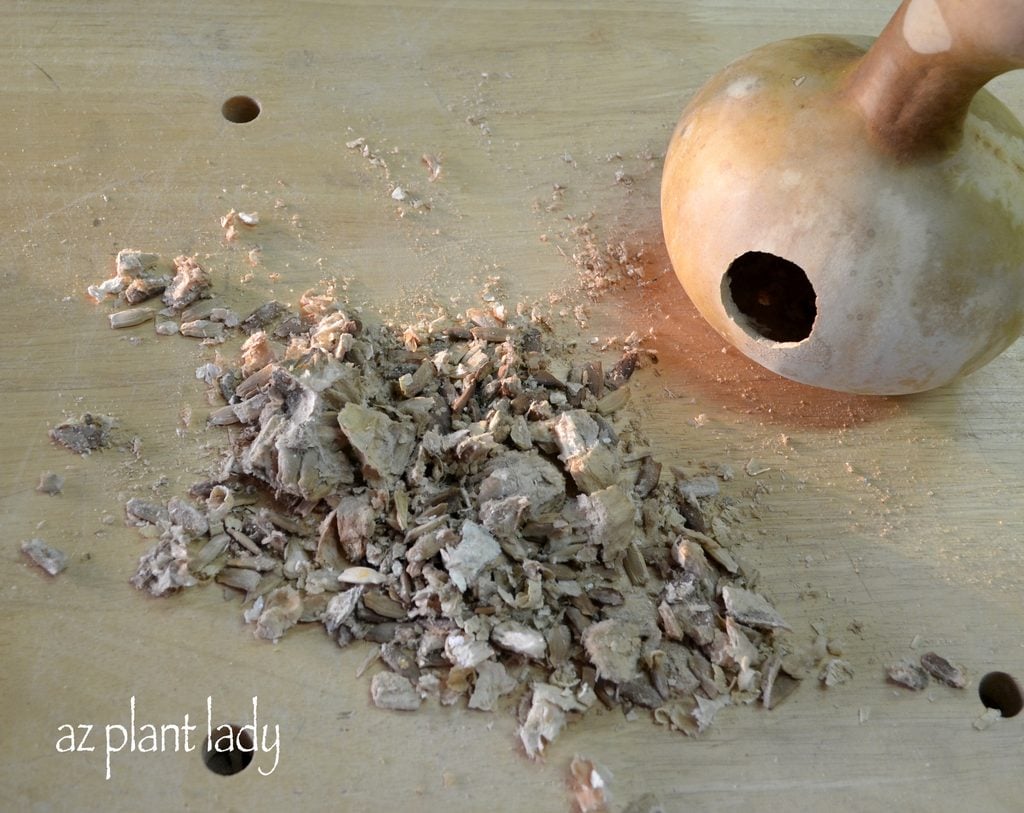
Once you have created the hole, remove the inside seeds and membranes. I did this using a butter knife. Don’t worry if you leave some behind – the birds won’t care.
Drill 5 small holes in a circle around the base for drainage and then sand the outside of your gourd until smooth.
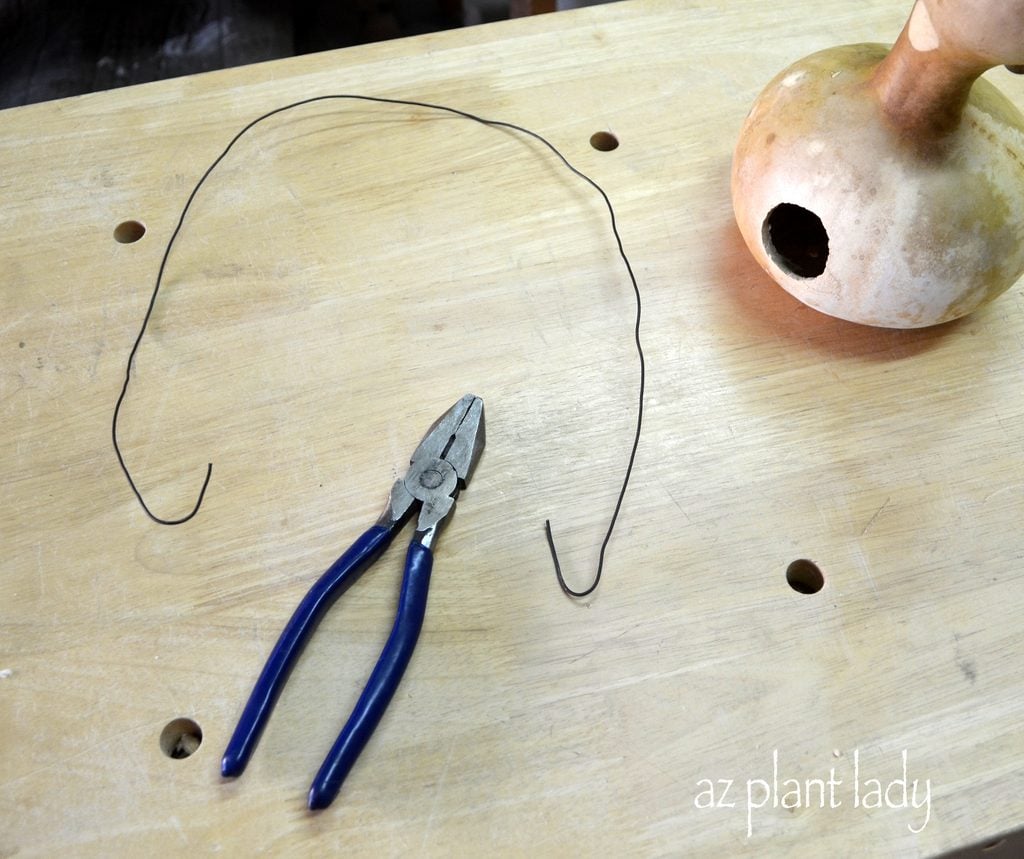
To hang the gourd, I made two small holes on the top of the gourd, on either side of the stem. Them I took wire and bent them, as shown above.
Insert the wire in each of the holes.
To protect your bird house, spray the outside of the gourd with polyurethane or paint it your favorite color and hang from your favorite tree.
Now, my gourd is ready for some feathered friends.
So, how about you? Do you want to try growing birdhouse gourds? Get started this spring by planting some seeds and next year, you too will be able to make your own gourd bird house.
Next, learn how to make a Purple Martin Gourd House.
Got some old tires on hand? Building a tire garden is easy!

- Stack your tires, being sure to keep the configuration stable.
- Fill with compost or potting soil and add some plants. Most people suggest avoiding edible plants, as trace chemicals from the tires could leak into the soil. Visit BirdsandBlooms.com for container planting ideas.
- Like any container, these will dry out more quickly than garden beds, so be sure to water as needed.
- Get more tire garden advice and how-to by clicking here.
You can even paint the tires using appropriate outdoor paints (ask at your local home improvement store). This is a great project for kids, too. A friend of mine helped her children’s school decorate and install inexpensive tire planters as a way to spruce up the grounds and get the kids interested in gardening.


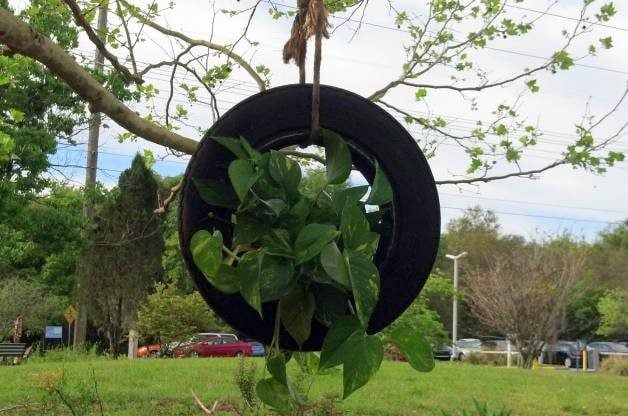
No room on the ground? Smaller tires from trailers or wheelbarrows are great for hanging from trees or sturdily-mounted hooks. Paint them or leave them plant – whatever suits your own style.
Have you created a tire garden? Do you have tips for our readers? Tell us in the comments below.

Most of us are familiar with seeing vines growing up on a wall or fence.
But, have you ever thought of using them as a groundcover as well?
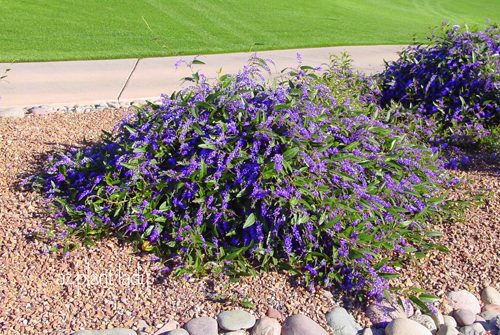
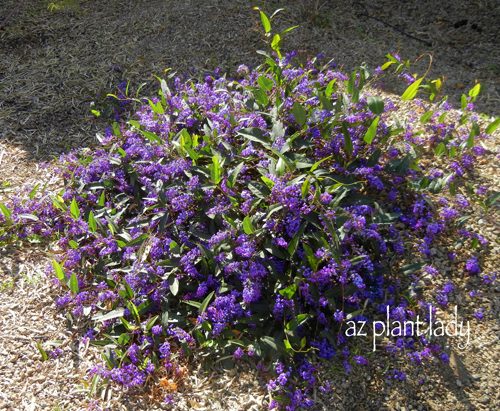
Years ago, when I worked as a horticulturist for golf courses, I was always wanting to try something new in the feature areas that lined the golf courses. So one year, I planted Purple Lilac Vines (Hardenbergia violaceae) as a groundcover.
I must admit, that the results were better then I expected. The vines did very well on the ground and we would trim them as needed to keep them from growing too large (for the Purple Lilac Vines, that was about twice a year).
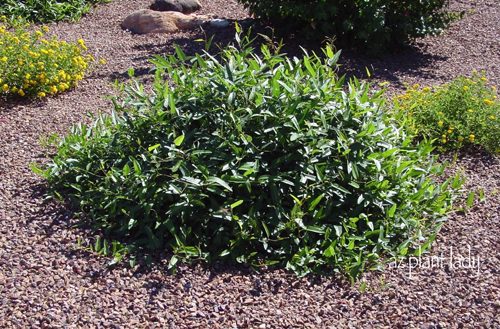
Even when the vines weren’t covered with flowers, they still made an attractive groundcover.
Every three years, we would prune the vines back severely to about 1 ft, which would rejuvenate them. In fact, the vines that I planted along the golf course are still there 11 years later.
Other vines that you can grow as a groundcover are
– Winter Jasmine (zones 6 – 10)
– Sweet Potato Vines (grown as annual)
– Clematis (zones 7 – 11)
– Virginia Creeper (zones 3 – 9)
– Carolina Jessamine (zones 5 – 9)
– Trumpet Vine (zones 4 – 10)
– Confederate Jasmine (zones 8 – 10)
Before using vines as a groundcover, be aware that some can be invasive in areas with mild winters,. So be sure to keep them under control by pruning as needed.
When purchasing flowering vines, you are most likely to find them in your nursery when they are in bloom. Often, it can be hard to find them when they aren’t blooming.
So, next time you are faced with a bare area in your garden that needs a groundcover, try using your favorite vine instead….
How about you? Do you have any favorite vines you’d like to use as a groundcover?
Here is an easy project that can bring a little greenery to your windowsill. Did you know that you can grow carrot tops in a pot?
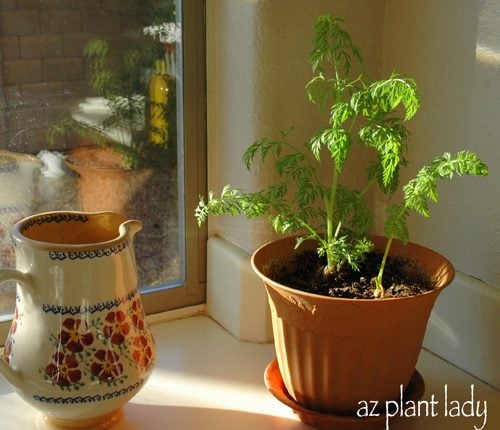
It may seem a bit strange to grow carrot tops in a container, but the leaves of carrots are quite attractive. They provide a welcome spot of green during the winter months, or when you don’t have access to a yard or garden.
I remember my mother showing me how to grow carrot tops when I was a little girl. Later, I grew them with my own daughters.
The process is very simple. You need a small container, potting mix and of course, carrots.
Discover six fun facts about carrots.
Step 1: Choosing Carrots

You want to select carrots that have some green showing at the top. Carrots sold separately are much more likely to have green on top than those packaged in bags.
Step 2: Trim the Carrots
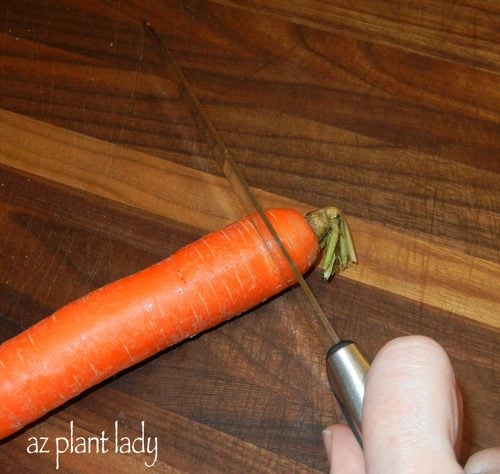
Cut the carrot tops off at approximately 1 inch in length. Use the remainder for cooking or eat them raw. Have you ever tried purple carrots?
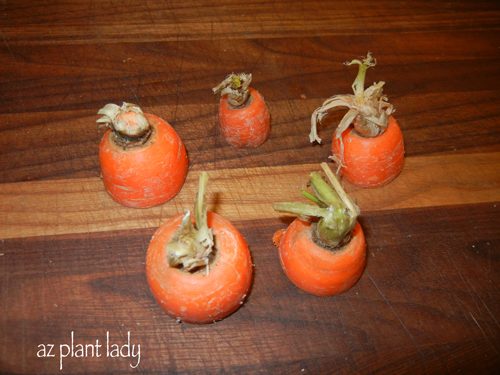
You can see that these carrot tops have some residual growth on top, which will make them more likely to sprout when planted.
Step 3: Plant Carrot Tops in a Container
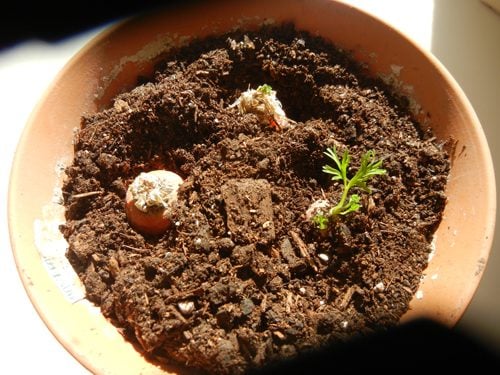
Plant the carrot tops in your container filled with potting mix so that a little of the orange top peeks through. Keep the soil moist, but not soggy. Be sure your container has a hole for drainage. Place the container by a sunny window. Check out perennial vegetables that grow back each year.
Step 4: Watch Them Grow
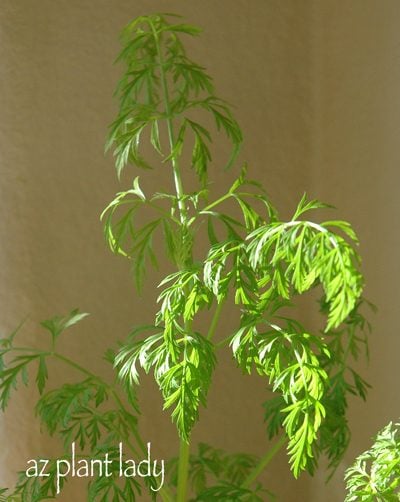
You’ll be pleasantly surprised at how quickly your carrot tops will begin growing. The orange part of the carrot, will grow small root hairs that grown down into the soil. Your carrot tops won’t form a new carrot, but they will flower and produce seeds. If your carrots are hybrids, the carrots seeds won’t turn out the same as the original carrot, but you can certainly try planting them in your vegetable garden and see what kind of carrot comes up. Here’s your guide to vegetable harvest times.
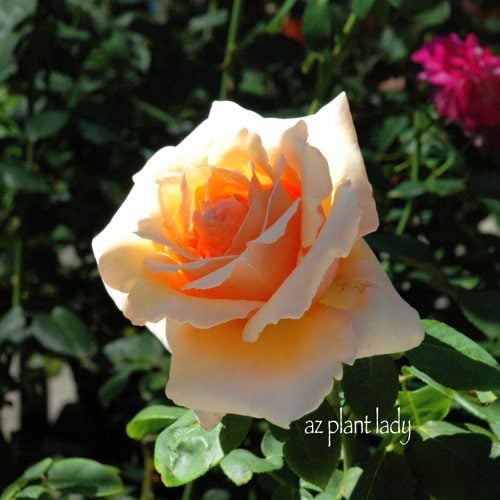
Do you love roses? I certainly do. At one point, I had over 40 different rose bushes growing in my garden. The large, beautiful and fragrant blooms are the reason why roses are so popular.
How about you? Have you considered planting roses? If you live in zones 8 to 10, now is the time to plant them. In cooler zones, spring is when bare root roses can be planted.
I previously wrote about how to select bare root roses. Now we’ll cover how to plant bare root roses—don’t worry, it isn’t hard, but there are a few rules to follow.
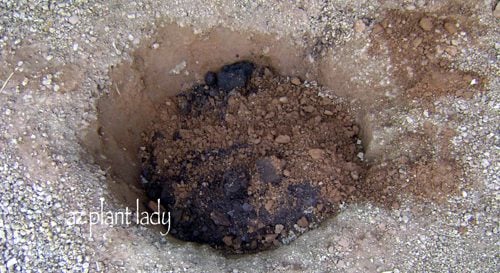
Have you ever heard the saying “It’s better to plant a $10 tree in a $100 dollar hole?” Well, the saying is also true in regards to roses. You can plant an expensive rose, but if the hole is not prepared correctly, the plant will not do as well as a cheaper rose planted in a proper hole.
By following these tips, you will not only have healthier roses, but your rose bush will be covered with abundant blooms.
Find out why Knock Out Roses are a gardener’s dream come true.
Planting Bare Root Roses
Planting roses isn’t difficult as long as you follow a few basic rules.
- Place your hole in an area where your rose will receive at least 6 hours of sun. Don’t plant right next to large shrubs or trees since their roots will steal nutrients and water from your rose. In southern gardens, avoid planting in an area with reflected heat from afternoon sun.
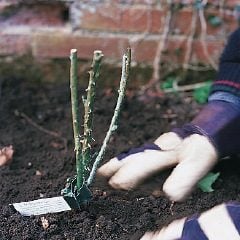
- Soak your bare root rose at least 12 hours before planting, covering the roots with water. After soaking, prune any broken and damaged roots and prune back the canes (branches) to 12 inches (make the pruning cut 1/4″ above an outward facing bud.)
- Now for the hole – dig a hole at least 18″ wide and 18″ deep (I dig my holes about 24″ wide). By digging a wide hole, you loosen up the soil, making it easier for the rose roots to grow outwards.
- Roses love fertile soil, so it is important to amend the soil in the hole. Add compost and mix with the existing soil. Add bone meal to the hole as well, which will help to stimulate root development.
- Create a small mound (with your soil/compost/bone meal mixture) in the hole, so that the roots of the bare roots, rest on top and flare out. Then add the rest of your soil mixture and gently tamp it down to remove any air pockets. How deep to plant you rose depends on your climate. Many types of roses have a bud union, which is a swollen area just above the roots that is sensitive to cold temperatures. In warm climates, the bud union should be 1″ above the soil while in cold climates, it should be buried 1 to 2″ deep.
- Water your rose well after planting. To help prevent the canes from drying out, it helps to add compost on top of the newly planted rose so that the canes are covered. You can remove the compost once you see new growth appearing and leave it around your rose as a mulch. DO NOT add any fertilizer as this will stimulate top growth before the roots can support it.
For more in depth information on how to plant roses, check out this link.
Next, learn how to prepare and prune roses for winter.