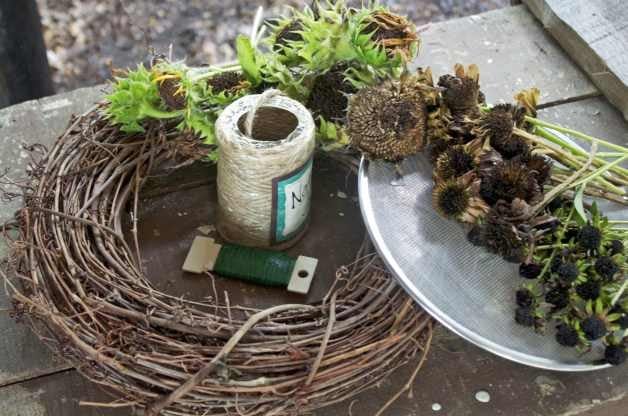
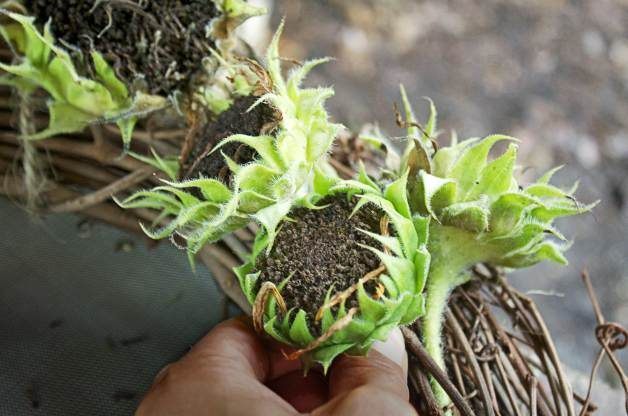
If you’ve ever been torn between the desire to tidy up the dead seed heads of summer blooms and leaving a good food source for birds, then this project is perfect. It will give you and the birds the best of both worlds! Just collect your spent blooms and turn them into an attractive DIY bird feeder wreath.
Materials:
- Splatter screen or window screen
- Rope or twine
- Grapevine wreath
- Assorted seed heads
How to Make a DIY Bird Feeder Wreath:
Step 1
You can use just about any kind of screen for this project as long as it provides good drainage and the holes aren’t too big. (I used a spatter screen, but a window screen would work.) Cut to fit in the middle of your wreath and remove everything else that could potentially get in the way.
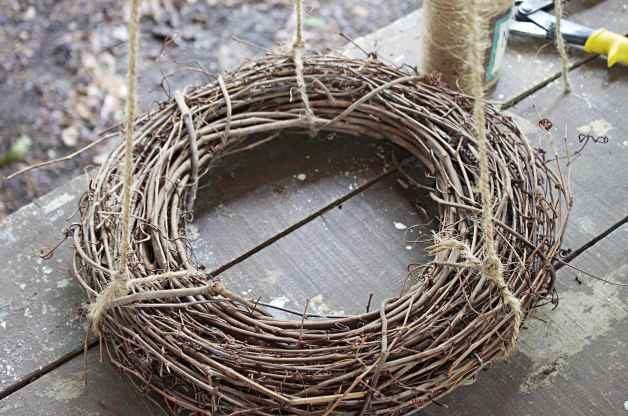
Step 2
Cut the twine or rope into three lengths, about 48 in. each. Tie at evenly spaced intervals around the wreath.
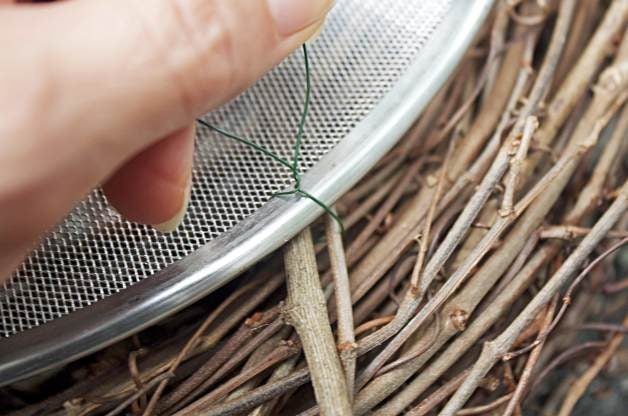
Step 3
Flip the wreath over on your work surface and place the screen on the back of the wreath. Thread a length of wire through the screen near the edge and then around a sturdy vine in the wreath, twisting the ends together to secure. Do this at three or four intervals or until screen is tight.
Step 4
Flip the wreath back onto its right side, and begin tucking the seed heads in among the vines. Continue until the wreath is covered. Fill the middle with your favorite birdseed and hang! Next, learn how to make a DIY bird seed wreath.
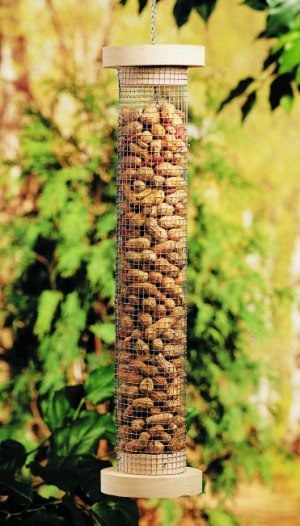
Need some help attracting birds to your backyard? Try adding a new food into the mix. Peanuts are a draw for woodpeckers, blue jays and nuthatches. This simple DIY bird feeder is a perfect way to try this food source in your yard. As a bonus, squirrels may be so busy visiting this feeder that they’ll leave the others alone!
Materials:
- One 2-foot 1-inch x 6-inch board
- Approximately 12 inches x 18 inches of hardware cloth with 1/4-inch squares
- 36-inch-long light-duty chain
- One screw eye
- Netting staples
- Waterproof carpenter’s glue (or 1-5/8-inch deck screws)
- Band, saber or scroll saw
- Wire cutter
- Needle-nose pliers
- Soldering iron (optional)
Step-By-Step Instructions:
Step 1
Cut out four disks-two should measure about 4-3/4 inches across, and two should measure about 3 inches across-with a band, saber or scroll saw. Make the circles with a compass, or simply trace the rims of quart and 1/2-pint paint cans (or other cans similar to the dimensions above). Cut the smaller disks carefully—they should be as close to identical as possible.
Center and glue (or predrill and fasten with three 1-5/8-inch deck screws) each small disk to a larger disk. Clamp these pieces together until the glue completely dries. This will form the top and base of the feeder.
Step 2
Fasten one end of the chain to a screw eye. Open the eye with two small pliers. (Twist in opposite directions until the eye opens just enough for the chain to be inserted.) Close the eye with a pliers.
Drill a pilot hole in the center of one of the small disks and turn in the screw eye. This will become the feeder’s base.
Step 3
Wrap hardware cloth around the completed base. (If using a 1/2-pint paint can to determine the size of the smaller disks, wrap the hardware cloth around the base and the can, which should be positioned about 10 inches higher than the base. Wrap heavy-duty rubber bands around the base and can to form a cylinder.)
Cut the hardware cloth about 1/4 inch beyond the last complete square where it comes together. This will leave small wire tabs on one end. Now you can remove the rubber bands and paint can.
Step 4
Bend hardware cloth into a cylinder and attach to the feeder’s base with netting staples (with the chain inside). Join the two ends of hardware cloth to form a cylinder. Secure by wrapping the tabs around the other end using needle-nose pliers. Make sure the cylinder isn’t too tight at the feeder’s top, otherwise it will be difficult to lift up and close when filling with peanuts.
Tip: We recommend spot soldering the wire at the seam about every 2 inches for a better hold. If there is excess wire at the tabs, trim with a wire cutter.
Step 5
The chain can be looped for hanging or attached to an “S” hook. Slide the top up along the chain and then fill the cylinder with peanuts, unsalted and in the shell. You’ll be amazed by how fast the peanuts start attracting birds!
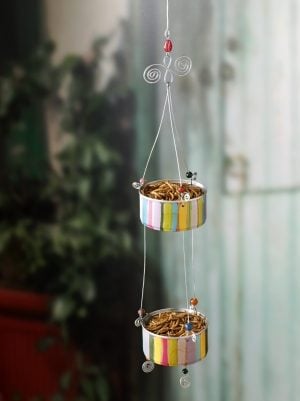
Attracting bluebirds is easy when you offer mealworms. There’s no need to buy an expensive feeder, though. This DIY bird feeder made from tuna cans costs less than $1 to make. You just need a few supplies and tools. Then hang it in a tree, and wait for those blue beauties to arrive.
Materials:
- 2 recycled cans (tuna or cat food)
- 16- and 18-gauge wire
- Beads
- Paint
- Needle-nose pliers
- Drill
Step-By-Step Instructions:
Step 1
Clean out your cans and let dry. Drill three holes in the shape of a triangle on both the bottom and rim of each can. Be sure the holes on the top and bottom line up so your feeder isn’t crooked.
Step 2
Paint or decorate your cans any way you like. I used acrylic paint in many layers, allowing the paint to dry. Then I accented with a gold color metallic pen. You can also use spray paint or permanent markers to create your own unique design.
When completely dry, spray the painted cans with a little bit of matte finishing spray.
Step 3
Cut the wire that will hold the two cans together. Cut six pieces, 9 inches long, of 18-gauge wire. Insert the wire into the rim of each can and twist a few times, leaving approximately 3 inches for decorative curling and 6 inches for hanging. Leave unattached for now.
Step 4
Create the hanger portion of the feeder by cuting about 12 inches of 16-gauge wire. Make a small loop at one end, and then fold the wire over to make a hook. At the other end, create an eyehook. Depending on where you will be hanging your mealworm feeder, adjust the length as needed.
Step 5
For the decorative element under the hanger, cut a 12-inch piece of 16-gauge wire to loop and curl. Fold the wire in half, and make a loop at both ends in a figure-eight formation. Cut the remaining ends to the same length and curl. Attach this piece to the hanger by creating an eyehook at each end of a bead and attach the two pieces together.
Step 6
Attach the cans together. Start with the bottom can. Place a bead on each stem, insert the excess wires into the top can and make a small loop at the end of each one. Do the same with the top can, attaching the excess wires to the hanger.
Step 7
You can add swirls, beads and any other decorative elements to the bottom of the second can. Using 4-inch pieces of wire, insert them through the bottom of the can and decorate as desired.
Finally, it’s time to hang the feeder and add the mealworms. In no time at all, you’ll be attracting bluebirds from all over the neighborhood!
I got this idea for a tiered birdbath while watching how the birds and other critters use the baths on my deck. I have a traditional concrete bath, the bowl of another small birdbath minus a pedestal, and a plate just deep enough to hold some water. They all get used. House finches, chipmunks, bugs—everyone has room. And because of the daily show they put on, I decided to make my very own DIY bird bath water park for all creatures large and small. You can too!
You can use any thick, sturdy branches you can find. First, though, pick your bowls, because the biggest one will nestle at the top of the tepee formed by the sticks. You’ll be mounting the holders for the smaller bowls to the limbs or sticks themselves. The bowl at the bottom should meet the needs of any four-footed visitors, like turtles or chipmunks. And none of the bowls should be deeper than 2 inches, because you don’t want to intimidate the critters you’re trying to attract.
Materials:
- Three tree branches or sticks, with diameters of 2 to 3 in.
- 3 or 4 bowls of different sizes and shapes
- Drywall or wood screws, in lengths from 1 to 3 in.
- Screwdriver or drill with drill bit slightly smaller than screws
- Iron plant holders (find these at your hardware store)
- Rocks, optional
Step-By-Step Instructions:
Step 1
Once you’ve chosen your limbs and have played with the positioning a bit, use a drill or screwdriver and drywall screws to attach the branches where they intersect.
Step 2
Using screws, attach plant holders to the branches where you want your bowls.

Step 3
Position the bowls, fill with water and find a comfy chair nearby. Before long, nature will come calling!
Tips: If you want to make friends with garden bugs, add a few rocks to one or more bowls for perching.
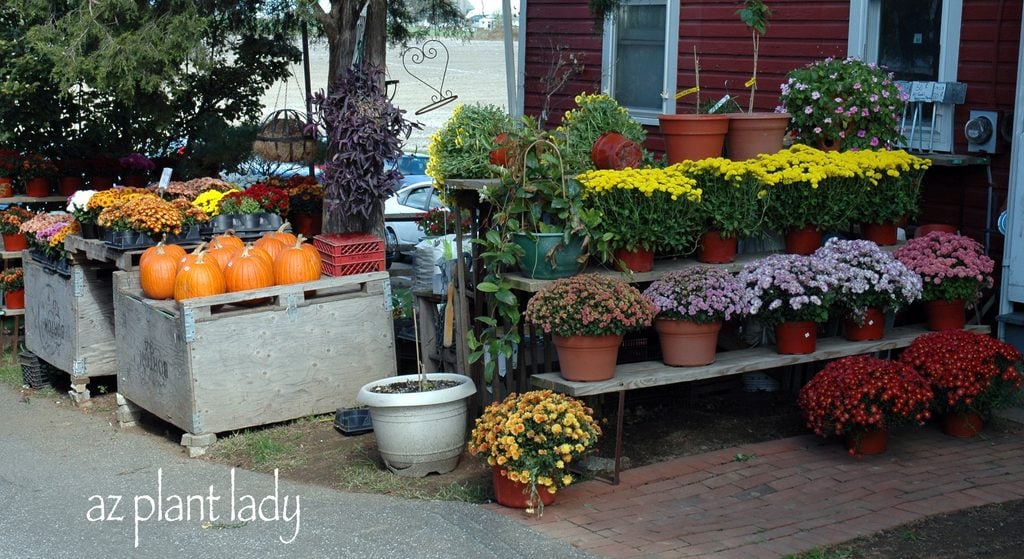
It is a clear sign that fall is on its way when you begin seeing pumpkins and mums at your local nursery. Summer flowers are beginning to fade in the garden, leaving it somewhat colorless. But, you don’t have to settle for a boring fall garden. Here are the best fall flowers that aren’t mums.
There are countless flowering cool-season annuals that you can plant now to add beautiful, color to your garden. Here are a few of my favorites.
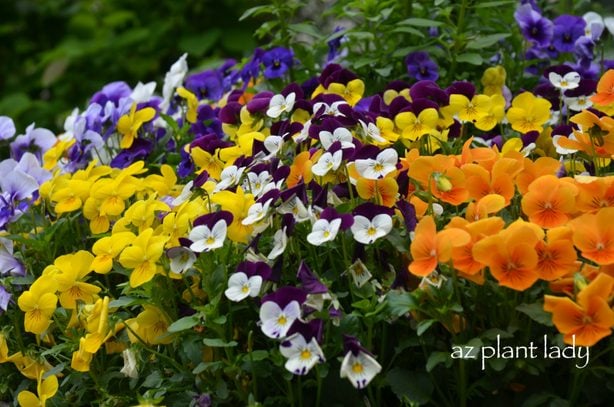
Viola
Violas come in many different colors and are easier to grow than pansies. You can create a gorgeous container, like the one above, by combining 5 different colored violas. Here’s 9 more fun fall outdoor container ideas.
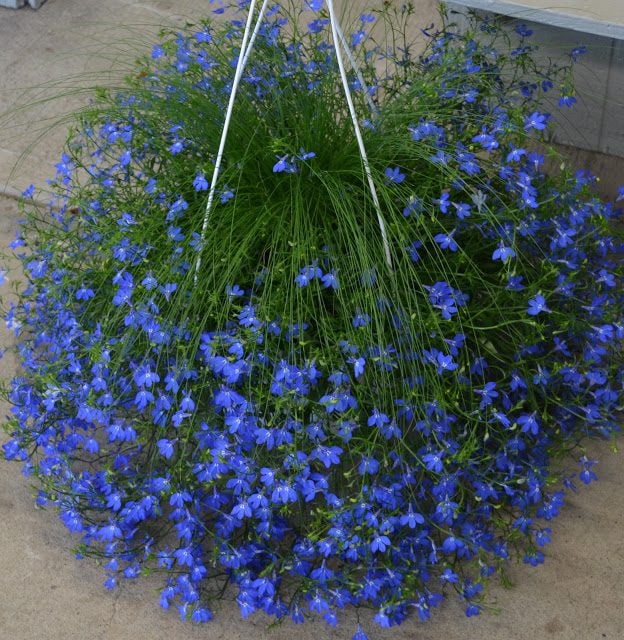
Lobelia
Lobelia is one of the bluest flowers that you can find anywhere. It looks great when used as a trailing plant when planted next to taller flowering annuals. In this container, that I saw at an Amish flea market in upstate New York, the lobelia looks like it is sprouting from the ends of the ornamental grass in the center.
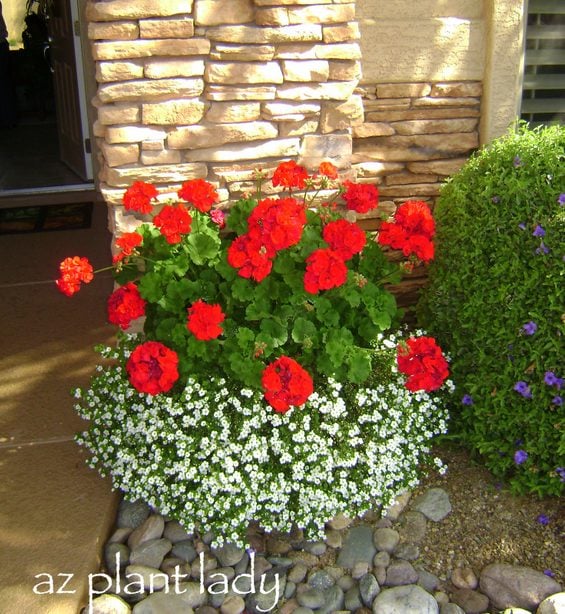
Geranium
Geraniums do well in the cooler temperatures of fall. I like to plant trailing annuals around them such as alyssum or bacopa (pictured above). Another great combination is to plant bright pink geraniums with blue lobelia. All gardeners should plant these late-blooming fall flowers that attract butterflies.
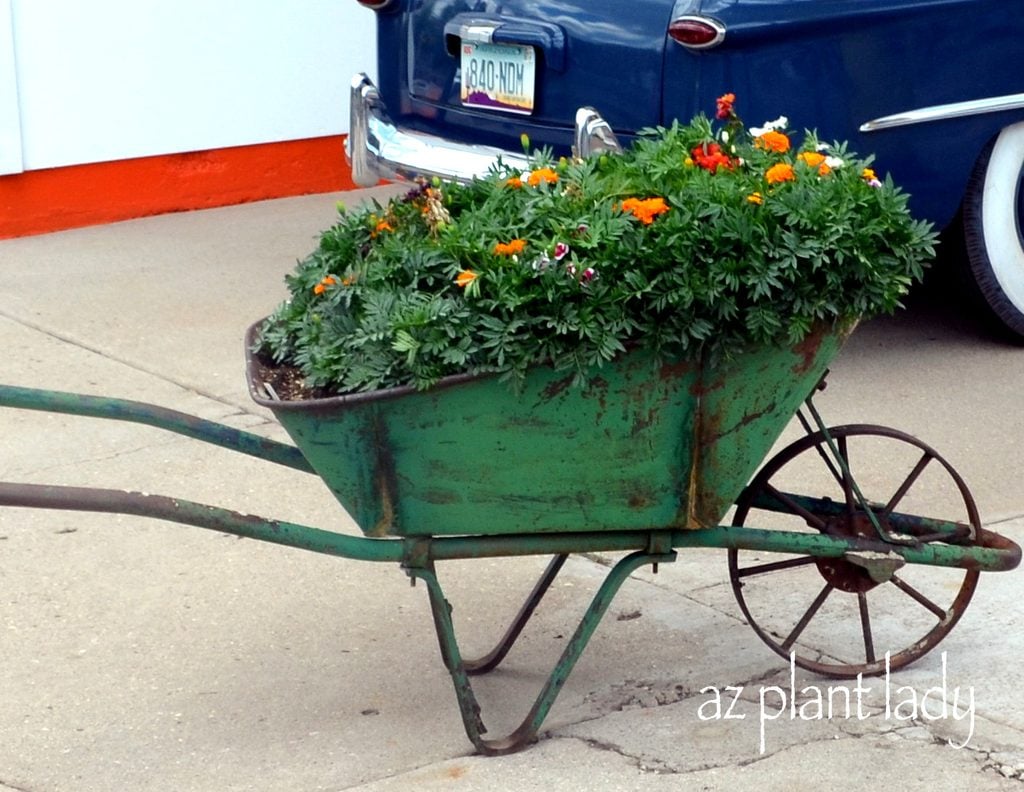
Marigold
Marigolds will also flower into fall. The bright orange flowers contrast nicely with this old green wheelbarrow. When the flowers fade, sprinkle some of the seed throughout your garden and they will reappear after winter. Here’s more flowers that are easy to grow from seed.
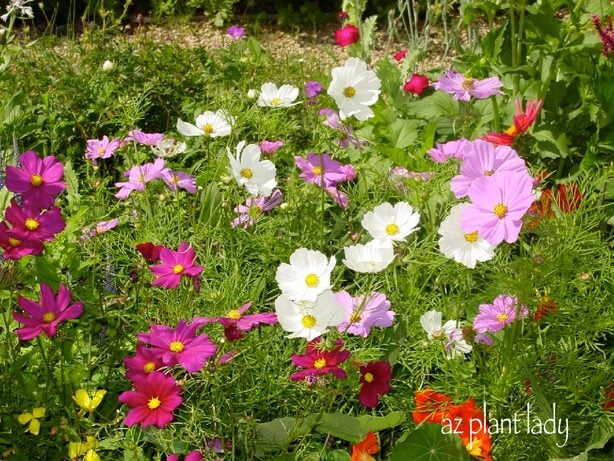
Cosmos
Cosmos are a must-have for any garden. They usually come in shades of purple, but are also available in yellows and orange. Cosmos are easy to start from seed, but for fall planting, you are better off buying transplants. Check out the best places to buy plants and seeds online.
A few years ago, I was driving through North Carolina in October and noticed large swaths of cosmos planted along the highway medians. They were just beautiful.
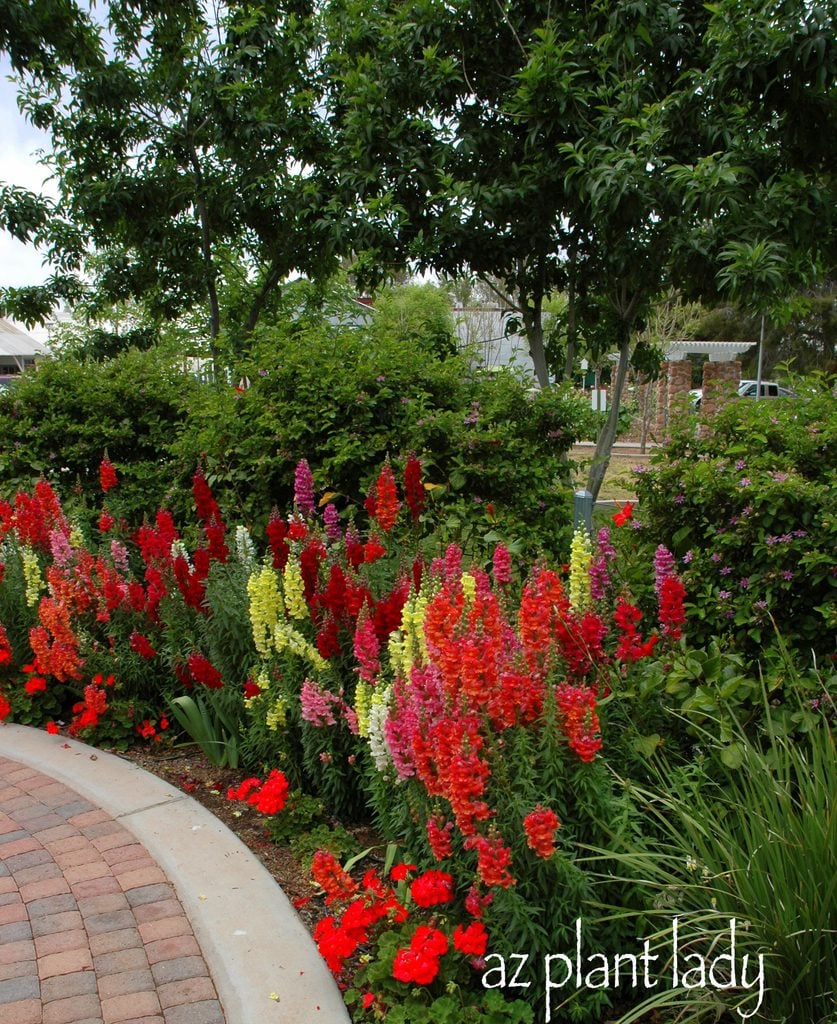
Snapdragon
If you have kids, then you know that snapdragons are one of their favorite flowers with their opening and closing ‘dragon mouths’. Snapdragons are a great flowering annual to use toward the back of the garden because of their height. I like to plant petunias in front of my snapdragons. Annuals vs. perennials — what is the difference?
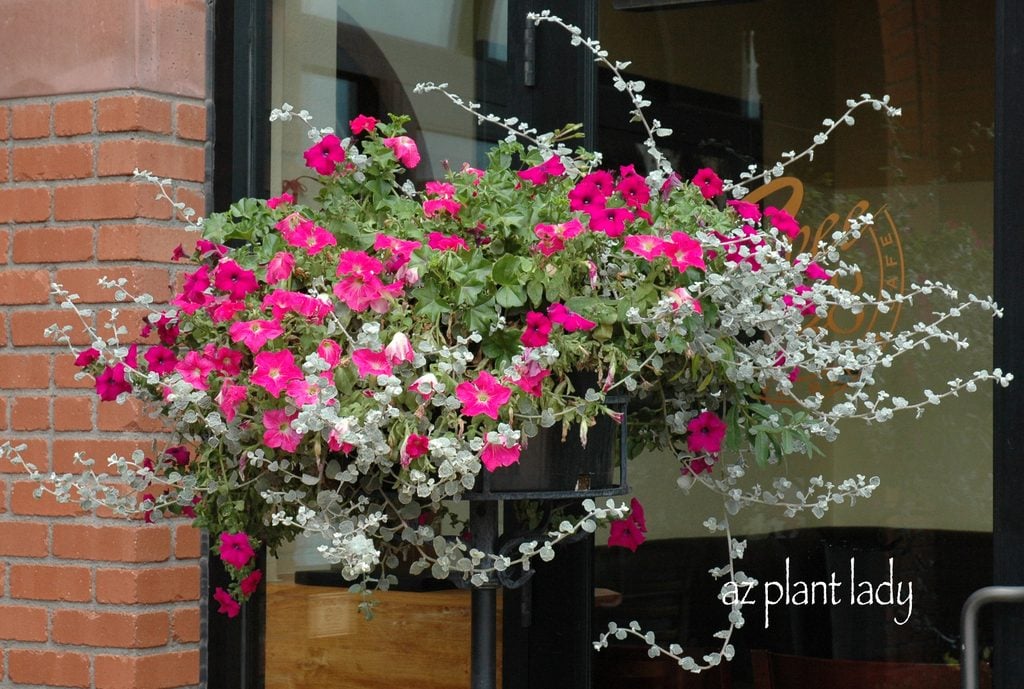
Trailing Petunia
Trailing petunias are becoming very popular. The flowers are smaller than regular petunias, but they have a trailing growth habit, which makes them a great choice for hanging pots. Check out the best fall shrubs to grow this season.

Ornamental Kale
An unlikely plant has become a welcome addition to the fall garden—ornamental kale. Available in purple and white colors, this leafy vegetable is used as a ornamental plant. The colors deepen with cool temperatures. Plant with purple violas and bacopa for a beautiful cool color combination. Like regular kale, ornamental kale is edible, but because it was bred as an ornamental plant, it does not taste as good. Learn more about edible flowers that you can eat.
So as your summer flowers begin to fade, celebrate the arrival of fall with these fall bloomers!
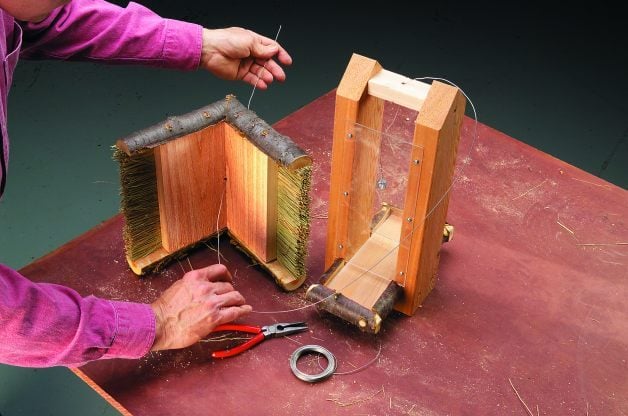
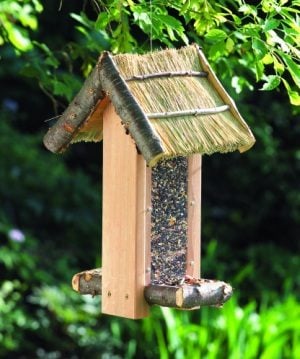
With so many different kinds of bird feeders available these days, there’s certainly something out there to suit any style. If you’re looking for a feeder that’s rustic but still cozy and fun, try this thatch-topped design. While it’s a little more challenging than some of our beginner designs, we’ve got plenty of photos to walk you through the process. So gather your tools and learn how to make a DIY bird feeder in cozy cabin style!
Materials:
- One 2×4 x 4 foot cedar (or pine)
- One 1×6 x 4 foot cedar (or pine)
- 1/16″ acrylic (cut to size at home center or hardware store)
- 1 lb. 2-1/2″ rust-resistant screws
- 1 lb. 4d galvanized casing nails
- 12 #6 x 1/2″ pan-head screws
- Cut roof thatch from two brooms (old ones are fine), or try hay, twigs, reeds or similar material.
Step-By-Step Instructions:
Step 1
Cut your wood pieces as follows:
- 2: 1-1/2″ x 3-1/2″ x 16″ sides
- 1: 3/4″ x 5-1/2″ x 8-1/2″ roof
- 1: 3/4″ x 4-3/4″ x 8-1/2″ roof
- 1: 3/4″ x 3-1/2″ x 9-1/2″ feeder tray
- 1: 3/4″ x 1-1/2″ x 3-1/2″ top brace
- 2: 5″ x 10″ x 1/16″ acrylic
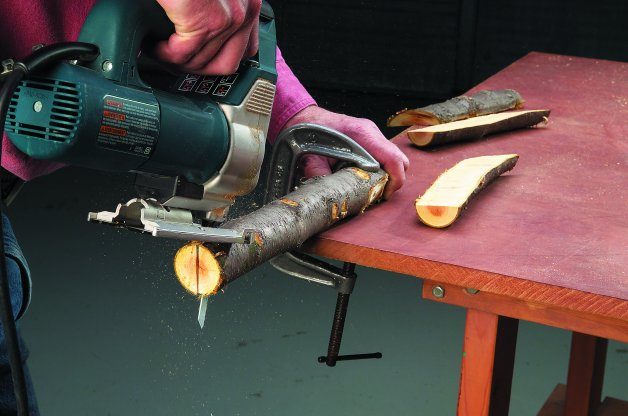
- 4: 1-1/2″- to 2-1/2″-dia. x 8-3/4″ branches cut lengthwise and mitered for roof edge.
- 4: 1-1/2″- to 2″ dia. x 3″ branches cut lengthwise for sides of feeder tray
- 2: 1-1/2″- to 2″-dia. x 5″ branches cut lengthwise for front of feeder tray
- 4: 1/4″- to 1/2″-dia. x 8-1/2″ twigs to hold thatch on roof
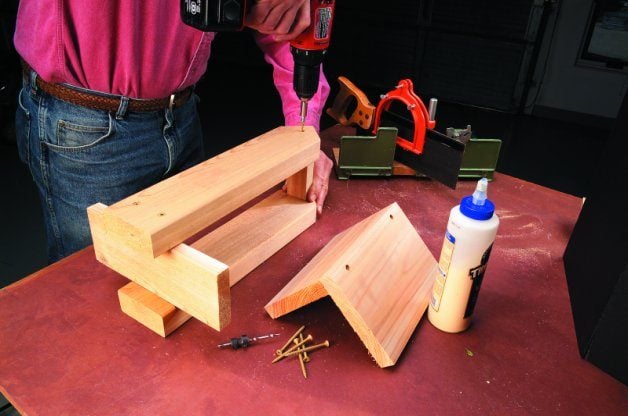
Step 2
Cut the sides of the feeder from a 2×4 and the roof, top brace and feeder tray from a 1×6. Attach with 2-1/2-inch rust-resistant screws and exterior glue. Don’t attach the roof to the sides—it slides up hanger wire so seeds can be poured into the bin from the top.
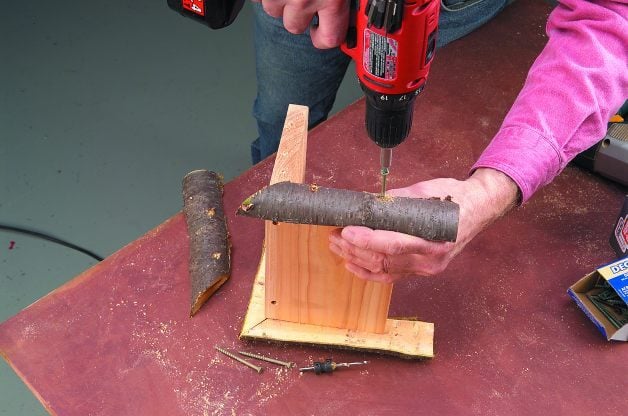
Step 3
Rip a 1-1/2- TO 2-1/2-inch branch in half with a jigsaw, miter the ends, then attach to the roof edges with 2-1/2-inch screws. Predrill all screw holes, and don’t worry if the cuts are rough and uneven—they’re supposed to be. The branches should be more or less flush with the bottom edge of the roof boards.
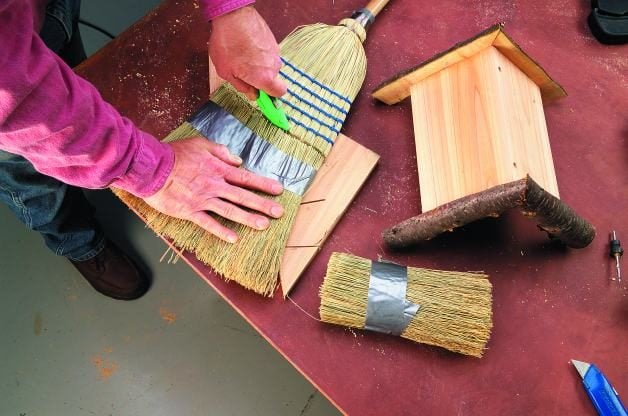
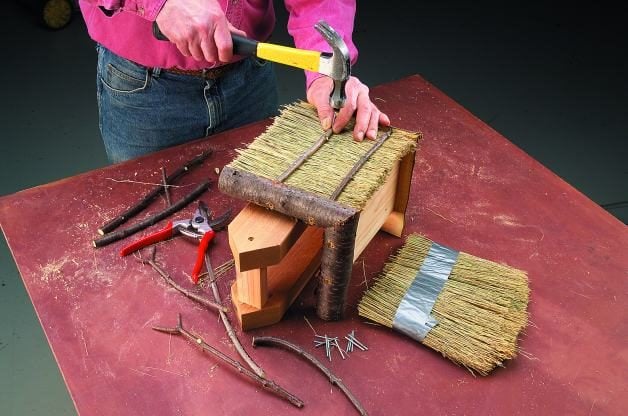
Step 4
Tape the thatch from brooms to hold it together, then cut it 7-1/2 inches long with a sharp knife. Arrange the thatch on the roof and nail two green twigs to each side to hold it in place. The feeder makes a convenient brace (as shown). Trim ragged edges with scissors after the thatch is nailed down.
Step 5
Drill three screw holes slightly bigger (5/32 inch or more) than the screw size through each side of the acrylic. Attach each piece of acrylic with six pan-head screws, but don’t overtighten, or it might crack. Leave a 1/2-inch gap at the bottom for the bird feed to flow out.
Step 6
Screw or nail on half branches around the perimeter of the feeder tray to keep the feed in place. Finally, drill a hole at the center of the roof and the top brace, and slip wire or rope through for the hanger.
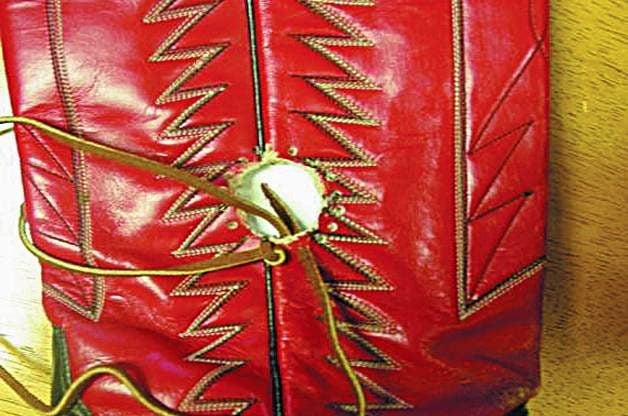
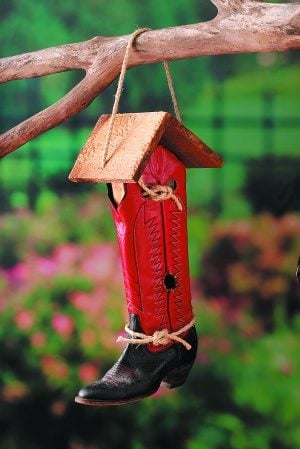
Are you a little bit country? Then this DIY bird house project will be right at home on the range! Linda Lancaster of Ada, Oklahoma designed this cowboy boot birdhouse at the request of many Birds & Blooms readers over the years. Pick up a pair of boots at a rummage sale and make two of these – one for yourself, and one for a boot-scootin’ neighbor or friend!
Materials:
- One cowboy boot
- One 1- x 2-inch 8-foot pine board
- One 1- x 6-inch 8-foot rough cedar board
- 3 to 5 feet of sisal rope
- One pair of leather bootlaces or 3 feet of leather lacing (from a craft store)
- 20 to 30 1- to 1-1/2-inch nails
- Two 5/8-inch brass wood screws
- Saw
- Screwdriver
- Scissors
- Hammer
- Drill
- Drill bits (1/16-inch and 5/16-inch)
- 1/4-inch hole punch
Step-By-Step Instructions:
Step 1
Cut a 1-inch hole midway up the boot. One way to do this is to trace around a quarter. (This will create the perfect-sized hole for a wren.)
Using the hole punch, punch holes all around the opening. Make sure your holes are at least 1/8 inch away from the entrance hole to avoid tearing. Use a piece of leather lacing at least 2 feet long, and lace around the hole. To finish it, tie a double knot on the inside of the boot.
Step 2
Using the hole punch, make two holes on the front and back of the boot at the top. You’ll use these later.
Using a 5/16-inch drill bit, drill two to three holes in the boot’s sole for drainage. Set the boot aside while you build the frame.
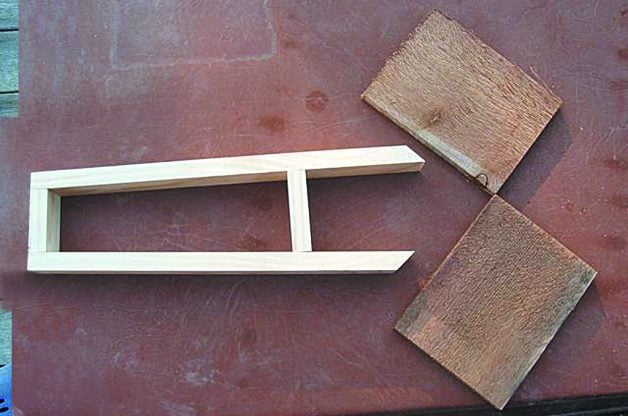
Step 3
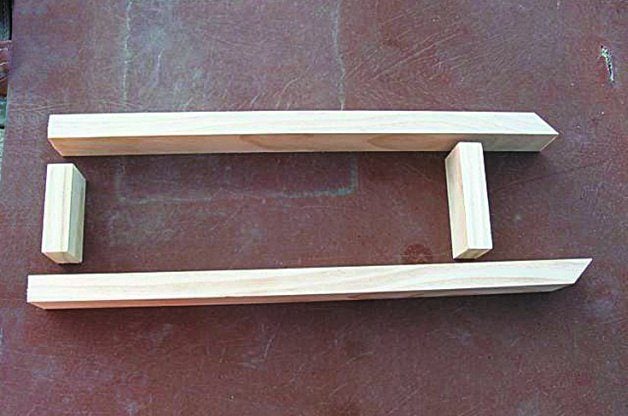
To determine the correct length for your frame boards, place the pine board inside the front part of the boot. Add roughly 2 inches and cut two pieces of that length. Cut a 45-degree angle on one end of each of these boards. (This is the hardest cut of the whole project, so if you can do this, the rest should be easy!)
From the original pine board, cut another two lengths, one 2-1/8 inch and the other 3-1/4 inch. (These will be your spacers, and you might need to adjust them for boots with wider shafts.)
Step 4
Cut two 6-inch lengths of cedar from the fence board for the roof. To assemble the frame, the 45-degree angles will face away from each other. The 2-1/8-inch piece of wood will connect the bottom, while the 3-1/4 inch spacer is roughly 8 inches above that.
To keep the boards from splitting, drill pilot holes with a 1/16-inch drill bit. Nail boards in place, using two or three nails at each connection.
Place the two cedar roof lengths at right angles. Drill and nail the two pieces together using at least six nails. Then place the roof over the frame and drill and nail into place, using at least three nails on each side.
Step 5
Using the 5/16-inch drill bit, drill two holes in the roof eaves and attach a 2-foot length of sisal rope for hanging.
Slide the wooden frame into the boot. Use brass wood screws to attach the boot to the wooden frame (through the holes you punched earlier). These screws won’t rust, and you can easily remove them for cleaning.
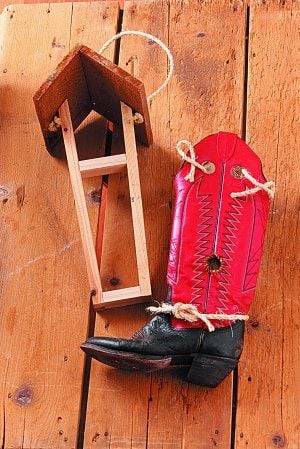
Step 6
Decorate any way you like. I added a bit of extra rope to mine. To attract house wrens, hang the boot from a tree or other support about 6 to 10 feet above the ground.
Materials:
- Chicken wire
- Cardboard
- Twig
- Cloth scraps
- Wire
- Beads (optional)
Step-By-Step Instructions:
Step 1
Cut an 18-in. x 8-in. rectangle of chicken wire and roll to make an 8-in. tube. Weave loose wires together along the length of the tube to make a seam, and cut off any wires that stick out. The tube should be about 13-14 in. in circumference.
Step 2
Close one end of the tube by weaving together all the loose wires across the opening, making a rounded, convex shape at the end. This will be the back of the birdhouse. Be sure to trim any excess wire.
Trim the other end of the tube, which will be the opening of the birdhouse. The chicken wire segments are shaped in hexagons; trim the opening so that you have complete hexagons alternating with spaces.
Step 3
You don’t have to have a perch, but if you prefer one, find a slender but sturdy 6-in. twig for a perch. Weave the twig through the chicken wire so that one end is held securely in place and the other extends a few inches from the opening.
Step 4
Cut cloth scraps into pieces about 5 in. wide and 2 ft. long. (You can use shorter scraps if you have them.) Use different patterns and colors if you like. Cut a 2-in. slit up the middle of each end of the strips, to be used for tying the fabric to the wire.
Step 5
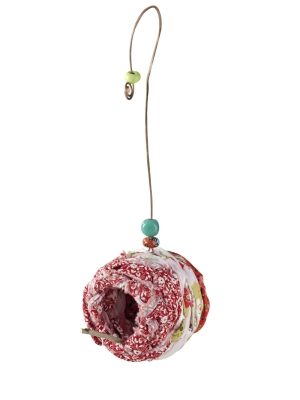
Starting at the opening of the birdhouse, tie a strip of cloth to the chicken wire, knot it and then weave it through the wire, covering the outside of the house with cloth as you go and securely tying the other end of the strip to the wire when you’re done. Trim excess fabric at the knots.
Step 6
Continue with more cloth strips until all the chicken wire is covered. As you wrap the opening of the house, bend wire inward so you get a neat round opening. Be sure to cover any sharp ends, which may require more than one layer of fabric.
Step 7
For hanging, you’ll need a 12-in. or longer piece of 14-gauge wire. (The bottom of a wire coat hanger works fine.) Bend into a small eyehook at one end and attach to the chicken wire at top center of the birdhouse. If you like, add a few beads and make a decorative swirl at the other end of the wire, then shape a large hook to hang the house. Enjoy!
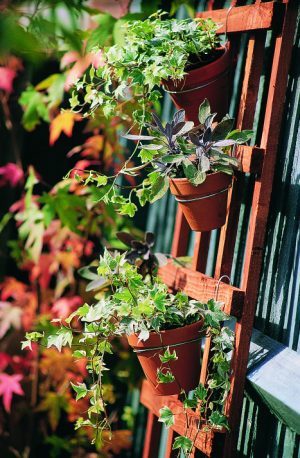
Have some old clay pots lying around? Brighten up a bare fence or wall with this simple pot trellis. You can change the look as often as you like – just unhook the pots and pop in fresh plants.
Materials:
- Trellis
- Clay pots
- Galvanized Wire
- Wire Cutters
- Pliers
Step-By-Step Instructions:
Step 1
You can build a trellis yourself with leftover scrap wood using nails to hold it together, or you can buy a trellis to suit the site or cut one to fit. You may wish to stain or paint it with exterior paint first. Then place the trellis in its spot, making sure the horizontal bars are sturdy enough to hold the weight of potted plants.
Step 2
To fashion a pot loop, bend a length of galvanized wire to fit snugly beneath each pot rim. Twist one end of the wire over itself and pinch tight with pliers, leaving one long end free for hanging. Bend the long end of the wire to make a hook that fits snugly over a horizontal piece of trellis. Add as many pots to the trellis as you like, and add plants to suit your style!