
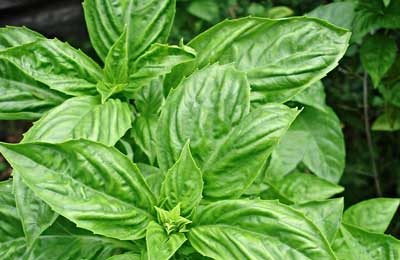
Fresh is best. You can hardly go wrong with this motto in general, and it’s certainly true when it comes to herbs. For years, I’ve been growing herbs to use in cooking, tea and other things. I love walking over to a pot and snipping just what I need. Fortunately, growing herbs year-round for fresh use is easy and enjoyable. Just follow these seven basic steps, and you’ll soon know how to grow herbs in winter too.
1. Choose the right location
Many herbs lend themselves to indoor gardening, even during the coldest months of the year. Basil, chives, mints and parsley are just a few that do very nicely in pots with bright indirect light. It might surprise you to know you don’t need direct sunlight for growing most herbs; the indirect light most of us get will work fine.
East-, south- and west-facing windows should all give your herbs enough light, especially if you set up a small table or use a counter that keeps plants about a foot away from window glass. You should probably steer away from north-facing windows.
Look around your house and choose your best location. Don’t limit yourself to the kitchen. Why not have a pot of chamomile in the bathroom, anise hyssop in the living room and basil or sage in the kitchen window?
2. Buy the right pot and soil
After you figure out your location, it’s time to pot up your herbs. Seeds can be challenging to start indoors, so my suggestion is that you begin with starter herb plants. I prefer growing my plants in clay pottery or unglazed ceramic pots. Natural-fiber pots made from rice, wheat, coir or recycled newspaper are also good choices. I typically stay away from plastic pots because they hold water longer and less evenly than clay pots, making it hard to know when to water.
One of the most important steps in growing herbs is choosing a high-quality potting soil. This is a good place to spend a little extra if you can. Buy soil that feels nice and loose and moist when you take hold of a handful. It shouldn’t compact into a tight ball when you squeeze it. Poor-quality soils, which tend to compact quickly, can eventually become like concrete around plant roots, making it difficult for plants to develop a healthy root structure. If you’re unsure what soil is best, the garden center staff can help guide you.
3. Plant with loose soil
Now you’re ready to plant. Loosely fill the pot with soil up to the rim. Don’t press the soil down in the pot, which will make it harder for roots to get established. Before planting, water the soil thoroughly so that it is evenly moist. Now remove the starter herb plant from its pot and gently loosen the soil around the bottom inch of roots. Scoop out a hole in the planting pot and settle the plant in its new home.
Carefully fill soil back around the roots without compacting it. Water the plant moderately to settle loose soil in and around the roots.
4. Learn how to water
Learning to water herb containers is what takes the most practice, but don’t be intimidated. You want soil that stays evenly moist, not soggy and not bone dry. How fast the soil dries out will vary a lot from home to home, especially when furnaces are circulating warm air throughout the house. Until you get used to how fast your plants dry out, check them every couple of days.
To keep plants and soil from drying out too fast, avoid placing them near furnace vents or hot, sunny windows. Plan to water plants every three to five days or so. There should be liquid in the drainage saucer beneath the pot, which should get reabsorbed back into the pot within six to eight hours. If that doesn’t happen, pour off the excess, because standing water invites destructive insects.
5. Add organic fertilizer
Fertilize herbs once a month with organic fertilizer. Since you’ll probably be using the plants for cooking or tea, you don’t want to be eating chemical fertilizer residues. So I don’t forget, I mark my calendar for the fifth of the month, which is my fertilizing day for all indoor plants.
6. Prevent insect pests
Whenever you grow plants indoors, insects can come calling. You can prevent most problems by making sure your soil doesn’t get soggy. It’s also important to keep dead and dying foliage from gathering on top of the soil, as decaying plant matter is the perfect habitat for insects like fungus gnats.
If you notice a few pests on your herbs, take action right away by spraying with a soap- or neem oil-based plant product. These treatments are organic and are safe around children and pets. It’s important to treat plants every five to seven days for at least three weeks to catch all the insect life cycles and eliminate the problem.
7. Harvest for good health
Finally, be sure to pinch back or harvest your plants regularly every week or so. Pinching back the top couple of inches of growth helps plants stay bushy and healthy, and the harvest is perfect for cooking, making tea or adding to your bath. If you have extra, you can dry or freeze it for later use.
It takes a little discipline, but growing herbs indoors is actually pretty easy. Before long, you’ll wonder why you didn’t start sooner!
Tammi Hartung is an herbalist and organic grower in southern Colorado. She is also the author of Homegrown Herbs and The Wildlife-Friendly Vegetable Gardener. Read her blog at desertcanyonfarm.wordpress.com.
Year-Round Herb Recommendations
- Basil—Pesto or pizza
- Sage—Whole grains and poultry
- Chives—Salad herb
- Anise hyssop—Tea
- Mint—Herbal mouth rinse
- Chamomile—Bath herb, tea
- Lemon balm—Herbal skin toner
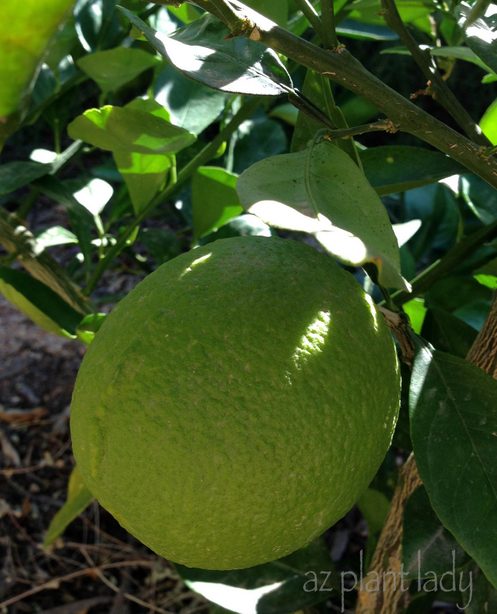
While gardens in cold, northern climates may be shivering under a layer of snow and ice, southern gardeners in warm climates are being greeted by the sight of ripening citrus.
Growing up in Southern California, our garden always included citrus trees. We had a large lemon tree next to the patio that produced baskets filled with countless lemons. There was also an orange tree just outside my bedroom window. Springtime would bring the most heavenly scent of orange blossoms wafting through my bedroom.
Fast forward to the present and I now have my own garden in Arizona, where citrus is widely grown. Our first home had a large grapefruit tree that my oldest daughters would climb. Later, we built a new home and I spent time creating an ‘edible garden’, which is filled with three vegetable gardens, blackberry bushes, apple and peach trees.
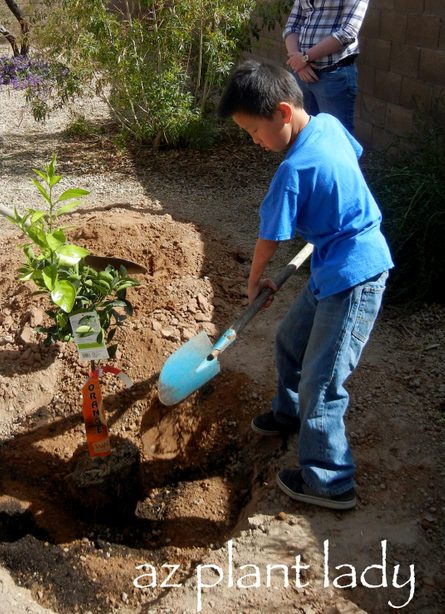
A couple of years ago, we added an orange tree to our edible garden. The kids were so excited about the prospect of fresh oranges right off of the tree.
It was a very small tree, but younger trees (of all types) handle the transplanting process better then older trees.
Like many fruit trees, I knew that we would have to wait a few years before our little tree would bear any fruit because most of the tree’s resources were being spent on growing new roots before it could concentrate on top growth.
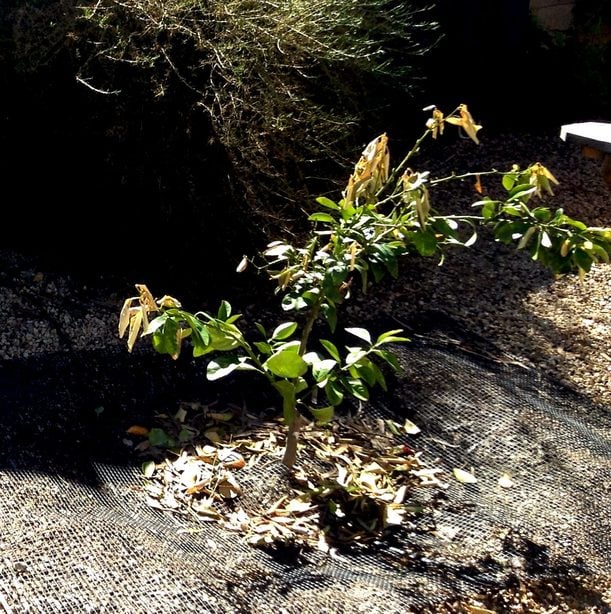
The first year in the ground was not a happy one for our little tree. A hard freeze came that dipped temperatures into the low 20’s for 5 days in a row.
Citrus grow in the warmer areas of the United States including California, Arizona, Texas and Florida (in zone 9 and above) and do suffer damage when temps dip below freezing.
Any hope of any fruit being produced were dashed because the branches had been damaged by the frost.

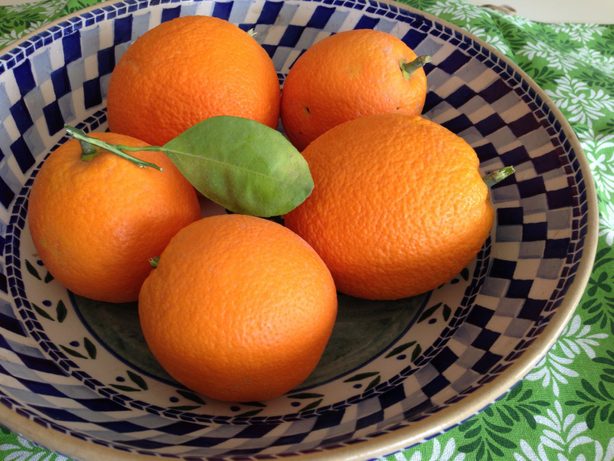
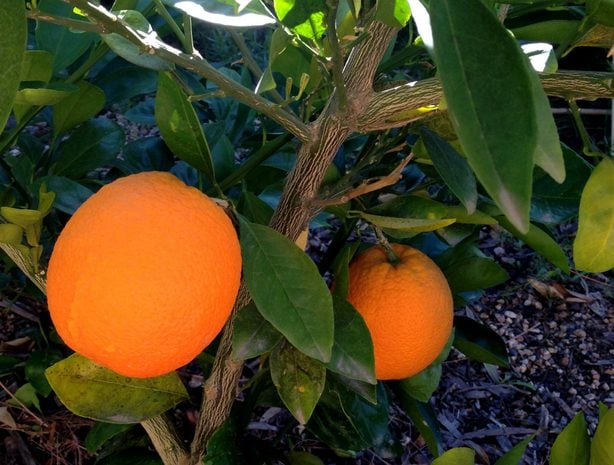
Eight months after the frost, I was delighted to see that our small tree had five green oranges on it. It has also grown a bit larger, which meant that it could support a few oranges.
Both my husband and kids were impatiently waiting for our oranges to start ripening. Every week, we would check to see the green color on the oranges slowly disappearing and being replaced with a lovely shade of orange.
Finally the day arrived when our oranges were ready to be picked.
An easy way to tell if oranges are ready to be harvested is to lightly pull them while twisting them off the branch. If they do not come off easily, then wait another week before trying again. Thicker-skinned Navel oranges are usually completely orange when ready while thin-skinned Valencia oranges still retain some green coloring mixed with orange when ripe.
**Oranges do not ripen after being picked, so keep them on the tree until they are fully ripe.
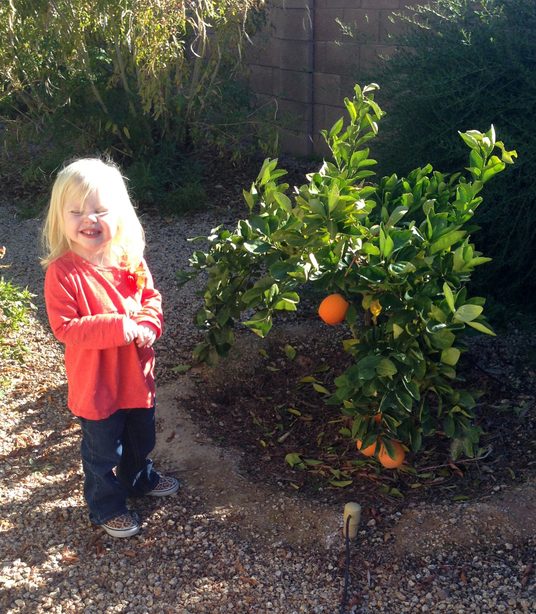
My 2-year old granddaughter, Lily, was excited to help me pick the oranges, which brought back memories of picking oranges from the huge trees in my own grandparent’s backyard.
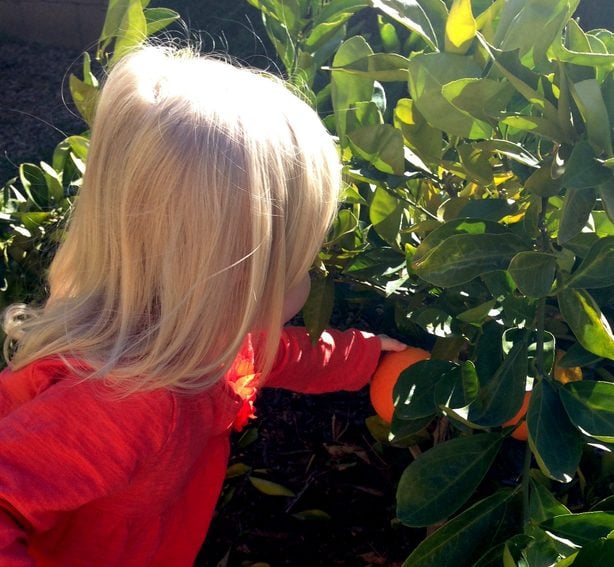
Because our first harvest was so small, we picked all five oranges off of the tree.
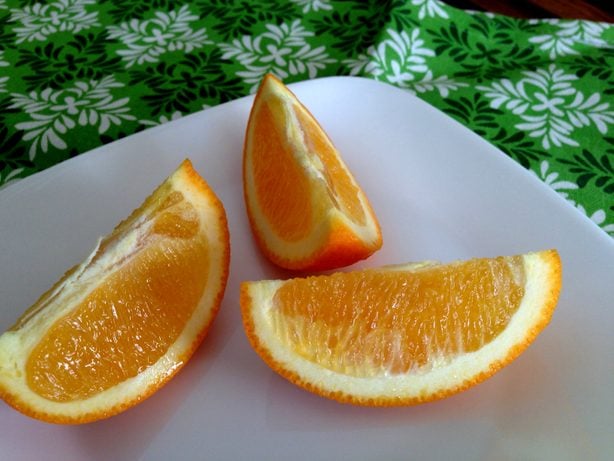
Then we went inside and sliced up the largest orange to taste. It was sweet and absolutely delicious.
Because this was our first taste of fruit from our tree, they tasted extra special.
As our orange tree grows larger and our harvest bigger, I plan on making lots of orange marmalade.
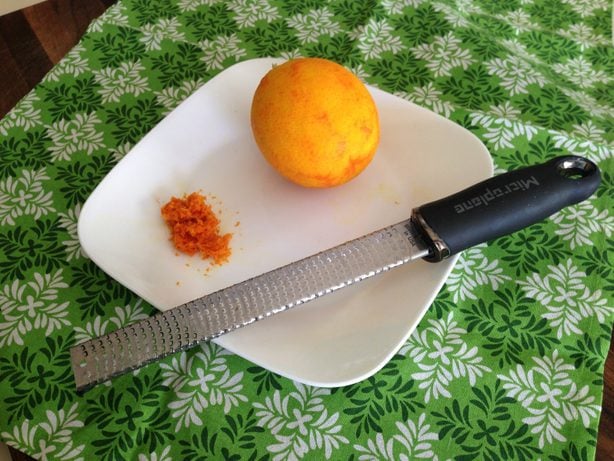
In the meantime, I decided to preserve the zest from the skin by freezing it. This way, we will be able to enjoy our small harvest a little bit longer when we use the zest to flavor our favorite dishes.
You can freeze the zest from all types of citrus. Earlier, I wrote about freezing the zest from lemons, which I often use when I cook. Read how to freeze zest here.
I am looking forward to later this year when our peach and apple trees will bear fruit 🙂
Do you have any fruit trees in your garden? What types?
How to Wrap a Plant
I love gifting potted plants, especially at the holidays. This is a gift the recipient can enjoy for a long time to come, and surprisingly nice selections are usually available at your grocery store. The only thing I don’t like is the foil wrapping that these plants often come in; I prefer to take a few more minutes to personalize my gift plants in some way. This year, I stumbled across an incredibly easy solution for how to wrap plant gifts, just by using some cookie tins I found at the bargain store. Not sure what kind of plants to give? Check out easy-care holiday houseplants.
I liked these tins because they were taller instead of shallow. Most stores have a wide variety of tins available this time of year, so you should be able to find some that work for you.
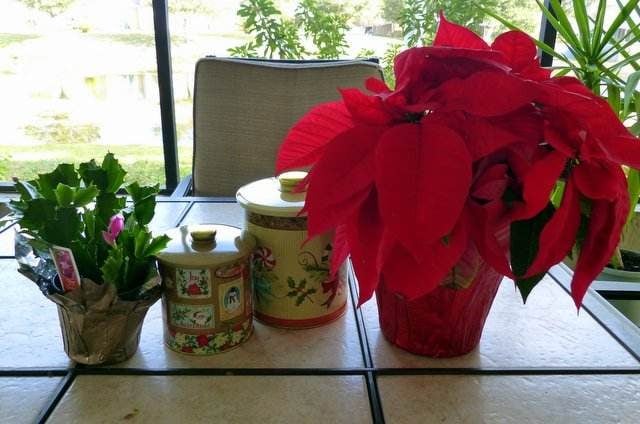
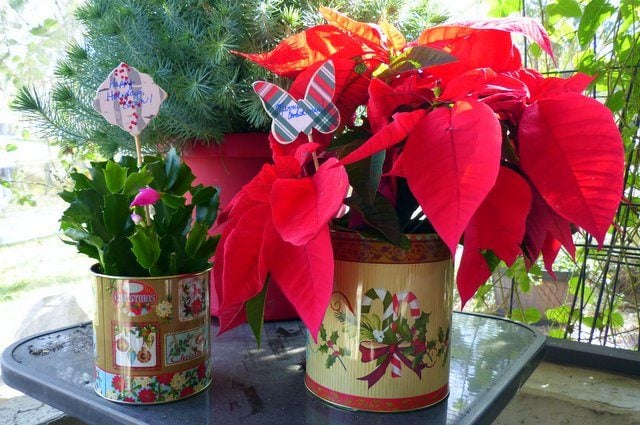
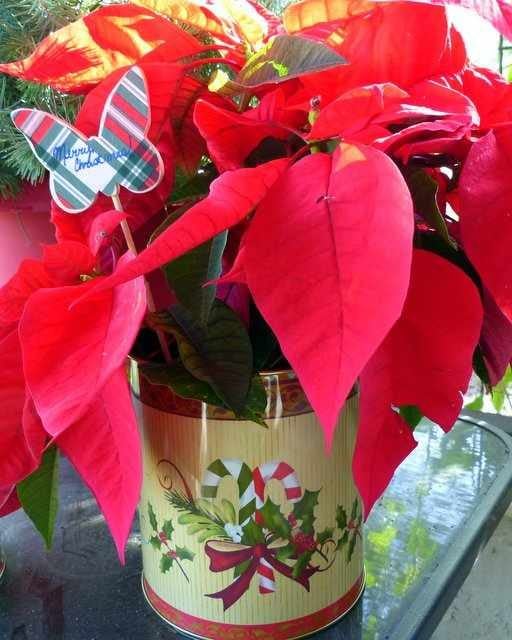
I left the plants in their original pots and removed the foil wrapping. The small Christmas cactus on the left slid right in.
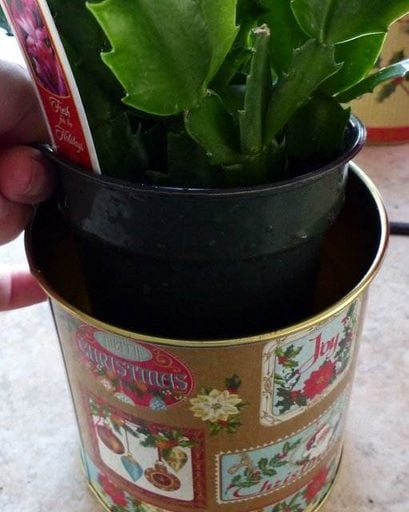
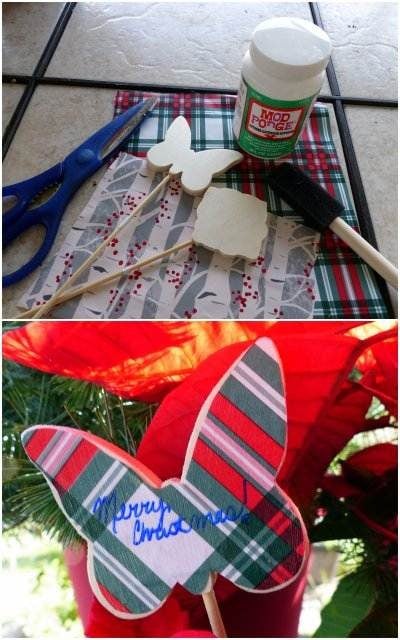
The bigger poinsettia had a wide lip on the pot that made it a little too big to slide all the way down. I solved that problem in no time by trimming the rim with a pair of scissors. Once I had the plants in the pots, I quickly made up some holiday tags using some wooden stakes I picked up at the craft store last summer, along with some wrapping paper and Mod Podge.
I haven’t decided what to do with the lids from the tins, yet – I may give them to my recipient so they can use the tin for something else along the line if they decide to re-pot the plant eventually.
If you have trouble finding tins you like, there are still plenty of options out there for dressing up your potted plant gifts. Happy gifting!
Next, check out the best gift ideas for gardeners.
I’ve never met a gardener who didn’t want to share or expand his or her garden. And there are so many ways to do just that. One easily overlooked way is by taking plant cuttings. You can take a snip of a plant to start a whole new one—for yourself or a friend! Bear in mind that you can’t take a cutting from a plant that is patented. That’s usually any new variety, but you can tell by checking the plant tag. Most old fashioned favorites and garden classics are fine to use for cuttings. Most important, though: Don’t get discouraged if growing from plant cuttings doesn’t work the first couple of times around. It can be a tricky process and takes some trial and error. This list includes some of the easiest plants to propagate.
Learn more tips for plant propagation.
On This Page
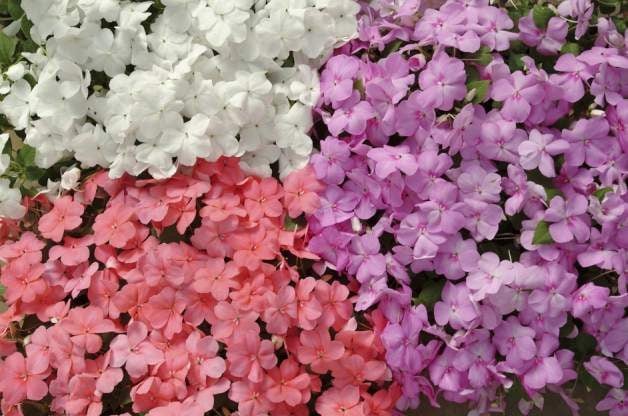
Impatiens
Impatiens, Annual
It’s true: This garden standby is in danger, but research is underway to save this beauty from downy mildew. But for the meantime, don’t count impatiens out in gardens that haven’t been afflicted with the disease! Resilient and reliable, it’s a cheerful, shade-loving flower that will do well in almost any part of the landscape.
Taking cuttings: Take cuttings only from healthy plants and keep them short, with no more than two or three mature leaves on each.
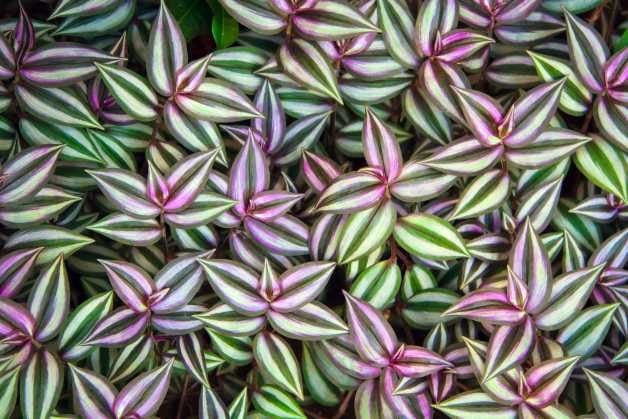
Inch Plant
Tradescantia, Zones 8 – 12, Annual elsewhere
A longtime favorite houseplant inch plant can be grown outdoors in containers or as a ground cover where winter-hardy. For prime leaf color, grow inch plant in filtered sun.
Taking cuttings: It’s easy to start this colorful plant from cuttings because you can take them from outdoor plants anytime during the season and year-round from houseplants.
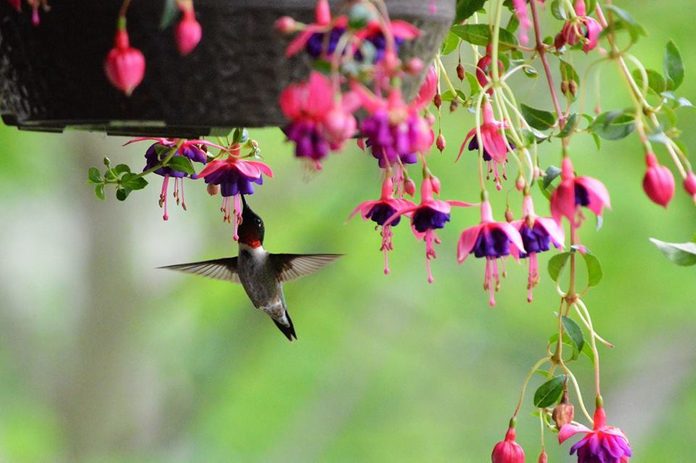
Fuchsia
Fuchsia, annual
Fuchsia’s dainty flowers might be some of the most recognizable blooms of all. Some even say that the delicate blossoms resemble a ballerina. Outdoors, this graceful plant will benefit and thrive in shade. Fuchsia is most commonly grown in a container. Try it mixed with other annuals, too! Fuchsia also attracts hummingbirds.
Taking cuttings: The good news is that fuchsia cuttings will root quite quickly, sometimes even in 10 days or fewer. Take cuttings in late summer, and don’t allow them to wilt. Place the cuttings in the growing pot right away.
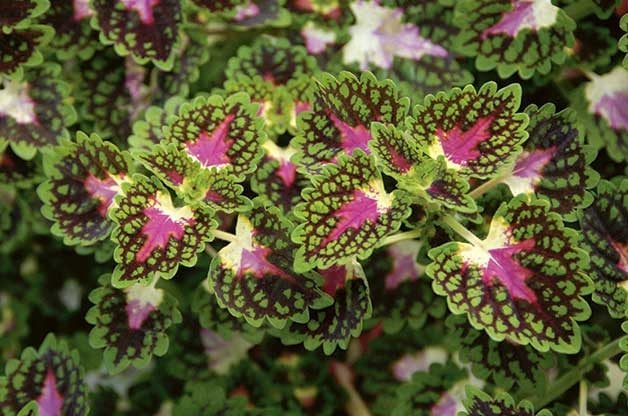
Coleus
Solenostemon, Annual
Coleus is both a garden classic and an ever-evolving star, with fresh varieties popping up every year. And it’s not just a shade favorite anymore, either. New hybrid plants can tolerate full sun, but this means they also need more water than traditional cultivars. Coleus will do best in rich, moist, well-draining soil. Check out our top 10 favorite colorful coleus.
Taking cuttings: Take a 2- to 3-inch stem cutting and remove the lowest leaf. Stick the cutting in vermiculite, perlite or a well-drained potting mix, covering the leaf scar, and put it in a warm, bright location out of direct sunlight. Cuttings root in about two weeks, and several weeks later they can be planted in a well-drained potting mix.

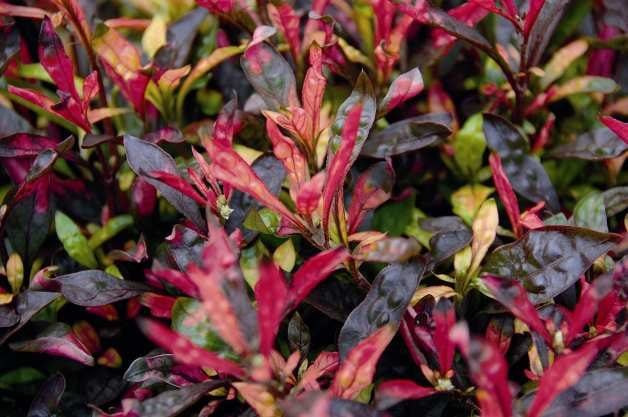
Copperleaf
Acalypha wilkesiana, Annual
This copper-colored charmer can be grown as both an annual outdoor plant and a houseplant. Use it to add fiery color to partially shaded beds, borders or even a large container. You may see yellow-white summer blooms.
Taking cuttings: Easy to maintain, copperleaf is equally easy to grow from stem cuttings. (See instructions for coleus, above.) Take the cuttings in late summer and let them root and grow indoors over the winter.

Sweet Potato Vine
Ipomoea batatas, Annual
Classic sweet potato vine is generally grown for its fabulous chartreuse foliage, but new varieties like Blackie are options, too. The foliage has a more intense color when planted in the sun, but it will perform in partial shade.
Taking cuttings: Make a cut straight across the stem about 6 inches from the tip. These cuttings are actually the easiest way to start new plants; some gardeners swear by placing the cutting directly in the ground in spring, keeping the area moist until the roots develop.
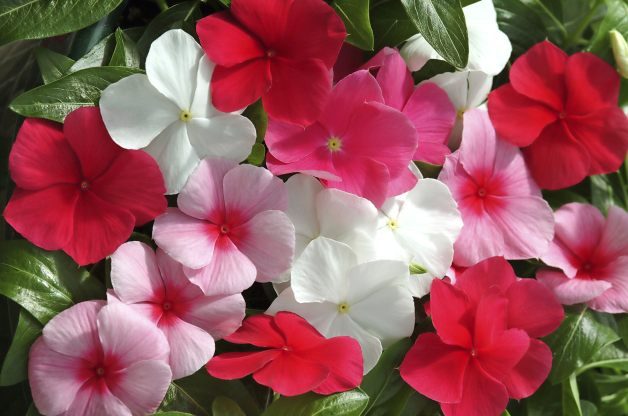
Annual Vinca
Catharanthus roseus, Annual
Also known as Madagascar periwinkle, this annual is great for full sun or part shade and tolerates heat stress. Annual vinca is similar to impatiens in look and growth habit, so it is an excellent substitute for impatiens in hot, sunny areas. The glossy green leaves are a nice complement to the colorful blooms.
Taking cuttings: Vinca cuttings can be taken throughout the growing season before the first frost. They’ll root quickly and may bloom when grown in a sunny window.
Alternanthera
Alternanthera, Annual
A visual delight because of its riotously colorful foliage, alternanthera is a bushy shrub you can pinch and shear to maintain shape and size. Because you can keep it under control, it’s an ideal container plant. Grow it in full sun to bring out its knockout leaf color.
Taking cuttings: You’ll want to make any divisions of alternanthera in spring, but take cuttings in late summer. Then overwinter the young plants indoors.
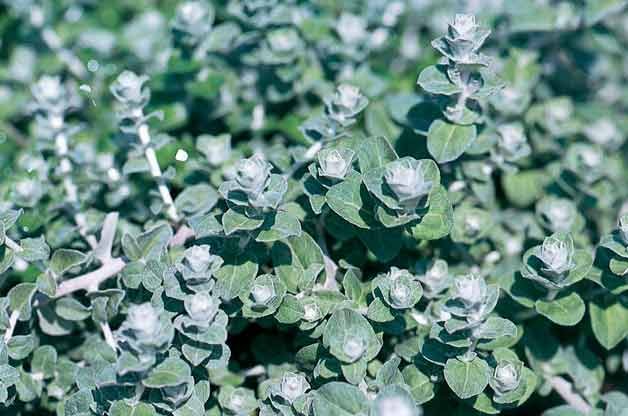
Licorice Vine
Helichrysum petiolare, Zones 9 to 11
Here’s a drought-tolerant vine you’ll want to use as a trailer or filler, especially in large containers or hanging baskets. It can be grown as an annual in places outside Zones 9 to 11. The fuzzy, silvery foliage offers wonderful texture in a grouping of plants. It loves to soak up the sun but will do well in partial shade, too.
Taking cuttings: Licorice vine cuttings will do best when taken in late summer. The rooted cutting will be ready for planting in spring when the danger of frost has passed.
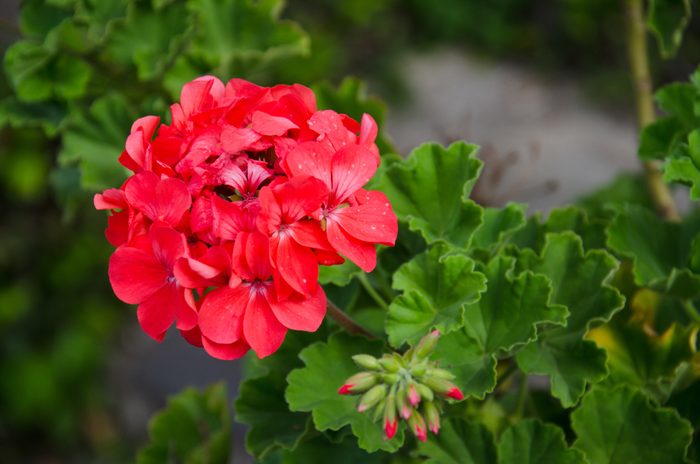
Geranium
Pelargonium x hortorum, Annual
Geraniums have so many virtues, and they don’t always get enough credit. Sure, they’re somewhat old-fashioned, but they’re pretty, sun-loving, long-lasting, tough, and perfect in containers and window boxes.
Taking cuttings: Make sure your tools, rooting mix and pots are sterilized; geraniums are very susceptible to disease. At the end of summer, make a cut about 4 inches down from one of the growing tips of the plant, remove flowers and buds, and place cuttings in a pot. They should root within 20 days. You can also try a rooting hormone for increased success.
Why Trust Us
For nearly 30 years, Birds & Blooms, a Trusted Media Brand, has been inspiring readers to have a lifelong love of birding, gardening and nature. We are the #1 bird and garden magazine in North America and a trusted online resource for over 15 million outdoor enthusiasts annually. Our library of thousands of informative articles and how-tos has been written by trusted journalists and fact-checked by bird and garden experts for accuracy. In addition to our staff of experienced gardeners and bird-watchers, we hire individuals who have years of education and hands-on experience with birding, bird feeding, gardening, butterflies, bugs and more. Learn more about Birds & Blooms, our field editor program, and our submission guidelines.
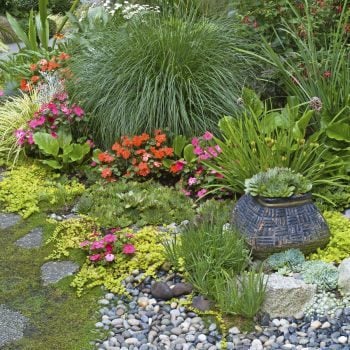
Rock gardens expand a gardener’s planting palette and offer creative challenges to gardening enthusiasts. Ideally suited to hot spots and difficult-to-tame slopes, they take their inspiration from wild flora that sprouts along gravelly mountain peaks and sandy desert floors. Building a rock garden allows gardeners to play with an array of small plant varieties that would likely be lost if planted in traditional perennial borders.
Ed Glover, a member of the Wisconsin-Illinois chapter of the North American Rock Garden Society, has been rock gardening for more than 25 years. He tends his own 120-by-15-foot rock garden at his home and acts as a volunteer rock-garden caretaker at the University of Wisconsin-Madison.
“I like rock gardening because it’s challenging,” Ed says. “It allows me to try to grow plants I’ve seen in the mountains out west. Since the plants are small, you can put in lots of different ones in smaller areas. They supply pretty foliage when not in bloom, and the rocks are interesting, even in winter. I always tell people to start with a small rock garden. If they like it, they can expand it a little at a time.”
 Kim Zoss, a horticulturist at the Chicago Botanic Garden, also encourages gardeners to start small. “Beginners might try cultivating a rock garden in a trough, in a nook, atop a small berm or around a water feature,” Kim says. “Rock gardens should look like a natural part of the landscape, so a gardener needs to look at the whole yard to see how a rock garden will fit in. It’s best to place the gardens where you can see them easily and often.”
Rock Garden Location and Construction
As a rule, rock gardens require sunny sites and quick-draining soil. Ed recommends planting alpine-type gardens on sunny, south-facing slopes; xeric-type rock gardens planted with drought-tolerant plants do well where conditions are hot and dry.
“When constructing a rock garden, always build up for good drainage,” Ed advises. “Instead of digging up existing soil, mound new soil atop the ground. I use a soil mix that’s equal parts compost, sharp sand and pea gravel. Dig into the mix to place your rocks, and bury the bottom third of each rock, so it doesn’t look like you just tossed the rocks in.”
Burying portions of the rocks not only provides a natural overall appearance but also encourages plants to stretch their roots to the soil beneath the rocks, which results in healthier plants. Ed suggests spacing rocks to create crevices for tucking in cushion-forming plants or creeping cultivars that will wander over nearby stones. Situate larger rocks so they create microclimates that offer shaded planting sites on one side and sunny spots on the other. Tilt flat rocks to direct rainwater into the soil.
Select a single type of native rock in different sizes and shapes for a cohesive, natural-looking garden. If you’re planting alpine gardens, opt for porous rocks such as limestone, sandstone, shale or tufa; nonporous rocks like marble, basalt and granite work well in desert-inspired gardens.
Rock Garden Plants
Common landscape-design principles – such as including zone-hardy varieties with varying heights, forms, textures and bloom times – apply when creating rock gardens. But, since rock gardening focuses on individual plants, it’s important to not crowd plants and to choose nonaggressive plants that won’t overgrow their designated spots. If you’re including evergreens for winter interest, select miniature varieties with a very slow growth rate.
Ed plants an array of alpine and subalpine perennials, many with cushionlike profiles. Draba aizoides, a mat-forming perennial with yellow flowers, and saxifrage, a silvery-foliaged plant with white, yellow or pink blooms, kick off the flower show in early spring. Creeping phlox and rock cress will blossom next and are followed by summer-blooming dianthus and blue-flowering campanula.
Desert rock gardens supply a good foundation for penstemons, sedums, cacti, low-growing yarrow and hens-and-chicks. The Chicago Botanic Garden’s rock garden combines alpine and xeric perennials, such as ice plant, small sedums, ground-cover potentilla, pulsatilla, moss phlox and dwarf iris with miniature evergreens, such as Teddy arborvitae. Other good rock-garden options include Tom Thumb cotoneaster and blue rug juniper, Kim says.
Perennials are the mainstay of rock gardens, but some gardeners incorporate heat-loving annuals, such as moss rose or creeping zinnia, into their design for season-long color. Kim also recommends tucking miniature spring bulbs amid the rocks for early spring color.
Rock gardening is becoming increasingly popular, and local nurseries are responding to the growing demand for rock-garden plants. Ed and Kim recommend checking local nurseries first—you’ll often find plants larger than those available through mail-order catalogs and varieties specifically suited to your planting zone.
Rock Garden Maintenance
After the plants are in, mulch the entire garden with at least an inch of gravel that matches your rocks and stones. The mulch conserves moisture, keeps weeds down and fashions a suitably stony backdrop for both boulders and plants. Limit fertilizer applications to once a year to keep plants from growing too large. Educate yourself about each plant’s water requirements—too much moisture may cause root rot; too little water may stress out plants. Instead of using a sprinkler, Kim suggests spot-watering each plant to meet its individual water needs adequately.
Try your hand at birdscaping, and you’ll quickly learn that landscaping is for the birds — literally! Planting with birds in mind pays off fast, attracting birds in greater numbers with more variety and longer visits from your feathered friends. It’s easy, too. All it takes is looking at your yard from a bird’s point of view.
You’ll have greater success at attracting your favorites when you realize two things – finding food and not getting eaten – are the two biggest issues for birds. Sure, you can just put out a tempting spread at the feeders, and birds will come. But to get them to linger, and maybe grace your place with a nest come spring, you’ll need to make them feel safe, both while they’re eating and while they’re moving about the yard. This is the backbone of birdscaping.
“The more plants, the better” is my motto. A yard that’s chock-full of different trees, shrubs, grasses and vines, plus the usual flower beds, is what brings in the birds. One that’s mostly lawn won’t get many customers at all. You might think food is the best for attracting birds to your yard, and you’re right. Food is exactly what they’re after on all those plants, including insects in incredible numbers and any tempting berries or fruit. But surprisingly, seed probably comes last when it comes to attracting birds.
You can learn a lot about planning for birds just by watching them in their natural surroundings. Observe them in your yard, and you’ll see that very few of them spend time out in the open. Most birds move from one clump of plants to another. They alight in trees, gather in bushes or scoot through the garden looking for food. The sheltering branches or stems protect them from the hungry eyes of hawks, prowling cats and any of the other critters that are only too happy to dine on a dove, sparrow or chickadee.
So think like a wary bird and set up stepping-stones of shrubs, trees, grasses and flower beds. Go horizontal with corridors of plants so birds can move easily about your yard. A hedge of mixed berry bushes is irresistible to bluebirds, thrashers, catbirds and other friends. Groups of shrubs with just a hop, skip and jump between them are also great.
But think vertically, too, because birds move up and down as well as sideways. You can shoehorn in a surprising amount of cover by layering small trees, shrubs, ferns and ground covers near big trees, and by adding an arbor or trellises for vines and roses. Thinking like a bird instantly reveals the benefit of including ornamental grasses, roses and other shrubs, as well as small trees, to your flower beds. Your backyard will soon look like an oasis, especially from the air.

While most gardeners strive for neatness, birds like messy surroundings, so birdscaping focuses on finding a happy medium—a natural look that will coax birds into lingering and possibly even nesting. Let perennials, shrubs and other plants knit together, instead of keeping bare space around every plant. Allow the dead leaves to lie beneath shrubs and hedges as an insect-rich mulch for gray catbirds, thrashers, wrens and other friends to investigate.
Hold off on cutting back flower beds until spring so goldfinches, titmice, doves, quail and other birds can shelter in them when searching for seeds and insects in winter. Instead of getting out the clippers every few months, learn to love the natural look of a free-form hedge. Birds will appreciate it. And you’ll appreciate the birds bringing life to your yard, every season of the year.
Save Money While Attracting Birds
- Dig suckers from lilacs, forsythia, weigela, serviceberry, shrub roses and other multiple-stemmed plants and transplant them to new homes.
- Trees and shrubs cost less at garden centers than nurseries. Selection is limited, and plants may not be as nicely shaped or as big, but the savings may get you three or four plants instead of just one.
- Look for free or cheap plants on craigslist.com or freecycle.com. Early birds get the worm.
- Scour the bulletin boards at supermarkets and other places, and post your own notice for “Free Plants Wanted.”
- Bare-root shrubs are a bargain. Look for bramble fruits, forsythia, hedge plants, and roses in bags rather than pots.
- Shop end-of-season sales to save a bundle.
- Scout the “sad sack” section of your nursery and garden center for damaged but salvageable plants at cut-rate prices.
- Treasure every bird-planted tree seedling you find in your yard; transplant while still small.
Plastic bottle crafts are a great way to reuse those ubiquitous water bottles. With a few easy steps, you can create these colorful garden flower decorations.
Materials:
- 2 or 3 same-size plastic soda bottles
- Waterproof permanent adhesive
- Gloss spray paint for plastics
- Small scrap of Styrofoam block
- Scrap of colored foam for backing
- 3/8-in.-wide x 24-in.-long wooden dowel rod
- Opaque permanent paint markers
- Paper-backed duct tape sheets (optional)
- Scissors or craft knife for bottle trimming
- Flexible ruler
Step-By-Step Instructions:
Step 1
Wash the bottles and let dry. Use a flexible ruler and permanent marker to make an even circular line as a cutting guide about 1/3 of the way down from the tops. Cut and discard top portion of bottles, keeping the bottoms to make the flowers.
Step 2
Place bottles upside down on scraps of cardboard or newspaper in a well-ventilated area. Stand the dowel rod in the Styrofoam block to make it easier to paint. Following manufacturer’s instructions, spray-paint exterior of bottles and dowel rod. Apply as many coats as needed for complete coverage. Let dry and remove the rod from the Styrofoam.
Step 3
Using a permanent marker and flexible ruler, lightly mark sections evenly around perimeter of each bottle for flower petals. For small bottles, mark about every 1 in.; for larger bottles, mark about every 2-1/2 to 3 in. Use scissors or a craft knife to cut vertical slits on marks, making several flower petals. Stop cutting each slit at the ridged base of bottle bottom. If desired, trim ends of petals into rounded shapes.
Step 4
Bend the petals forward so they’re at right angles to the center of the flower (the bottle bottom), creasing each one at the ridged base of the bottom. If needed, bend and press firmly several times until the petals stay in place.
Step 5
Using permanent adhesive, attach the bottles by stacking bottoms with petals outward. Stagger the placement of petals. For inner bottles, bottoms may have to bend slightly to fit inside outer bottle. Let adhesive dry.
Step 6
If desired, cut a 1-1/2- to 2-in. strip of duct tape to fit the perimeter of the top flower’s center. Decorate the center of the flower using the paint markers.
Step 7
Attach the dowel rod. For larger stacked bottles, cut small crisscross slits through the side of the middle bottle. For smaller stacked bottles, cut a small V-shape slit from the back edge of the last bottle. Put one end of dowel rod through slit, running it across the width of the bottle bottom until it meets the opposite inner side. Use permanent adhesive to glue dowel rod in place at both sides. Let adhesive dry.
Step 8
Cut a circular piece of colored foam slightly larger than the opening on back of flower and secure it with glue around the edges. Let it dry.
Stick your soda bottle flower a few inches into the dirt, indoors or out. No need to water it!
My husband and I are just finishing up a (very long!) renovation of a rustic 1950s rancher. I enjoy cranking up the volume on these outdated midcentury homes. So when it came time to design an estate sign for the property, I knew I wanted something with a clean, sleek feel that also reflected the home’s humble roots. I hope you agree that this tin can and conduit pipe recycled garden sign fits the bill.
Materials:
- 3-ft. x 6-in. wooden board (or desired size)
- 20 or more opened 16-oz. (or other same-size) tin cans with labels removed
- Two sections of ¾-in.-wide galvanized conduit for sign sides (desired sign height plus a couple of feet extra)
- Two 2-ft. sections of slightly wider galvanized conduit to secure in the ground 7-ft. or longer piece of 3/8-in.-wide threaded galvanized steel rod for the can rails
- Several nuts to fit threaded rod (enough to attach cans)
- Exterior-grade vinyl letters and numbers to fit board
- Cardboard scrap
- Sandpaper
- Paint and paintbrush
- Exterior non-yellowing spray sealer
- Cabinet knobs (optional)
- Bike chain (optional)
- Silver- or chrome-colored spray paint (optional)
- Colored plastic can or bottle top
- Wire tools
- Bolt cutters
- Nail punch and hammer
- Metal snips
- Drill press or vise and hand drill
- Electric drill with drill bits
- Plumber’s pipe cutter
Step-By-Step Instructions:
Step 1
Use bolt cutters to cut two pieces of threaded steel rod to fit the sign. Measure the length of your board (mine was 3 ft.) and then add 3 in. to each rod end. For instance, I cut two 3-ft.-6-in. rods to make the can rails for my sign.
Step 2
Trace the open end of a can onto scrap cardboard and cut out. Mark the center of the cardboard circle and punch a hole. Use this as a template to mark the center on the closed end of all the cans with a marker. Then use a nail punch and hammer to make a hole on each marked spot. The hole should be wide enough to fit the threaded steel rod.
Step 3
From the other rod end, slide on a can, closed end first, until it rests in the open end of the first can. Thread a nut until it reaches the bottom of the previously placed can. Align cans and tighten the nut. Repeat until all cans are secured together. I used about 8 cans on each rail. Use enough cans so that 3 in. of rod remains at both ends when done.
Step 4
To cover the open end of the rail, use metal snips to cut 2 in. up the sides of the can’s perimeter. Then squeeze the can’s slit sides, open end first, into the last can on the rod. Thread a nut against the bottom of the can to secure.

Step 5
Repeat Steps 3-5 to make the second rail of cans using your other steel rod piece.
If desired, spray-paint the tin can rails and conduit sections.
Step 6
Sand the board and paint it in your choice of color(s). Let dry completely. Then apply vinyl letters and numbers as desired to the board.
Step 7
On a flat surface, lay the can rails and the board so they are spaced exactly as you want them to be in the finished sign. I used a couple of blocks of wood to raise the board to the same level as the rails.
Step 8
Cut the two sections of conduit to your desired sign height plus a couple of feet. Then lay the equal sections on each side of the rails and board. Mark holes on the conduit sections where you want to attach the rails and board. Be sure to mark both sides the same. I used one screw centered on each side to attach the board, but you may want to use two equally spaced screws for stability.
Step 9
Using a drill press or vise and hand drill, make holes in the conduit sections where marked. For the rail holes, don’t drill all the way through. For the board sign marks, go all the way through the conduit section. I used 2-½-in. drywall screws and made my drill holes slightly larger than that for the sign.
Step 10
After drilling, lay the conduit sections beside the rails and board again. Insert the threaded rods on the rails into the appropriate holes. Then attach the board, using a nut as a spacer between the board and conduit section.

Step 11
For a more finished look, attach cabinet knobs to the top of each conduit section. You can also add a bike chain under the address.
For the flower, punch a hole in the bottom center of a can. Use metal snips to cut slits about 3/8 in. wide, ending about 1 in. from the bottom, all around the can. Curve slits outward like flower petals. Drill a hole in the top center of a colored plastic cap (like that on a spray-paint can). Use recycled materials like colored wires and washers to decorate the top. Curl the end of the wires through the cap hole. Use a length of wire to attach the decorated plastic cap to the can bottom with cut petals. Then secure it to the sign.

Step 12
Coat the entire sign with spray sealer and let dry.
To secure the sign in the ground, hammer two 2-ft. lengths of wider conduit into the ground and slide the sign conduit sides down into them.
If you’re going to grow containers, you might as well grow containers. You know, go all out – make a statement – create a living piece of art! I’m not talking about those little baskets from the garden center filled with the standard petunias, geraniums, impatiens and pansies. Not that there’s anything wrong with those—my kids get me a lovely hanging basket of petunias every Mother’s Day. But if you’re going to invest in good soil, cool pots and unique plants, then you might as well be distinctive, daring and dramatic. In short, it’s time to go big or go home. We’ve got tips to make all your container garden ideas amazing!

Find the Right Base. To anchor everything, you need the right container. You’ll certainly have plenty to choose from. Just go to the garden center, and chances are you’ll find rows and rows of them in every size, shape and color imaginable. Before you even start looking at plants, find a container that inspires you. A short, stocky container would be just the thing for a small conifer. A bold turquoise container would be the perfect backdrop for various shades of pink. A big, tall container is a nice option for trailing plants.
A good pot or other planter can be expensive, but go ahead and splurge a little if you find one you really like. Chances are you’ll have it for years. Oh, and remember that containers are like shoes—they’re better when you buy them in pairs!
Celebrate Height. One of the easiest ways to make an impact with a container is tall plants. Cannas, purple millet and ornamental corn all have big, interesting leaves—and you can’t beat the wow factor of a cultivar that’s 4 to 6 feet tall. Another easy way to get height is with ornamental grasses. They not only grow several feet tall in a single season, they also give containers nice texture. You can find some colorful annuals (purple fountaingrass, for instance, is an annual in most zones), but don’t overlook perennials like switchgrass and zebragrass. Just because you’re growing in a container doesn’t mean you have to dump the plants out each year. Offer the perennials good protection in a weatherproof pot over the winter, and you’ll have a jump on next year.
Include Trailing Plants. Trailing plants are a must-have for hanging baskets, but they’re also a showstopper for other containers. Garden centers often have a whole section of trailing plants. Use blooms like trailing begonias, petunias and geraniums, or try foliage plants like sweet potato vine and licorice vine. You’ll probably want to stick to a single type of trailing plant per container, but it can be fun to mix in a couple of varieties within a single family. Plant a couple of sweet potato vines, a standard one and a variegated one. They’ll complement one another while offering some extra variety.
Choose Bold Colors. You don’t necessarily want to pair bright red flowers with a bright red container. But with a little bit of planning, you can use color to your advantage. It starts with your pot of choice. How colorful is it? If you love bright orange, yellow or blue pots, what’ll work well as accents? Another option is to choose a more subdued, neutral pot that maybe has an interesting shape or lines. Then use plants to make an impact. One advantage to this is that you can change the plants from one year to the next. If you have a brown or terra-cotta pot, you could have a red, white and blue theme one year and a yellow theme the next.
The More the Merrier. If you read the label on most cultivars, it’s going to say you should space plants 12 to 24 inches apart. But container gardening doesn’t abide by those rules. It’s better to throw a few extras into the mix, which results in a fuller, bigger, bolder container. Of course, you can go overboard, so use your discretion when planting. If it feels too crowded, it probably is. But if you have lots of soil space, fill it up.
Don’t Forget About Presentation. So you have your height and your trailing plants. You’ve chosen an inspiring container. And you’ve used color to your advantage. Now you just need to make sure that everything works together. Where will your container live? What do you have planted around it? If it’s in a solitary location, is it big enough to fill up the space? The planning and placement of your container are the deciding factors in its success. Give it an outstanding display, and all your hard work will be worthwhile.
Now that you know the basics, use these container garden ideas as inspiration.
Orange Surprise, by Ball Horticultural
Container Size: 14 inches, Exposure: Sun
- New Day™ Clear Orange gazania (2)
- Emerald Falls dichondra (2)
- Silver Falls™ dichondra
- Pony Tails Mexican feather grass
Container size: 14 inches
Exposure: sun
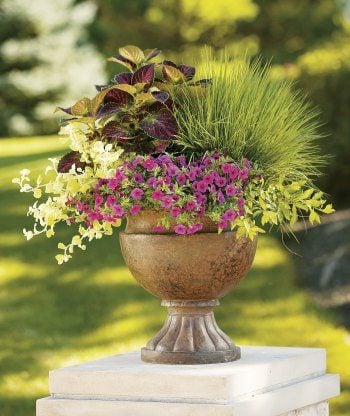
Party of Five, by Proven Winners
Container Size: 24 inches, Exposure: Sun
- Superbells® Pink calibrachoa
- Northern Lights tufted hairgrass
- Gold Mound duranta
- Lemon Licorice licorice plant
- ColorBlaze® Kingswood Torch coleus
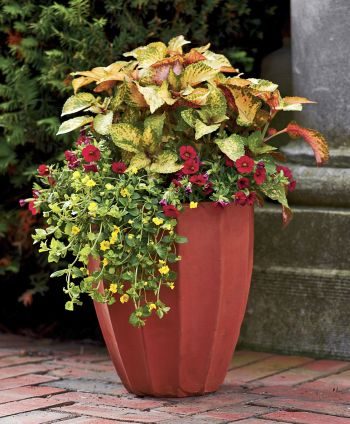
Bands of Gold, by Proven Winners
Container Size: 14 inches, Exposure: Sun
- Superbells® Red calibrachoa
- GoldDust™ mecardonia
- Amora coleus