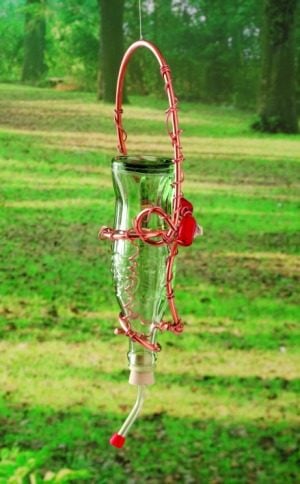
Forget buying expensive, decorative sugar-water feeders. Now you can make your own homemade hummingbird feeder for just a few bucks using a recycled bottle and copper accents, one that is a decorative addition to any backyard. You’ll be amazed at how fun and easy it is to make this one-of-a-kind craft idea. You’ll be attracting hummingbirds to this feeder before you know it!
Materials:
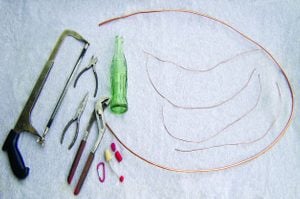 5 feet of 4-gauge untreated copper wire
- 3 to 5 feet of 12-gauge untreated copper wire
- Beads or other decorations
- D ring or carabiner
- Screw eye
- File
- Needle-nose pliers
- Wire cutter
- Hummingbird feeding tube – Find these at bird supply stores and online. If you can’t find a local supplier, try doing a web search for “hummingbird feeding tubes” to find a source.
- Glass Bottle (Note: Glass bottles larger than 375 ml are heavy and more prone to leakage. Thus, they are not recommended for this project. Above all, the bottle must provide a tight fit for the stopper portion of the feeding tube you buy. Anything less than an airtight fit will allow the nectar to drip from the feeding tube. Many soda and water bottles are a good fit for a commercial tube feeder assembly. Be sure to test the seal before you complete your design and add sugar water.)
Step-By-Step Instructions:
Step 1
File the ends of the copper wires so there are no sharp edges.
Take the 4-gauge wire and bend it at one of the ends to form a small circle. This should fit loosely over the opening of the bottle.
Insert the bottle in the circle, and make one more loop around the neck to hold it securely.
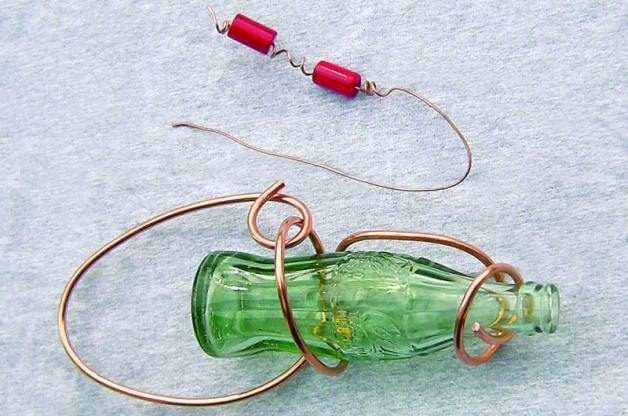
Step 2
With the neck of the bottle securely in the two loops, wind the rest of the wire around the bottle. This is where you have a little freedom to create your own design. The wire should be loose enough to easily remove the bottle for refilling the sugar water, but tight enough to hold the feeder securely.
Bend the last 18 inches or so of wire upward to make a hanging hook and then fashion a loop at the very end to secure it, as shown.
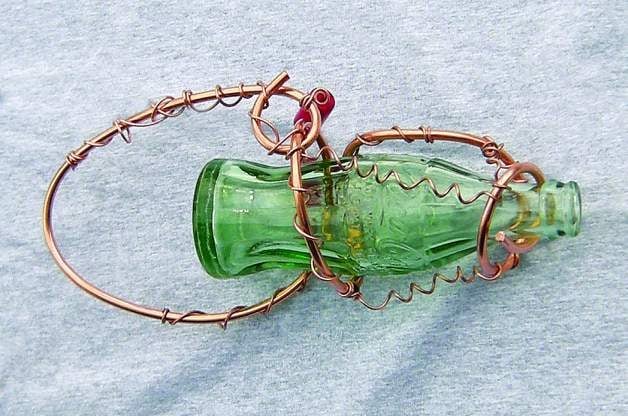
Step 3
Next, decorate your feeder using the 12-gauge copper wire. Use needle-nose pliers and wire cutters to shape the wire as needed. Here’s a design tip: To create the look of curling vines, wrap the wire around a pencil first and then attach it in pieces.
Use colorful beads or other adornments to complete your design. Remember, hummingbirds love red, so it’s a great accent color.
Step 4
Remove the bottle and fill it with sugar water. Then take your store-bought feeding tube and gently twist the stopper into place at the opening of the bottle. It should fit snugly to avoid leaking.
After you fill it with sugar water, place the bottle back into the copper holder. You might have to shake the bottle a little to dislodge any air bubbles. If it leaks, remove the feeding tube and try repositioning the stopper to get a more snug fit.
Ready to put your feeder to work? Make sure it hangs securely by hooking the feeder onto a snap ring or carabiner. Then put the ring through a screw eye and hang the entire feeder in the desired location.
Homemade Oriole Feeder
No need to break the budget when it comes to attracting orioles! This simple DIY oriole feeder was inspired by one designed by Daniel Medbury of Plymouth, Michigan. We’ve simplified it a bit so anyone can build it—even a child with some adult supervision. You may even have enough scrap lumber lying around to make one or two without spending a dime.
Materials:
- One scrap 2 x 4, at least 13 inches long
- One 1-inch x 8-inch board, about 12 inches long
- One 1/4-inch dowel, at least 18 inches long
- Four 2-1/2-inch galvanized finishing nails
- Four common nails
- Waterproof carpenter’s glue
- One screw eye for hanging the feeder
- Table saw
- Power drill
- Combination square
Step-By-Step Instructions:
Step 1
Cut a 2 x 4 board at least 13 inches long. Cut two 45° angles to form a centered peak on one end (this will become the top). Use a combination square or tri-square to help draw the cutting angles.
“Dog-ear” the corners at the bottom end by sawing about 3/4 inch off each corner at a 45° angle.
Drill two 1/4-inch holes. Center one hole 1-1/4 inches from bottom of the board and the other 6-1/2 inches from bottom. Make sure you drill the holes perpendicular to the 2 x 4. This will ensure that your perches will be straight.
Step 2
Cut two roof pieces from the 1-inch x 8-inch board. One section should measure approximately 6 inches x 7-1/4 inches and the other 5-1/4 inches x 7-1/4 inches. If you’d like, dog-ear the outside corners of the roof pieces by cutting off about 1 inch from each corner at a 45° angle.
Nail the roof pieces to the 2 x 4 peak with two common nails. The longer piece overlaps the shorter.
Step 3
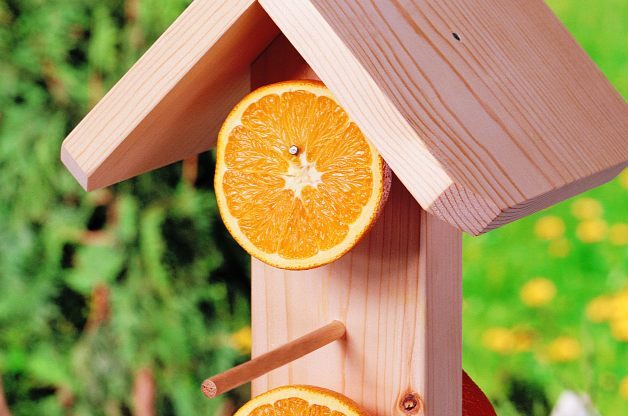
The oranges are held onto the feeder by spearing them onto 2-1/2-inch finishing nails. Center these nails on each side of the 2 x 4 about 3 inches above each perch hole. Drive the nails about 1 inch into the 2 x 4 at a downward angle so the oranges won’t slide off.
Step 4
Cut the 18-inch dowel in half for perches. Insert the dowels into the holes and center them. A little waterproof carpenter’s glue in the holes will hold the perches firmly in place.
Step 5
File or cut a flat spot in the center of the roof peak for a screw eye, which is used to hang the feeder. Drill a pilot hole first to prevent the wood from splitting.
A coat of deck stain is optional, but it’ll help protect the wood from weather. Be sure the stain is dry before using the feeder.
Psst—orioles also love to eat grape jelly.
DIY Orange Wreath Oriole Feeder
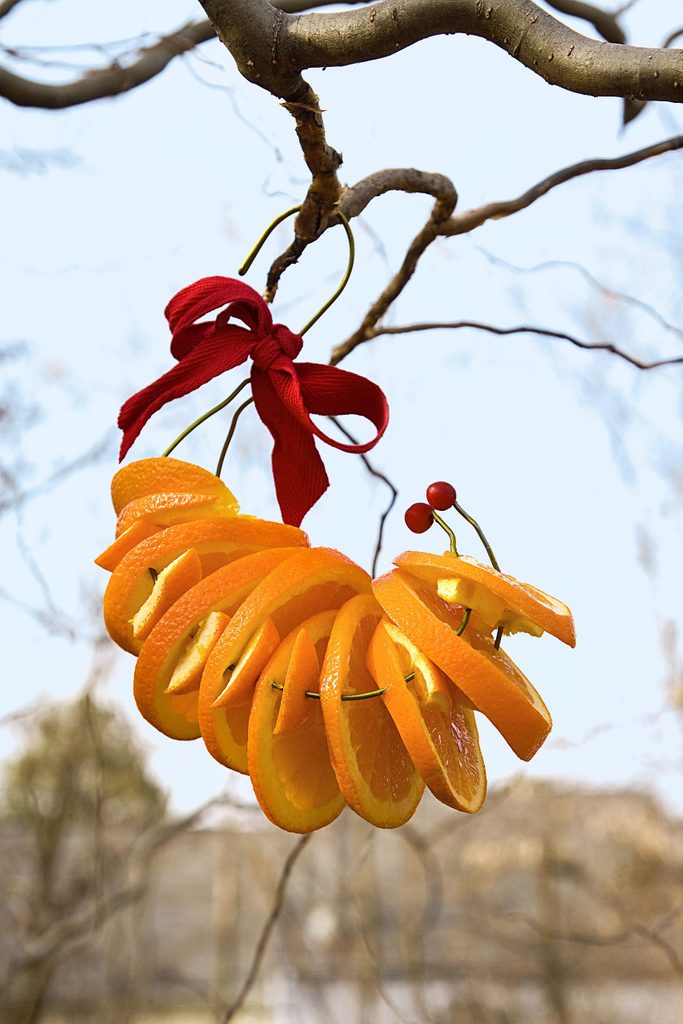
Orioles love fresh oranges and the color orange, making these wreaths perfect for feeding orioles. Hang one of these DIY orange wreath oriole feeders on or near a sturdy branch so an oriole has a perch from which to peck!
Materials:
- Coat hanger with a cardboard tube
- Needle-nose pliers (or strong hands)
- Wire cutters
- Oranges
- Cutting board
- Good slicing kitchen knife
- Ribbon and berries (optional)
Step-By-Step Instructions:
Step 1
Remove the cardboard tube from your hanger and bend the two sides of the hanger toward each other until they are spaced about 1 inch apart.
Shape the outline of a bird, as shown. I found that using my hands was the easiest way to start. Then I used needle-nose pliers to shape and smooth any rough curves. Use pliers or a wire cutter to snip the curled ends off the hanger.
Step 2
Cut oranges into about ¼-inch slices. Cut little pieces of rind from the orange ends into roughly ½-inch triangles. These will serve as spacers between the slices and will help keep everything in place. Thread an orange slice through both wires. Then thread a piece of rind next to it on one or both wires. Repeat until you run out of wire.
Tie a little bow and add some berries at the end if you wish. Hang from a tree close to a window so you can watch the feeding orioles!
Next, learn about the oriole species you should know.
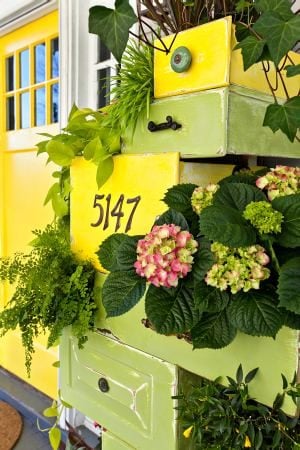
This fun planter project combines two of the hottest trends: recycled garden items and vertical gardening! I love drawers. Small ones, big ones, skinny ones, shallow ones—I’ll take them any way I can find them. So when I see a big old ugly dresser in an alley or a thrift store, all I can think about is what I’m going to do with the drawers. Like many gardeners, I’m always looking for new vertical garden ideas, so stacking these drawers seemed like the perfect way to go! Whether you put this display in your garden, or on a front porch as I’ve done here, it will add interest and color to your space.
Materials:
- Drawers
- Handles
- Wood scraps
- Screws and screwdriver
- Drill
- Sandpaper
- Exterior-grade paint and primer
- Plants
- Potting soil
- Finish nails, brads or staples (optional)
- Lawn-and-leaf bags (optional)
- House numbers (optional)
Step-By-Step Instructions:
Step 1
Stack the drawers so that you have a solid foundation and ample planting spaces. I used two matching drawers screwed together on the bottom to provide a wide, sturdy base. From there, I cantilevered all the boxes in opposite directions, using the center of the bottom boxes as my visual guide. This is attractive, plus balancing the drawers this way provides stability.
Step 2
Once you know how you’re going to arrange the drawers, make feet out of wood scraps and screw them onto the bottom drawer or drawers. For my feet, I used a salt-treated 4-by-4 cut into 3-in. lengths. If using two drawers for the bottom, screw those together first, then attach the feet, including a fifth one for support where the two base drawers meet. Adding feet ensures that water will drain freely away from the unit, preventing rot. Just make sure the feet are chunky enough to support the weight of the unit.
Step 3
Drill drainage holes in the bottoms of all the drawers. The size of the hole is not critical; a drill bit of about a quarter inch worked for me. You’ll need about 10 holes per drawer to get good drainage.
Step 4
Sand, prime and paint each drawer individually with exterior-grade coatings. You can paint the inside of the drawers as well, or you can shellac them to seal the wood to prevent decay. You can also leave the interiors unfinished and line them with plastic lawn-and-leaf bags if you prefer, but coating them in some way will definitely prolong their life.
Step 5
Now is a good time to attach any decorative handles, house numbers or other embellishments to the drawer faces. You also may want to experiment with the placement of the drawers at this point, or draw your planned design on paper first.
Step 6
Starting from the bottom, attach each drawer to the one below. I found the easiest way to do this was to cut a piece of scrap wood the width of the lower drawer to support the drawer that will go on top. Secure the support board to the inside of the lower drawer with screws. Rest the next drawer on top of this support board and the perimeter of the drawer below, and then secure it with screws, brads, pneumatic staples or finish nails—whatever is readily available and works for you. Repeat with all the drawers.
Step 7
To ensure that your drawer garden won’t pull apart as soon as you move it, cut at least two lengths of wood to the height of the finished unit (not including the legs); a 1- x 3-in. or 1- x 4-in. strip of wood is ideal. Screw these to the back of your unit, making sure to include each drawer. This provides rigid bracing and additional strength to the finished piece.
Step 8
Time to plant! You can put potted plants in your unit or take them out of the pots and plant directly in the drawers. I found a mixture of upright grasses, hanging vines and dramatic blooms to be a lovely combination.
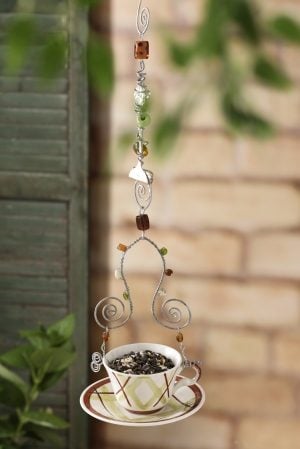
Re-purpose a mismatched or slightly damaged teacup and saucer by turning it into a bird feeder. You can easily customize this project with the beads or other accessories you choose. It can be as basic or as intricately detailed as you want! It’s practical, too. Watch the birds as they perch on the rim of the cup. As a bonus, the saucer catches most of the discarded seed shells.
Materials:
- Cup and saucer
- Spoon or fork
- 14- and 19-gauge galvanized wire
- Drill with tile drill bit
- Nut and bolt (depends on the size of drill bit you are using)
- Needle-nose pliers
- Beads (about ten 6-10 mm beads and four more beads with a larger hole)
- Hammer
- Safety goggles
Step-By-Step Instructions:
Step 1
Drill a hole on the side of the teacup opposite the handle. Use the tile drill bit, but drill slowly and apply minimal pressure to avoid cracking the cup. Next, drill a hole in the center of the cup bottom and center of the saucer.
Step 2
Cut two pieces, about 10 in. each, of 19-gauge wire. Fold each piece of wire in half to make a small loop. Hold the loop with the pliers and twist about five times to make a hook at the top. Leave about 4 in. of wire on each side.
Step 3
Insert one of the wire ends into the hole in the cup from the inside out. Make the loop tight so that it rests on the rim. Twist the ends together to close the loop. Coil the excess with the pliers.
With the second piece of wire, make another small loop, which will sit on top of the cup’s handle. Try to make it about the same height as the other one. Depending on the placement of the handle, you might need to make more twists. Once they’re close to the same height, wrap the excess wire around the handle.
Step 4
Take 16 in. of 14-gauge wire and fold it in half to make a V. Using the pliers, coil the ends into swirls, leaving the V about 4 in. on each side stemming from the center. Press the piece by laying the wire on an anvil or hard surface and flatten with a hammer. This will prevent the wire from uncoiling. Add beads to the V by wrapping 19-gauge wire around it, adding a bead every three to five wraps.
Step 5
For the attachment pieces, use three pieces of 19-gauge wire and two beads. Thread one bead and bend two eyehooks on each end. Repeat for the other two wires. Attach one end of each attachment piece to the swirls of the V. Attach the other ends to the hooks at the top of the cup.
Step 6
Attach the saucer to the cup using the nut and bolt. Gently tighten, being careful not to crack the cup or saucer.
Step 7
Flatten the bowl of the spoon using a hammer. To roll the spoon to use it as a hook, gently tap the tip of the bowl. It will start folding or rolling, depending on the material the spoon is made of.
Step 8
Cut a 38-in. length of 14-gauge wire and make a swirl at one end. Press the swirl with a hammer so it doesn’t uncurl. Insert the opposite end of the wire into the fold of the spoon. Wrap the wire around the spoon a few times and add beads. When you get to the top of the spoon, there should be about 4 to 8 in. of wire left. At the end, make a hook with the pliers. Start by making a small loop, and then make a U at the end. Press this hook.
Step 9
Connect the spoon hanger to the rest of the feeder using the attachment bead. Now you’re ready to hang it and add some birdseed!
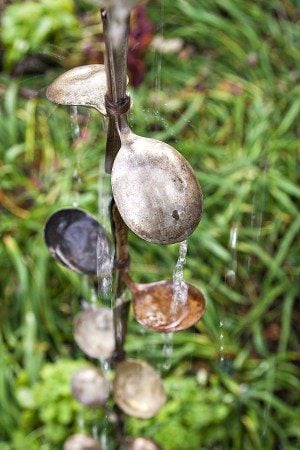
Rain chains are a beautiful way to harness the power of water. The concept is simple: Surface tension and gravity guide the water down a chain. DIY rain chains are great recycled crafts to make on a budget. I decided to make a chain out of salvaged spoons. If you’re looking for spoons at the thrift store, be sure to select thinner ones so they’ll be easy to bend and drill, and choose a wire that is rustproof and easy to manipulate.
Materials:
- DIY Rain Chain Materials
- Spoons
- Wire
- Drill
- Sharp drill bit
- Needle-nose pliers
- Bench vise or clamp and pliers
Step-By-Step Instructions:
Step 1
Decide how long you want the rain chain to be. Using a bench vise, bend enough spoons to complete the project. If you don’t have a vise, use a hand clamp to secure the flat part of the spoon against a table with the rest of it hanging over. Use pliers to bend the spoon down.
Step 2
Remove the bowls from a dozen or so spoons. Use the same method as in Step 1, only bend each spoon back and forth until the bowl snaps off.
Step 3
Drill holes in the end of each spoon handle, including the handles without bowls.
Step 4
Put two spoons together back to back so the bowls are facing outward. Fit a bowl-less handle between the handles of the two spoons, leaving several inches extended past the spoons. The protruding end of the handle should have the hole in it. Wrap wire around all three handles just above the bowls. Then wire together the handles of the spoons at the other end as tightly as you can. Be sure to leave some extra wire for attaching the next segment. Repeat this step until you’ve used all your spoons.
Step 5
Once all the segments are assembled, attach them to each other by twisting together the extra wire you left at both ends. Make sure to leave enough wire on one end of your chain for hanging.
Step 6
Hang the rain chain from a tree limb above a rain garden, or use it in place of a downspout above a splash block to direct water away from the house. You can also use a decorative glazed pot or rain barrel below the chain to collect water for use in the garden.
This porch swing bird feeder style has become very popular recently, with both humans and birds! This unique take on a platform feeder brings in cardinals, titmice, woodpeckers, and more. Can’t find one for sale near you? Build your own with our DIY bird feeder plans.
Start with this shopping list, then click the link below for the complete instructions in a printable format. We chose to use poplar, a wood commonly used for crafts, since this wood comes in the 1/4-inch and 1/2-inch thicknesses used in this project. That way, there’s no need to resaw the boards for thickness. You’ll find it with the craft woods at home improvement stores.
Materials:
- One 1/4-inch x 6-inch x 36-inch poplar board
- One 1/2-inch x 6-inch x 36-inch poplar board
- 4 feet of light-duty chain
- 6-inch x 12-inch window screen
- Four screw eyes
- Two S-hooks
- 1/4-inch staples
- 5/8-inch, 7/8-inch and 1-1/4-inch brads
- Table saw
- Power drill
- Pull saw or backsaw
- Small square
- 7-ounce hammer
- Small nail set
- Stapler
- Pliers
Step-By-Step Instructions:
Step 1
Ready to build? Click here to open the DIY bird feeder instructions in PDF format, perfect for printing and taking with you to the workshop!
Recycle mismatched plates, bowls or candleholders into beautiful glass garden flowers. These show-stopper garden decorations are sure to be one-of-a-kind and won’t require any watering!
Materials:
- 3 glass plates, bowls or dishes in three different sizes
- glass candleholder, salt or pepper shaker, or small vase
- 1 small vase that is flat on one side
- Alcohol wipes
- Paint specifically for glass
- Paintbrushes or sponges
- Markers or pens for glass
- Clear, waterproof silicone
- Copper, metal or PVC pipe
Step-By-Step Instructions:
Step 1
Clean the glass pieces thoroughly with alcohol wipes and let them dry. Use either a sponge or paintbrush to paint the glass pieces, covering completely. If you want, add details like stripes, circles or petals. A couple of layers might be necessary to get full coverage. Use the markers or pens to add small details.
Step 2
Bake the glass pieces according to baking directions on the paint bottles. (In general, bake at 325 degrees on the top rack for about 20 minutes.) But be careful: Very thin plates can break in the oven. And be sure to open your windows or turn on the exhaust fan, because the paints can have a strong odor when baking. Turn off the oven, and let the glass pieces cool completely before removing them.
Step 3
Lay the largest plate flat on a covered surface. Apply silicone to the bottom of the next largest piece and press it down onto your base plate. Continue applying silicone to the bottom of each of the smaller pieces until the flower is assembled. Let the whole piece dry overnight.
Step 4
The next day, apply silicone to the smallest vase and, holding the vase upside down, press it to the back of the flower. This will serve as the mount that fits over the pipe for display purposes. Let it dry overnight.
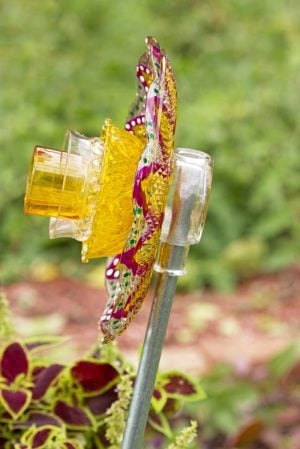
Step 5
Pound the pipe into the ground, slip the flower over the pipe and enjoy. Now make a few more—they look great in groups of two or three.

Finding plant markers that can withstand our punishing Ontario winters and survive the harsh summer sun has been a challenge. And I wanted them to be attractive, easy to make and reusable year after year. Is that too much for a gardener to ask? I hope not, because they also had to be inexpensive…I needed lots of them! Luckily, I stumbled onto these easy DIY plant markers using copper sheet metal and wire to make my own plant markers. In just a few evenings, I made a pile of these copper plant markers. The best part… they’re sure to last. All except for the ones I accidentally ran over last summer with the lawn mower!
Materials:
- 36-gauge copper sheets
- 12-gauge wire
- Paint marker, extra fine, black
- Colored paint marker (optional)
- Transparent tape
- Clear enamel spray
- Scissors
- Side cutting pliers
- Small rubber or plastic roller (optional)
- Soldering gun or mini torch (larger torches are not recommended for this small project)
- Solder and flux
- Incombustible soldering surface
- Fine sandpaper, 220-grit
- Fine steel wool
Step-By-Step Instructions:
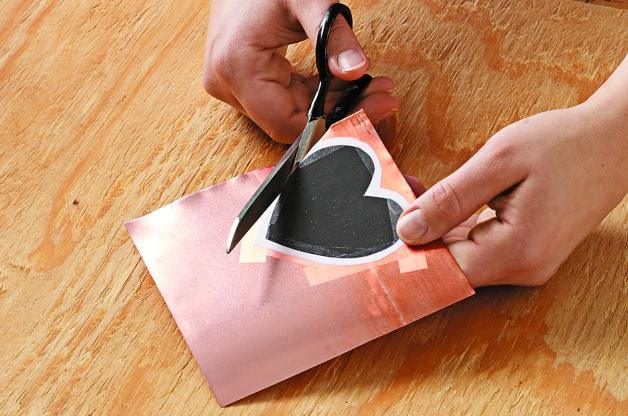
Step 1
Make your own paper shapes and cut about 1/8 inch from the edges. Tape them to the copper sheet metal. Cut the copper along the outline of each shape using a scissors. Sand sharp edges. Punch any holes desired with a paper punch. Flatten each shape with a roller, rolling pin or even a glass bottle on a smooth surface.
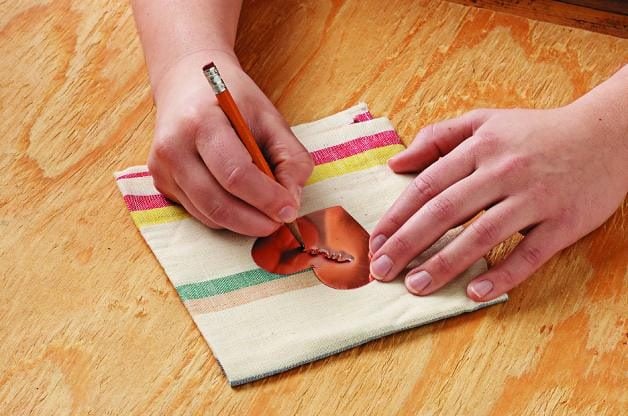
Step 2
Place the copper shapes on a soft pad (such as a dish towel) and write plant names with a blunt pencil. Use a black paint marker to write within the indents, making the names more prominent. Decorate the edges if desired.
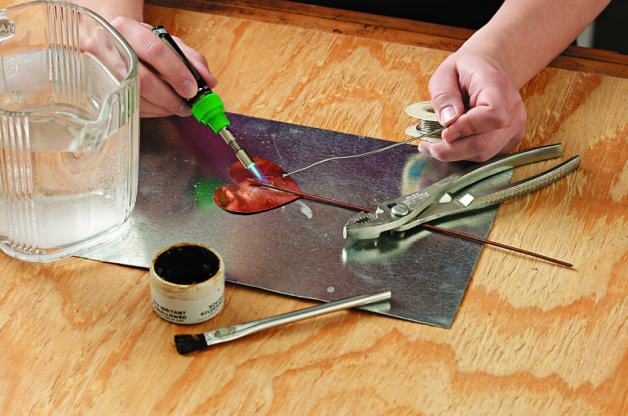
Step 3
Clean shapes and wires with steel wool or sandpaper before soldering.
Cut wire with side cutting pliers to desired length (mine are about 10 inches). Solder wire to the back of each marker. Apply flux first and heat until it bubbles. Then touch the solder to the side of the wire until it flows. Solder on both sides of the wire, holding the wire in place until it cools.
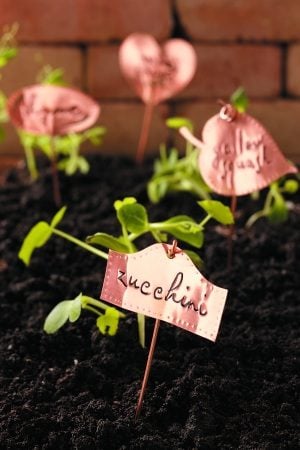
Step 4
Spray the markers with clear enamel to prevent tarnishing. Now you’re ready to add them to your garden!
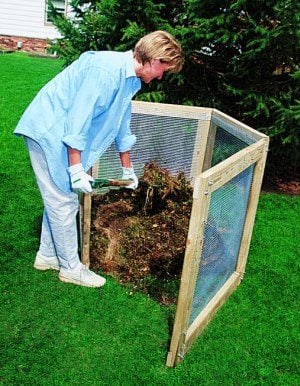
If your yard needs an extreme makeover, improve the soil first. This sounds tough, but compost makes it easy. It’s the ultimate soil amendment – experienced gardeners call it “black gold.” And you can make it for free! All it takes is a blend of yard and kitchen waste.
Unlike sprawling compost piles, this bin keeps the contents neatly contained. Air can circulate freely, which is essential for breaking down the ingredients, and the bin opens on any side, so it’s super-easy to turn the pile. Once you learn how to compost, you’ll be sorry you didn’t start doing it sooner!
Materials:
- Eight pressure-treated 6-foot 2×4’s
- Thirty-two 5/16-inch x 2-inch carriage bolts, nuts and washers.
- Four 3-inch door hinges
- Four large hook-and-eye assemblies
- 12-foot x 36-inch hardware cloth, 1/2-inch squares
- Poultry wire staples
- Waterproof construction adhesive
- Table or circular saw
- Rafter square
- Power drill
- Chisel
- Rasp
- Tin snips
- Pliers
- Heavy-duty work gloves
Step-By-Step Instructions:
Step 1
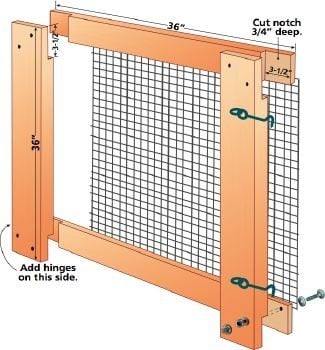
Cut each 2×4 in half to make 16 3-foot pieces. Cut a 3-1/2-inch x 3/4-inch deep notch (a rabbet) in both ends of each piece. You can do this on a table saw or with a circular saw. Make several close cuts (about 1/8 inch apart) across the grain in the notched section. Use a hammer and chisel to break out the wood between these cuts. Smooth with a rasp.
Step 2
Fit notched ends together to make four 3-foot-square frames. Drill holes for two carriage bolts in the opposite corners of each notch. Use construction adhesive in each joint before assembling. The nuts should face the outside so the bolts won’t catch on your clothes when you’re turning the pile.
Step 3
Use tin snips to cut the hardware cloth into four 3-foot-square sections. Tack each corner of the hardware cloth to the frame with poultry wire staples. Then staple around the frame every 2 inches.
Step 4
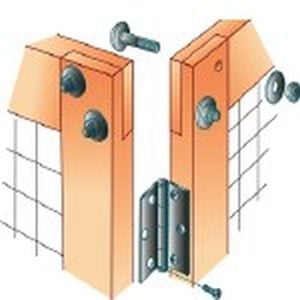
Connect two frames with two door hinges, then put two hook-and-eye gate latches on the other ends. Repeat this step for the remaining two frames. Stand the frames to form a square and latch the sections together.
Step 5
Put your bin in a level, well-drained area in full sun, with good air-circulation. Add equal parts brown and green wastes.
To aerate the pile, mix or toss frequently with a garden fork, or poke air holes into it with a broom handle. Keep the pile moist, like a sponge, but not soaking wet.
The process is finished when the bottom of the pile has dark, rich soil that crumbles in your hand.