
Recycle some silverware and a plate into a fun and functional homemade bird feeder. Keep your feeder simple, or personalize it by adding extra swirls, beads or any other decorations that strike your fancy.
Materials:
- Plate
- 3 butter knives, table knives or other dull-bladed knives
- Wire
- Beads
- Drill with masonry bit
Step-By-Step Instructions:
Step 1
Drill 3 holes, evenly spaced in a triangle, in the plate. Be careful not to crack the plate.
Step 2
Make eyehooks for the holes. Using about 6 in. of 16-gauge wire (a coat hanger also works), make a loop at 1 end of the wire, put the wire through one hole and make another loop to hold in place. Repeat for the other holes.
Step 3
Make a swirl on one end of a piece of 14-gauge wire, about 30 in. long. Working from the same end, wrap wire around the knife, starting at the tip and placing a colorful bead every couple of twists until you reach the end of the handle. Repeat with more wire and the 2 other knives.

Step 4
Using more 14-gauge wire, connect the knives to the plate. Then bring them together and connect at the top, and your feeder is ready to hang!
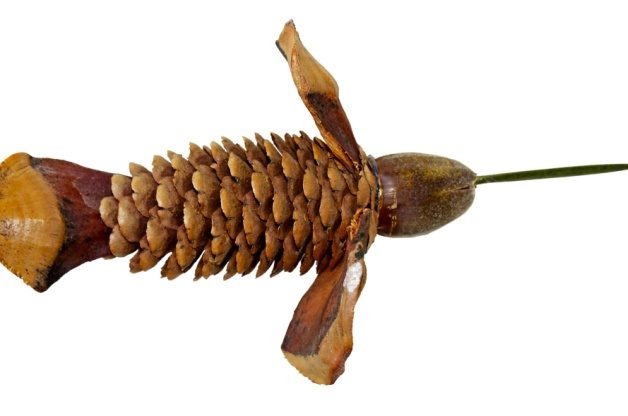
If you’re looking for crafts projects perfect for adults or kids, try this pinecone hummingbird craft. They’re perfect for hanging on the Christmas tree, or make a collection and hang them up year-round.
Materials:
- Acorns
- Pinecones (variety of sizes)
- Long thorns
- Clippers, knife
- Hot glue gun and glue sticks
- Outdoor craft paint
- Small paintbrushes
- Red glitter
- Thread
Step-By-Step Instructions:
Step 1
Begin to assemble the head by removing the acorn cap. Use some clippers to trim a slice of the acorn from the top to get a flat surface to join the pinecone body.
Step 2
For the bill, clip off a thorn near its base. You might want to slightly dull the end of your thorn by rubbing it with a piece of sandpaper.
Trim off the tiny pointed tip of the acorn. Then carefully use a knife to make a small cut in the tip of your acorn. Put a bead of hot glue on the thorn you just cut and insert it into the cut to form the bill.
Hot glue the acorn head to the cone body (I used a spruce cone here), trimming if necessary. Allow to cool.
Step 3
Using scales from larger pinecones, cut to a wing shape. Insert the wings between the scales of the cone body just behind the neck. Tuck a smaller scale into the end of the cone for a tail. Secure both the wings and tail with hot glue.
Step 4
Paint, covering both sides of the cone scales. Allow one paint color to dry before laying on another. I used a green with a white underside for the bodies and top of the head. Then I used a ruby-colored paint for the throat and black for the bill. If you like, you can dust the throat with a bit of red glitter while the paint is still a little wet.
Step 5
With a detail paintbrush, add eyes and other small accents. Finally, when the bird is dry, tie a length of invisible sewing thread around the neck. Hang as if it’s in flight.
What do you get when you combine the analytical brain of an engineer, the organizational tactics of an efficiency expert and the passion of a vegetable gardener? A little something called square-foot gardening, that’s what! A cutting-edge way to plan and plant, it makes the most of your space and cuts down on work. Sounds like a busy gardener’s dream. Developed by Mel Bartholomew after years of work in community gardens, the method is simple and versatile, making it the perfect choice for beginners and experts alike.
Square-Foot Gardening 101
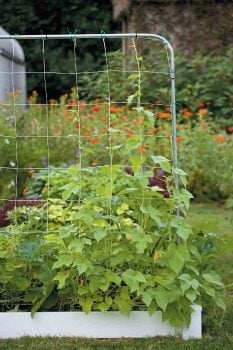
In its most basic form, a square-foot garden is a 4-foot-by-4-foot raised bed garden divided into 16 squares, with each square measuring 12 by 12 inches. You plant a specific crop within each of the 12-inch squares, rather than in rows.
Small-growing crops, such as lettuce or peppers, occupy a single square or two, while larger crops, like tomatoes and corn, can take up multiple squares. Trellises at the end of a bed support vining crops.
Beds can be made any length, but should be kept to no more than 4 feet wide. This allows easier access to the garden. Most people can reach halfway across the bed from either side for easy planting, weeding and harvesting.
If you plan to use multiple beds, it’s a good idea to make sure you leave paths between each so you can have access from either side. These paths, and the limited width of each bed, make it unnecessary to step into the beds-thus avoiding two dreaded words no gardener worth his or her green thumb wants to hear: soil compaction.
Let’s Begin With the Basics
Planning is a very important part of this system. A well-executed plan can result in a beautiful and productive garden that minimizes time spent on maintenance. Here are a few basics to keep in mind before you break ground.

LOCATION
If you’re just getting started, place your garden where it’ll get at least eight hours of sunlight. If it receives more than eight hours, even better.
SIZE
Decide how big you want your garden to be. At this point, a little reality check is beneficial. Are you growing just for your own consumption or are you planning on doing some freezing or canning? If you don’t know just yet, start with no more than one 4-foot-by-4-foot bed for each family member.
CONSTRUCTION
Build your own raised beds or buy a kit and assemble it. Raised beds put to rest any pre-existing soil issues because it’s a cinch to just fill them with a well-draining, premixed growing medium. In addition, raised beds require less bending when weeding or harvesting. The height can vary depending on the crops you plant. It can be as low as 3 inches for a salad garden, although a height of 8 to 12 inches is most common.
For material, naturally long-lasting woods, such as cedar or redwood, are fine choices. Other options include plastic lumber, vinyl and pressure-treated wood. The last bit of construction is to create the grid that divides the beds into 12-inch squares.
CROPS
Here comes the fun part: deciding which vegetables you’d like to grow! First, create a map that details what crop, including how many plants or seeds, you plan to put in each square. Next, devise a planting timeline based on your area’s average last spring and first fall frost dates. If planting seeds, take into account the “days to maturity” date on back of the seed packet.
SPACING
To determine how much room your plants need, consider the recommended space between each plant after thinning. You may even want to consider interplanting, which means incorporating fast-growing vegetables (such as radishes and leaf lettuces) among slow-growing varieties, which don’t need all of their allocated space right away. But by the time they do need the space, the quick-growing crop will be harvested and out of the way, providing more elbow room for the remaining plants.
PLANTING
Here’s a key item to remember: Sow seeds one at a time. The extra effort in single-sowing even the tiniest seeds pays big dividends later because there’s no need to thin seedlings.
CARE AND MAINTENANCE
Compared to traditional methods, square-foot gardening uses a smaller area. This results in less area for weeds to grow and more efficient watering. Use soaker hoses, or hand water with a wand. Ideally, walk by your garden each day to pull any weeds and keep an eye out for pests. If that’s not possible, be sure to spend time at least once a week in the garden.
HARVESTING AND REPLANTING
Harvest crops as needed or when mature. Once a square is empty, use hand tools to work in a little compost or a pinch of fertilizer before replanting the same crop or trying a new one altogether.
Dark shadows don’t mean your gardening days are doomed. Numerous options abound for creating eye-catching shade gardens. These easy shade solutions will help turn your shady yard into the colorful retreat you’ve always wanted.
- Determine the various degrees of shade in your yard. How much sunlight areas receive—and when they receive it—dictates what kind of plants will thrive there.
- Dew dries faster in areas that receive morning sunlight, so use plants there that require moderate or drier conditions.
- Poor soil often hampers shade gardens more than lack of sunlight, so liberally add organic matter in spring, fall or whenever preparing a new garden. Be careful not to disturb tree roots.
- Moss is a pretty, low-maintenance winner for shade gardening.
- Under deciduous trees, plant bulbs that will bloom before shady canopies develop. Smaller bulbs that naturalize—or spread on their own—work best, such as crocuses, daffodils, grape hyacinths and winter aconite.
- Help conserve moisture and add nutrients and organic matter by mulching with shredded leaves, evergreen needles and other organic materials.
- When you lay out new flower beds, take heed of the shadows thrown off by nearby buildings, shrubs and trees.
- Be careful when planting; errant digging easily damages tree roots.
- Make foliage a mainstay. Allow different colors and textures to complement each other, like broad, paddle-like caladium leaves against frillier fern fronds.
- Use shade-loving shrubs to anchor beds, add height and structure, and provide a dark backdrop off which bright blooms visually pop. Good choices include azalea, camellia, dogwood, hydrangea and rhododendron.

Azaleas are perfect plants to brighten up shady areas. - Sunlight intensity varies depending on how far north or south you live. Consequently, plants that require full sun in northern climates may need partial shade farther south.
- Container gardens add spot color and dimension to shade gardens and thrive because plants don’t compete with tree roots.
- Locate dense conifers on the northern side of your property to avoid creating excessive shade.
- If you’re trying to create shade, plant trees with small leaves and open, layered canopies. Mountain ash, birch, Japanese maple, honey locust, Asian dogwood and hawthorn will produce dappled, eye-pleasing degrees of shade.
- Do not bury tree roots with soil when adding shade plants beneath their canopy. As little as 1 inch of soil can kill some species of trees.
- Cyclamen grows well in shallow soil among tree roots.
- Water infrequently—only as needed, if possible—and thoroughly and deeply when you do.
- Pick plants that match your soil’s pH, rather than trying to change the soil.
- Shade plants that thrive in acidic soil include cinnamon fern, clethra, lily of the valley, rhododendron and tiarella.
- Shade plants that will grow and prosper in neutral soil include jack-in-the-pulpit, Kentucky lady’s slipper, trillium, Virginia bluebells, white baneberry and wild ginger.
- In areas where plants or grass won’t grow, create a mulch pathway to add visual interest, cover bare spots and enrich the soil.
- Early-blooming shade plants include bleeding heart, Japanese primrose, rue anemone, shooting stars, trillium and violets.
- Late-blooming shade plants include bear’s breeches, monkshood, toad lilies, willow gentian and yellow wax bells.
- Perennial ferns and sedges are fine choices for shade areas.
- It’s possible to replace dense shade with dappled light through judicious tree pruning. Don’t prune more than one-third of a tree’s branches in 1 year, and focus on smaller branches.
- Intermix shade plants as artistically as you would in a sunny spot. Position taller growers like astilbe in back, shorter ones like foam flower and hosta in front, and low-growing ground covers to fill in your display.
- Shade doesn’t mean your color choices are limited. Experiment with different plants and color schemes. A few to try are the white wands of astilbe flowers along brunnera’s sprays of little blue flowers, or bugleweed’s sapphire-blue spikes next to a light-hued rhododendron.
- Another great way to liven up a shady spot is to pick plants with varying textures. Combine the fine leaves of ferns against bold hostas. Or mix leafy bergenia with spiky ornamental grasses such as hokone grass. Even in complete shade, you’ll still have visual appeal.
- For a low-maintenance, attractive shady spot, try ground covers. Plant seedlings in staggered rows rather than straight lines. They’ll expand, fill the area and form a nice carpet.
- Want flower color in late summer or early fall? Several plants are adapted to this. Rhododendron blooms from midsummer to late summer with an array of color. Toad lily produces adorable violet-dabbed flowers.
- Don’t overpamper your shade garden in fall. If you allow the leaves to break down, they’ll contribute valuavle humus to the soil. Only if they’re smothering your plants should you rake them out.
- Consider how changing seasons affect sun and shade conditions in your yard. Even a yard filled with shade trees can support bright, spring-flowering bulbs, as long as they emerge before trees leaf out fully. Pick up hints from previous seasons. If sun lovers like marigolds died where astilbe thrived, you’ve likely found a hot spot for a shade garden.
- Resist the temptation to give shade plants a nudge by overwatering or overfertilizing them. Shade slows plant growth, so your plants in low light need less water and energy, not more. Mulching will also keep your workload light. It retains soil moisture and minimizes weeds.
Shade gardens are the perfect opportunity to try new perennials in your garden. These twelve plants will thrive in your shady areas. Many plants have multiple cultivars, which can make it difficult to choose one variety from another. Diane Gustus of Bloomington, Minnesota has made it easier. She takes notes on all of the plants in her garden to keep track of which cultivars do better than others.
Diane shares her “Perfect Perennials” list with Birds & Blooms readers. Please note that Diane lists plants by their botanical name, followed by the specific cultivar. This should make it easier for you to find a specific plant.
12 Perennials for Shady Areas
- Adiantum pedatum. Plant ‘Maidenhair Fern.’
- Astilbe. Try these cultivars: ‘Visions,’ ‘Rheinland,’ ‘Bridal Veil,’ ‘Deutschland’ and ‘Ostrich Plume.’
- Brunnera. ‘Jack Frost’ is especially pretty with variegated foliage.
- Chelone. Plant ‘Hot Lips’ because the foliage looks great all summer, and it’s a nice late bloomer.
- Cordylis lutea. This plant blooms all summer and has pretty foliage.
- Dicentra eximia. The ‘King of Hearts’ cultivar blooms all summer.
- Dicentra spectablis. This is a bleeding heart plant with white blooms.
- Hosta. Try some of my favorites, including ‘Francee,’ ‘Sun Power,’ ‘Gold Standard,’ ‘Stiletto’ and ‘Krossa Regal.’
- Polemonium. ‘Stairway to Heaven’ has beautifully variegated foliage.
- Polygonatum variegata. Try ‘Solomon’s Seal’ if you want striking foliage. It’s especially good under trees.
- Pulmonaria. Plant ‘Sissinghurst White’ because it’s a nice early bloomer.
- Trollius. ‘Lemon Queen’ has pretty buttercup-like yellow flowers.
Shade—you either love it or hate it.
Gardeners often fall into the latter category because low-light conditions prevent the development of lush lawns, leaving shady areas looking bare, or worse yet, weedy.
That doesn’t mean you should write off shady sections of your yard as no-grow zones, however. There are plenty of perennial ground covers that can be used in place of standard grass. These ground covers will naturally spread over time to create a lush carpet under trees, between buildings or in other places that don’t see much sunlight.
Study the Shadows
Before you grab any garden tools, it’s important to consider exactly what kind of shade you have. Survey the area at various times of day to gauge how much light it receives…and keep in mind that the amount of shade can vary from one season to the next due to the changing position of the sun and the density of the tree canopy.
So, what did you see? If sunlight is only partially blocked by open structures or trees with small leaves, like birch or honey locust, chances are good the shade is dappled or filtered. This means that plants will receive a mixture of bright light and shade throughout the day, a situation that is suitable for many flowers and ground covers.
Or perhaps the area gets 4 to 6 hours of light per day, and the rest of the time it’s in shade. This is considered partial shade and often occurs on the east or west sides of a house, or on the edge of a stand of trees. A wide variety of plants will grow in these conditions.
Spots that receive no direct sunlight, such as ground directly underneath Norway maples, oaks, spruces, pines and other trees with dense canopies, are in full shade, and only plants that tolerate low-light conditions will thrive there. Once you’ve determined what kind of light conditions you have, you’re ready for the next step—preparing the site prior to planting.
“Even at this point, I caution gardeners to go slow, especially if they’re trying to fill in bare spots under trees where grass won’t thrive,” says Birds & Blooms garden expert and contributing editor Melinda Myers.
“The feeder roots for most trees are in the top 12 inches of soil directly under the tree, and if you dig too deeply when removing grass or installing ground covers, you can damage these roots. The goal here is to create an attractive cover for a barren area, but not at the expense of the trees.”
Easy Does It
Melinda suggests removing the grass beneath trees in one of two ways. Cover the shady area with several layers of newspaper, grass clippings, wood chips or other organic mulch to eliminate what is growing there, or use an all-vegetation-killing chemical.
The second method produces immediate results, but be sure to read and follow all label directions carefully to avoid damaging nearby plants. It will also tell you how long to wait before planting again, which is generally 4 to 14 days. The first method of grass removal is preferable because it is chemical free, though it does require patience. It typically takes about a year to complete, but it enriches the soil and won’t harm future plantings.
After the grass is gone, it’s time to consider what ground cover is most suitable for your climate and soil. If you live in the Southwest, where the weather is hot and dry for long periods, bearberry and lady’s mantle are good choices because they don’t require much water, and they thrive in heat.
Pachysandra and lamium can handle colder Midwestern and New England winters and are easy to control. Traditional lily-of-the-valley and periwinkle also thrive well in these regions, but they need to be contained or they can quickly spread and become invasive.
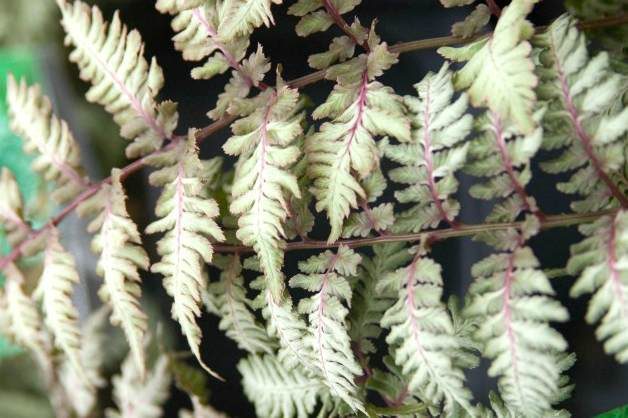
Florida violets and Japanese painted fern prefer lots of shade, moisture and heat, making them ideal for humid climates…and that’s just the tip of the iceberg. There are plenty more to choose from. Many of these ground covers do more than green things up in the shade—they also produce flowers that will add delightful dashes of color where you least expect them.
Time to Sow
Planting is pretty simple. The only thing to keep in mind is to avoid disturbing tree roots, which you can do by digging slightly wider and shallow holes rather than tilling up the entire planting area. After gently tamping the plants in place, apply a generous layer of mulch and water thoroughly—then keep an eye on things.
“Although much of the work is now done, the first few years are critical,” Melinda says. “Your ground cover will thrive if you put in a little extra effort in the beginning. People often don’t realize that areas under trees, particularly those with heavy canopies, are actually dry and require regular watering. Those thick layers of leaves shed rain pretty well. Even a lengthy downpour might not penetrate the soil enough to make a difference.”
And just like any newly planted garden, it’s important to stay on top of weeding. Removing unwelcome plants reduces competition for water and nutrients and gives the ground covers the opportunity to become established.
But it won’t be long before that once-barren area under the maple or next to the house is lush and green. And that’s when you know you’ve got it made in the shade!
10 Plants That Make the Most of Shade
Here’s a quick list of ground covers that will add pizzazz to shady spots. To make sure these plants aren’t considered invasive in your area, check with your local county Extension service. And while you’re at it, ask what they recommend for shade ground covers that perform well in your area.
- Bugleweed (Ajuga)—This beauty features masses of green, bronze or variegated foliage. Spires of blue flowers appear in late spring to early summer. Bugleweed may invade lawns, making it more suitable for areas surrounded by stones or other barriers. Zones 3 to 9.
- Bearberry (Arctostaphylos)—Rocky and sandy soils are perfect for this hardy, low-growing evergreen, making it good for drought-tolerant gardens. The plant also produces white or pink flowers in spring and red berries in fall. Zones 2 to 8.
- Ginger (Asarum)—Both evergreen and deciduous varieties are available. It will tolerate extremely low-light conditions and do well in the dense shade at the base of an evergreen. Zones 4 to 9.
- Japanese painted fern (Athyrium niponicum)—This low-maintenance plant was named Perennial Plant of the Year in 2004. It flourishes in moist, humid areas, and the texture and color of its fronds make it a great ground cover for any shade garden. Zones 3 to 8.
- Lady’s mantle (Alchemilla)—Soft-green leaves form a nice mat and spread steadily. Chartreuse flowers appear in late summer or fall. Zones 3 to 8.
- Lamium (Lamium maculatum)—Good in dry shade, the variegated leaves add a bright note from spring to fall. Pretty white or mauve flowers show up in May or June. Zones 4 to 8.
- Pachysandra (Pachysandra terminalis)—This well-known shade lover offers glossy evergreen foliage with white flowers in spring. Zones 4 to 8.
- Partridgeberry (Mitchella repens)—This evergreen features fragrant white flowers and red berries, prefers acidic soil and can handle moist to dry conditions. Zones 4 to 8.
- Sweet woodruff (Galium odoratum)—Despite its delicate appearance, this plant is tough and well suited to wooded areas. Its white spring blooms last for several weeks, and even its leaves have a pleasant scent. Zones 4 to 8.
- Winter creeper (Euonymus fortunei)—Trailing types of this mounding evergreen make great ground covers for shade. Winter creeper spreads easily, forming roots wherever its stems touch the ground. Zones 4 to 9.
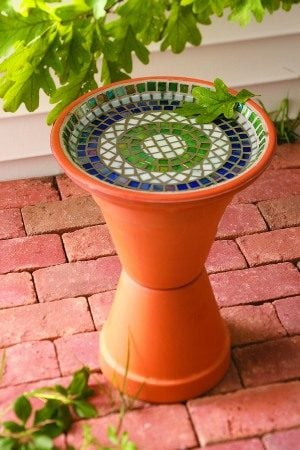
This mosaic bird bath might look difficult or expensive, but you’ll be surprised as how easy and low-cost it really is. Once you have some of the basic supplies, you can make several of these DIY bird baths in no time at all, and you’ll love the great job they do attracting birds. Put out several of different designs in your yard, or give them as gifts to bird-loving friends!
Maintenance Tips
- Clean your bird bath by scrubbing it with a brush or sponge and water. For stubborn algae stains, use a capful of bleach and then rinse thoroughly.
- Bring bird bath inside for the winter or the terra cotta will chip and crack in freezing temperatures.
- Apply grout sealer once every year or two to extend the life and beauty of the bird bath.
Materials:
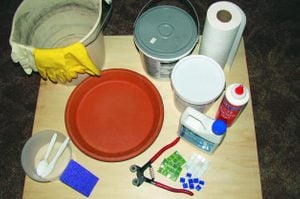 12-inch terra cotta saucer
- Terra cotta sealer
- Approximately 300 3/8-inch glass tiles of your choice
- Water-resistant tile adhesive
- Sanded grout in your choice of color
- Outdoor penetrating grout sealer
- Foam paintbrush
- Paper towels
- Tile cutters
- Plastic knife
- Rubber gloves
- Several soft cloths
- Sponge
- Safety glasses
- Dust mask
Step-By-Step Instructions:
Step 1
Rinse terra cotta saucer to remove dust and debris. Allow to dry overnight. Seal all saucer surfaces with a terra cotta sealer. Allow to dry at least two hours before gluing on mosaic pieces.
Step 2
Using the plastic knife, apply a thin layer of adhesive to the back of each tile. Press the tile, adhesive side down, to the saucer. (I find it easiest to start gluing from the outside of the pattern and then work my way in.) Allow no more than 1/4 inch between the pieces and try to keep the distance the same between all the pieces. This will add strength to your bird bath and will be more pleasing to the eye.
Tip: If you’d like to create a specific pattern or design, it’s good to have a pair of tile cutters handy. For example, I cut some of my white tiles diagonally.
Once all the tiles are in place, allow the adhesive to dry for at least 24 hours before grouting.
Step 3
Cover your work surface and put on a dust mask before you begin mixing the grout, as the dust from dry grout can harm your lungs. Mix the sanded grout according to package directions. You can remove the dust mask once the grout has been mixed and is no longer powdery. Your grout should be the consistency of peanut butter when completely mixed. If it’s too wet, the grout will be weaker and harder to clean up. Allow grout to sit five to 10 minutes before applying it to the saucer. If you buy premixed grout, make sure it is sanded grout for outdoor use.
Step 4
Wearing rubber gloves, apply grout by hand or with a plastic putty knife. Press grout between all the pieces and smooth with your fingers. When applying grout to the rim of the saucer, make sure the edge of each tile is completely covered and is smooth to the touch. Allow the grout to sit for 20 to 60 minutes or until it begins to dry. Then wipe off any excess grout with a dry cloth.
Step 5
Allow the grout to sit for an additional 30 to 60 minutes. Then fill a bucket with warm water, wet your sponge, wring it out well and use it to wipe off any film. You may have to wipe your piece several times over the course of an hour or two. Rinse and wring the sponge often for best results. If a film keeps forming on the piece, either your sponge is too wet or dirty or you need to let the grout dry a little longer before wiping it down.
After several hours, buff the tiles with a clean soft cloth to remove the last of the film.
Step 6
Allow the grout to dry at least 24 hours before sealing with an outdoor penetrating sealer. Follow manufacturer’s instructions. Usually you will need to apply the sealer with a foam paintbrush. Allow the sealer to dry for five to 10 minutes, then wipe off the excess with a paper towel. Allow it to dry for two hours, then apply another coat of sealer.
Leave the outside unpainted or apply an outdoor acrylic paint.
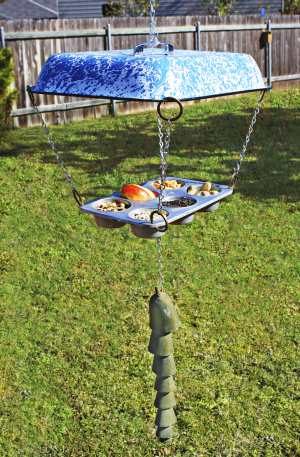
Recycled crafts projects are a great way to save money. Build this DIY bird feeder from an old muffin tin and save your cash for a bird food buffet!
Materials:
 Muffin tin
- Pan, lid or board for roof
- Metal hole punch or drill
- 8 key rings
- Jack chain
- Drawer handle or other hanger (optional)
- Metal screws (optional)
- Brass bell or other counterweight (optional)
Step-By-Step Instructions:
Step 1
Mark the places where you want to drill the holes for the corners of the muffin tin and of the pan, lid or board that will be your roof. Use either a metal hole punch or a drill bit to make holes in the tin and the roof big enough for the key rings.
Mark spots for small holes at the bottom of each cup of the muffin tin for drainage. Then punch or drill the holes, making sure they’re not so big that birdseed will fall through.

Step 2
If your roof doesn’t already have a handle for hanging, decide how you want to hang the feeder. I like using found items such as drawer or luggage handles, but even a simple eyebolt will work. Making sure the handle is centered, screw it to the roof.

Step 3
You’ll probably want to hang a counterweight from the bottom to offset the weight of larger birds, which will reduce the tossing of birdseed when the big guys come in for a landing. You can use anything from a large garden faucet handle to a big handbell or even an old doorknob. Test a few things out until you find one that works for you.
Drill a hole in the center of the muffin tin. Then, using an eyebolt or a plumbing pipe hanger and another length of chain, attach the counterweight. NOTE: If you intend for only small birds to use your feeder, you probably won’t need a counterweight.

Step 4
Run the key rings through the holes at the corners of the muffin tin and the roof. Attach four lengths of chain to hold everything together. You’ll probably find it best to use 8-in. lengths or shorter between the muffin tin and the roof. You can use even shorter chains if you plan to feed only small songbirds.

Step 5
Have some fun by decorating your piece. For an even funkier look, try hanging small objects from the chains or the corners; I’ve used vintage skeleton keys. Recycled crafts are such a good excuse to go rummaging at a garage sale this weekend!
DIY garden crafts allow you to express your own style. Every person’s version is a little bit different, so your unique creation will look like no one else’s! Once you learn how to make metal flowers, you can change the shape or color to suit your garden.
Materials:
- Thin sheets of aluminum, tin, roof flashing, or thin copper
- Tin snips or sharp scissors
- Sturdy wire
- Needle-nose pliers
- Gloves and goggles
Step-By-Step Instructions:
Step 1
Cut a strip of aluminum, tin, roof flashing or thin copper into strips about ½ in. high x 2½ in. long. (Be sure to wear gloves and goggles for safety.) Using snips or sharp scissors, cut “fringe” along the length of the metal strip.
Step 2
Take a sturdy wire cut to about 6 in. long and bend the tip into a U shape. Hook the wire at one end of the strip and cinch the wire down in the gap between the last two fringes so that the length of the wire extends below the base of the fringe.
Step 3
Using your fingers, wrap the strip of metal tightly in a circle. Peel the cut pieces down as pictured. Use needle-nose pliers to curl the petals if desired.