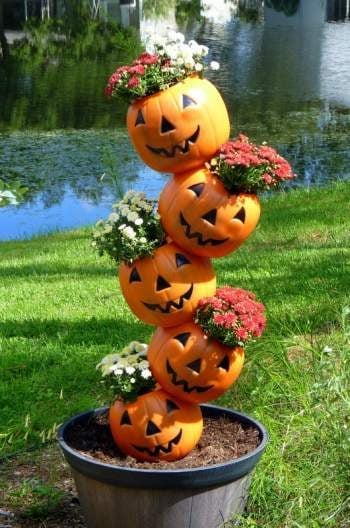
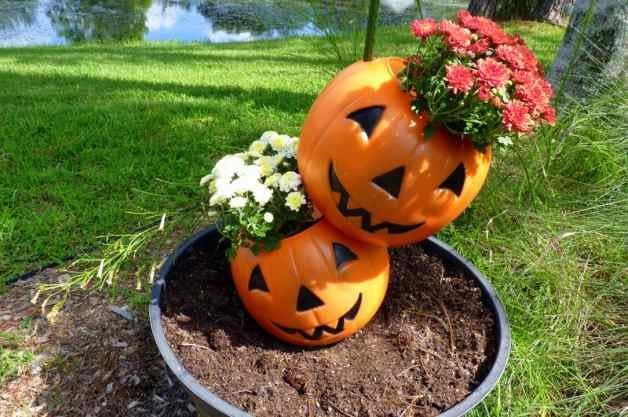
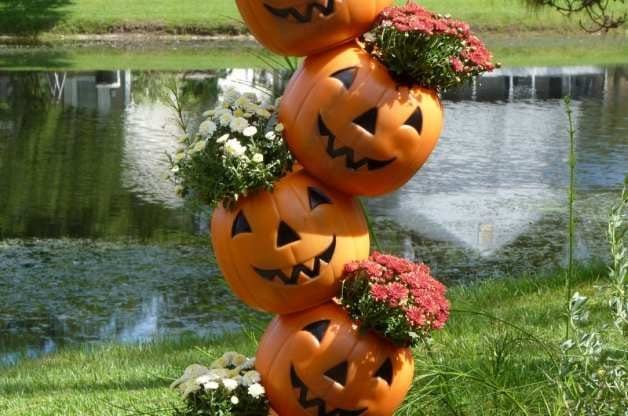
I’ve always been a fan of the “tipsy pots” planters, with their whimsical style and endless opportunities for customization. I’ve seen them as address markers and as bases for birdbaths, and a while back I created a miniature version with succulents perfect for your desktop or dining room table. I’ve thought for awhile that pumpkins and tipsy pots needed to go together somehow, and when I recently came across the bin of $1 plastic pumpkin candy buckets at Target, I knew the time had come to make it happen.
This is fairly inexpensive project, since you can find these plastic pumpkins everywhere right now, and usually for about $1 apiece. You also need a sturdy garden stake or metal rod at least 4 feet tall and a power drill with a 3/4 inch spade bit. If you’re using live plants, you’ll need potting soil to fill the pumpkins too. If it’s too late in the season for live plants where you live, try using artificial flowers and some styrofoam inserts to hold the flowers in place.
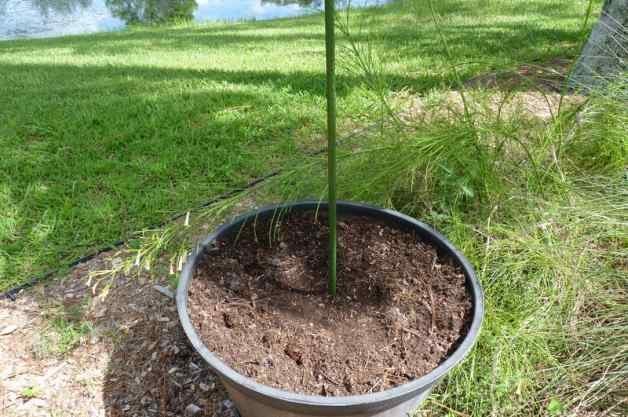
Start by finding a stable place to insert the stake. I used an empty whiskey barrel planter in my backyard. If you’re doing this project in a pot on your front porch, consider placing it in a corner so it doesn’t get knocked over. The pumpkin stack is reasonably sturdy, but trick-or-treating kids can sometimes get rowdy, so it’s best to be cautious.
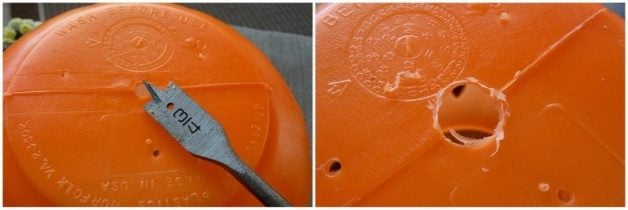
Next, cut the plastic handles off the pumpkins. Using a 3/4 inch spade bit, enlarge the holes on the bottoms of the pumpkins (or add one in the center of each if there isn’t one already). You’ll also be expanding one of the handle holes on each pumpkin; the side depends on which way each pumpkin will tip. (See below.) Go slowly with the drill at first, so you don’t crack the pumpkin. After drilling, make sure the holes are large enough that your pumpkins will slide easily down over the stake.
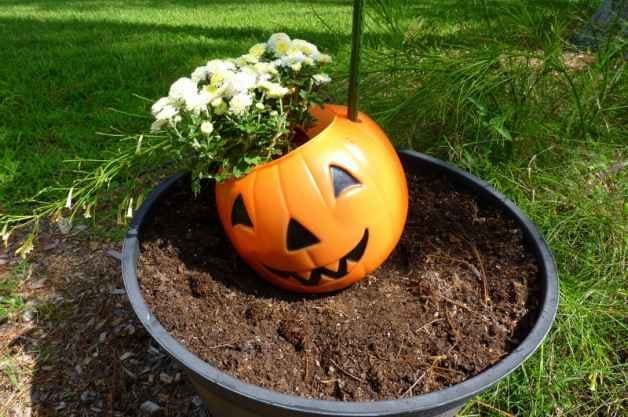
Take your first pumpkin and slide it down over the stake, going through the middle hole in the bottom and the enlarged handle hole. Nestle the pumpkin firmly down into the soil. Fill the pumpkin with potting soil and add plants.
Repeat with the next pumpkin, this time sliding the stake through the opposite enlarged handle hole. Rest it on the pumpkin below it, then fill with soil and plants. Make sure that everything is still sturdy as you continue to add the rest of the pumpkins and plants.
Though this planter is reasonably steady, it’s not quite as sturdy as those made with terra cotta pots. Use care when watering, and consider disassembling or moving inside during very high winds. At the end of the season, this planter is easy to take apart and store for next year.
I think I’m going to add some additional mums around the base of the pumpkins in the pot, for a more finished look. Otherwise, these Tipsy Pumpkins turned out exactly as I pictured them – not something I can say about every backyard project I attempt! Would you add this easy decoration to your garden for Halloween?
Dawn Kush says
Love the great idea- thanks for sharing!
Judy Thurston says
What a cute idea. I have a tipsy pot planter with the terracotta pots and I am definitely going to do this. Thanks for the idea.
Sherry Gray says
I love this! I am definitely going to make this for my front porch. Thanks so much! 🙂
c spears says
I love it and am heading to my local dollar store to purchase some plastic pumpkins and start the project. I think its a terrific idea for Halloween! thanks for sharing!
Cindy says
Very cute idea! I’m going to make one for sure!
rhoda says
I haven’t done anything like this before. Thank you for the nice idea and I will give it a try.
lenore says
Really great idea…fit’s in with Halloween theme,yet not scary !! Thanks 🙂
Linda Kruyshoop says
My grandson is going to love this.
isaiah43123 says
I’m wondering how these pupmkins would look on the solar landscape lights?
Roberta Zastawniak says
I have them on my 3 lamp light post…they really look nice…depending on how bright your solar lights are, I bet it would work just fine.
Barnbec says
Or just fill with with Christmas lights as you go up.
Barnbec says
*white Christmas lights
Donna Overton says
Thanks for sharing this with pictures and words! I am a very visual person and it helps soo much! I love this because I have everything I need except for the pumpkins! I love gardening so that helps with this project too!
Mary South /Colorado says
Yes very nice for front yard.
myra says
I really like this idea for the fact that is simple and inexpensive looking. I am on a budget and very much appreciate low cost DIY projects such as this. Thanks for sharing!
Dayna says
Target has the pumpkins for $1.00 each! Going to have to stop and get some. Way too cute! <3
Linda G says
What a great idea! These pumpkins are always left over at Target after the holiday, and that seasonal clearance discount would make this even more affordable (for the following year). I can also picture this with small plastic cauldrons to hold candy indoors for a party or outside holding white or green trailing plants that would look like bubbles running out of the pot.
carla says
Great idea….so creative and different! You are truly talented!
Shiela Foreman says
Really cute, and simple. You could also turn it around and use the backside of the pumpkins throughout the fall season.
Carolyn says
This project is adorable! I think I have different sizes to do this with also. Sooooo Cute, & functional. I think planting in the bottom is a great idea. Maybe something that cascades over the edge would be nice too, like Lobelia, baby breath, sweet allysum. Great idea 🙂
Linda Thomma says
Love it, I’m always looking for something
new and different. Can’t wait for fall!
Phyllis says
Do you drill a hole in the pot? If not what keeps it standing?
Sue says
love this! In addition to being unable to find ANY plastic pumpkins, what size are you using for the demo picture?
wendy lanzetta says
White lights @ Xmas time!! Perfect!!!
Anne says
i love the idea. So cute. I tried making. It would not stay upright. Today I have taken a clay pot and put concrete in it. Covered with plastic then turned it upside down, placed the pole in it waiting for it to dry. Then I will put the pot in the bottom of large pot and cover with dirt. Hopefully the weight of concrete and pot will help keep pole upright. Then stagger pots on pole. Excited to see if this works!
Roxanne Johnston says
I love this idea, I expanded on it a bit and put the pumpkins on my mini flagpole with the jack-o-lantern faces turned around, with a fall flag, I’ll turn them back around in October, with a Halloween flag!
Mamawme says
I used mickeymouse pumpkins! It turned out so cute.
Jan says
A few suggestions. Make sure you have a very sturdy pole. I made this last night with one of the green garden stakes and by mid morning the whole thing was bent over and on the ground. My husband took the whole thing apart and used a painting pole. The cheap pumpkins are really flimsy so filling them with soil made them crush in on themselves. If it lasts through the season, next year I will use artificial mums to lighten the load. Good luck.
Teri Macdonald says
I just did mine today, it turned out great! I love this idea for a cute and inexpensive decoration for fall.
Vanessa says
Where can I get a pole and how tall does it need to be? And what can I use for the bade
Helen says
Found this and I love it, only thing is they don’t have the pumpkins in the stores, tried all over. I went to the thrift stores and found a few for .25 and some for .59 and will make one for our yard this year, thanks.