
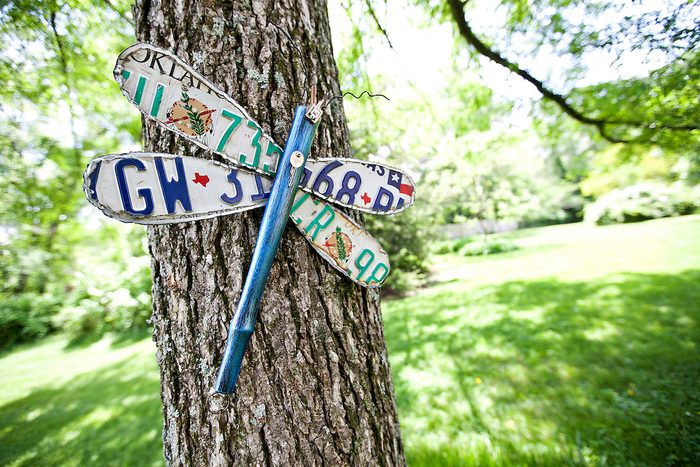
Tina Burrows of Roff, Oklahoma, shared this unique license plate dragonfly project with us. She and her husband, Steve, enjoy finding discarded items and giving them new life by turning them into DIY garden art. Tina suggests that you look for old license plates and chair parts at garage sales and thrift stores, or ask family and friends. See more of Tina’s creations at repurposed-life.com.
You can hang the dragonfly on a tree or fence, or use it indoors for a rustic and unique wall hanging. Get creative with paint colors for the body and materials for making the antennae and tail. And get the kids involved! They can paint the body, name the dragonfly and help find a place to hang it.
Check out fascinating dragonfly facts you should know.
License Plate Dragonfly Materials:
- Paint
- 1 chair leg or spindle
- 4 license plates
- Old keys, 1 key ring, heavy-gauge wire (or other decorations)
- Seven 1-in. multipurpose screws (or more as needed)
- Picture hanger
- Marker
- Safety gloves
- Metal file
- All-purpose aviation snips or cutting torch (see crafter’s note)
- Drill
Crafter’s Note: Aviation snips are sold at home improvement stores. Older license plates may require a stronger tool, such as a cutting torch. Be sure to wear safety gear.
Backyard Tip: If you don’t have a chair leg or spindle for the dragonfly’s body, try the handle of a hammer or a tall candlestick.
Here’s another super simple dragonfly DIY yard art project idea that you can make with copper wire.
Step-By-Step Instructions:
Step 1
Step 2
Create a pattern for the wings. This dragonfly has 9½- x 4-in. wings. Trace the pattern onto the underside of each license plate. Trace two for the left side, flip the pattern and trace two for the right side.
Step 3
Wearing heavy gloves to protect your hands, use snips to cut out wing pieces along pattern lines. File down rough edges.
Step 4
Lay out the pieces, right sides up, as you’ll want them to look when attached to the chair leg (body). On the wrong sides, mark the top-right (TR), bottom-right (BR), top-left (TL) and bottom-left (BL) pieces.
Step 5
With wrong sides up, position the top-right piece (TR) beside the top-left piece (TL) on the body, overlapping slightly to form the upper set of wings. Drill 2 holes through both plates into the body. Repeat for the bottom set of wings.
Step 6
Attach the wings to the body, using 4 screws.
Step 7
Use remaining screws to attach keys or other decorations to your dragonfly. Ours has keys for the head and eyes, and antennae of heavy-gauge wire drilled into the top. Attach a key ring with key to the bottom to decorate the tail.
Step 8
Attach a picture hanger to the underside and hang the dragonfly in a prominent spot.
On This Page
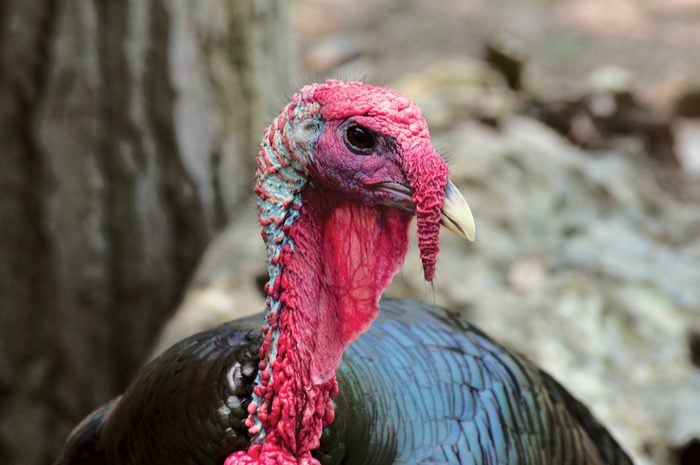
Wild Turkeys Almost Went Extinct
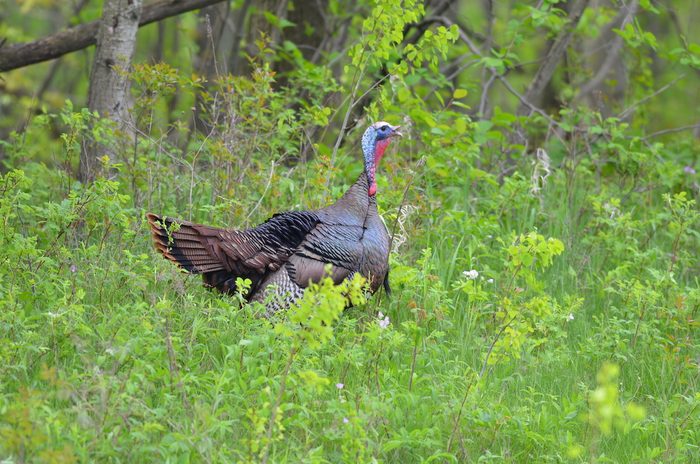
In the early 1900s, the situation for wild turkeys was dire. “Turkeys were eradicated from 18 of the 36 states that they had previously been found in,” Taylor Finger, game bird ecologist for the Wisconsin Department of Natural Resources, says. “Since then, reintroduction efforts have brought them back to those states, and they’re doing extremely well. It was a huge conservation success story.”
Interestingly, the wild turkeys in Wisconsin today didn’t come from Wisconsin: they came from Missouri. “The state of Wisconsin traded for turkeys with Missouri, which received ruffed grouse in return,” Taylor says. “Wisconsin got the better end of the deal. Turkeys have done well in Wisconsin, but Missouri still doesn’t have ruffed grouse.”
Today, turkeys number nearly 7 million in the wild. Commonly called forest turkeys, the eastern wild turkey bird is one of the most abundant subspecies and is found in swamps and forests. The other United States subspecies Taylor mentions are Merriam’s, Rio Grande, Osceola, and Gould’s.
Discover 7 extinct birds that should never be forgotten.
Wild Turkeys Can Fly Faster Than You Think
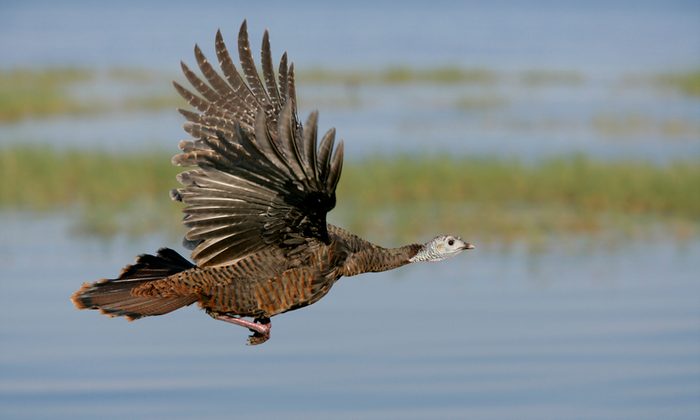
Most of the time when we see turkeys, they’re on the ground. It might come as a surprise to learn wild turkeys are capable of flight—and speedy flight, at that. “They can run up to 25 miles per hour, and they can fly up to 55 miles per hour,” Taylor says.
Discover what category turkeys ranked “fastest” in on our “fastest birds of North America” list!
People Eat a Lot of Turkey
Every year, the average American eats around 16 pounds of wild turkeys’ domestic cousins. We devour 44 million of these birds on Thanksgiving. That adds up to 736 million pounds of meat in one day (and countless naps on the couch).
How Much Does a Wild Turkey Weigh?
If you’ve wondered how much a wild turkey weighs, according to Taylor, males can range from 16 to 25 pounds; females are smaller on average, and usually weigh about 7 to 10 pounds.
Want more fascinating bird facts? Check out 14 mind-blowing facts about woodpeckers.
Wild Turkeys Hold Spiritual Meaning
Turkeys were first domesticated in Mexico around 800 B.C. Some Native American tribes worshiped them and buried their dead in turkey-feather robes. The Aztecs held religious celebrations in the birds’ honor.
Learn more about turkey vultures.
Keep Your Ears Open for Wild Turkey Calls
Bird songs courtesy of the Cornell Lab of Ornithology
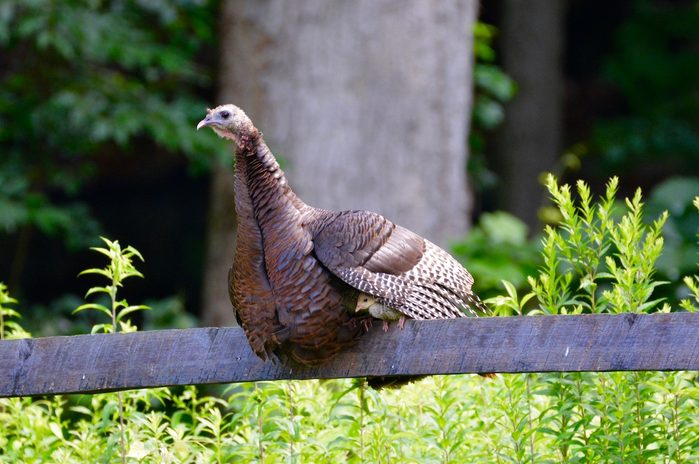
If you hear loud noises in a forest, they might be coming from a turkey. These long-necked birds make more than 20 sounds, including the classic gobble-gobble produced by males. Some wild turkey calls can be heard from a mile away!
If you hear a strange noise coming from up in a tree, it could be a songbird… or it could be a turkey. “They roost in trees,” Taylor explains. “At night, that’s where they roost to sleep—they hang out in trees. We have a hard time thinking of them as flying birds, but they fly quite a bit. They get up there to avoid predators.”
Go nuts over these amazing facts about bald eagles.
How to Attract a Wild Turkey Bird
These gobblers have big appetites. Large birds, they eat 5 pounds of food every week! Attract them with acorns, berries and cracked corn or large, ground-based bird baths.
Next, find out what foods can you feed to ducks?
About the Expert
Taylor Finger is the game bird ecologist for the Wisconsin Department of Natural Resources. He holds a Master of science degree in biology from Western University.
Sources
- University of Illinois Extension
- National Turkey Federation
- Colonial Williamsburg
- OneKind Planet
- The Nature Conservancy
- National Wild Turkey Federation
- National Wildlife Federation
- Cornell Lab of Ornithology
Why Trust Us
For nearly 30 years, Birds & Blooms, a Trusted Media Brand, has been inspiring readers to have a lifelong love of birding, gardening and nature. We are the #1 bird and garden magazine in North America and a trusted online resource for over 15 million outdoor enthusiasts annually. Our library of thousands of informative articles and how-tos has been written by trusted journalists and fact-checked by bird and garden experts for accuracy. In addition to our staff of experienced gardeners and bird-watchers, we hire individuals who have years of education and hands-on experience with birding, bird feeding, gardening, butterflies, bugs and more. Learn more about Birds & Blooms, our field editor program, and our submission guidelines.
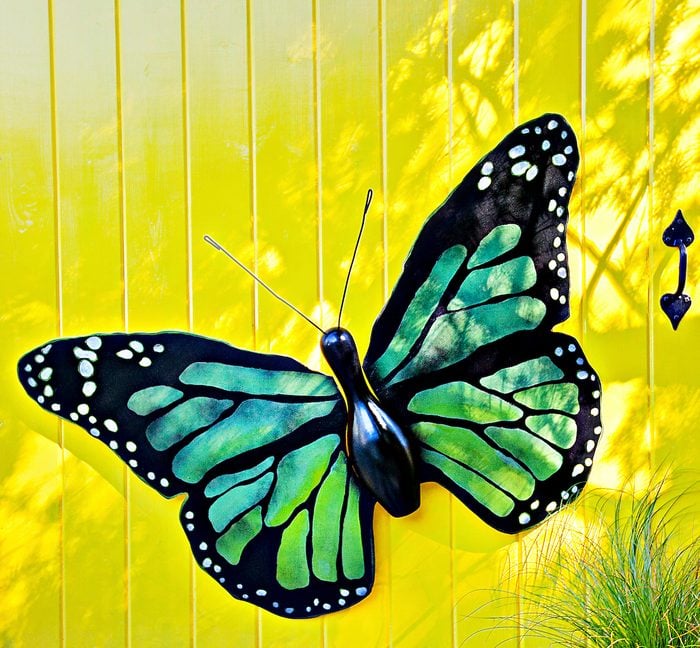
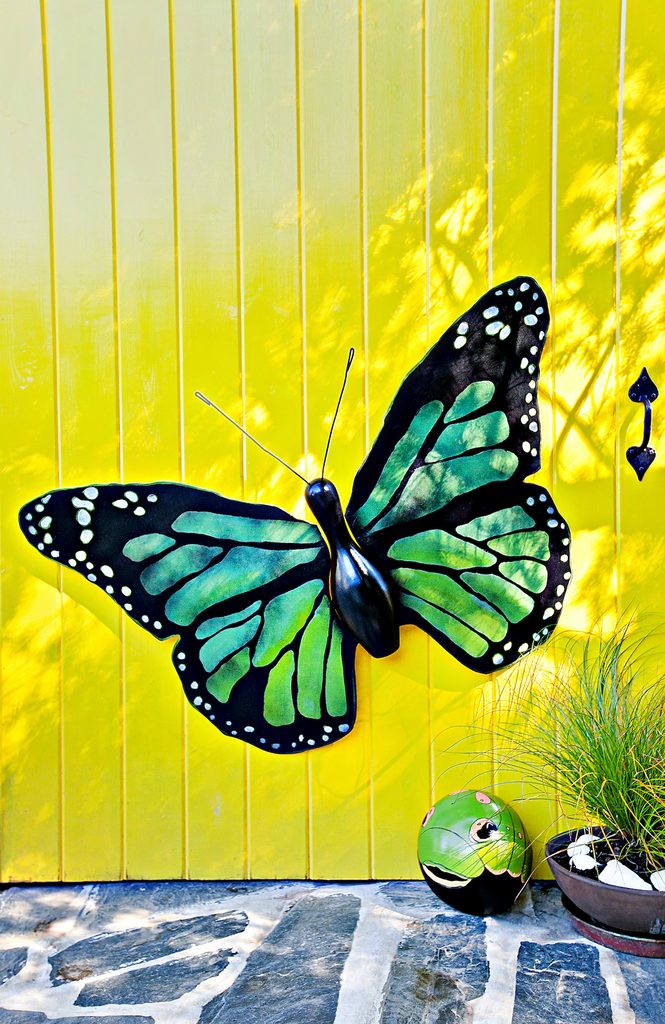
An old bowling pin can metamorphose into a beautiful butterfly with this striking pair of wings made from plywood. Try painting different wing patterns and let your imagination soar.
Learn how to make a DIY butterfly puddler.
Bowling Pin Butterfly Materials:
- Printer (optional)
- X-Acto knife
- Pre-primed lauan plywood
- Jigsaw
- Medium or fine grit sandpaper
- Bowling pin
- Drill and small bit
- Stiff wire or coat hanger
- Primer
- Spray paint
- Acrylic craft paint
- Paintbrush
- Four L-brackets and screws
- Galvanized wire or coat hanger
- Needle-nose pliers
- Super glue
- Exterior-grade spray varnish
Step-By-Step Instructions:
Step 1
Enlarge to desired size and tile-print the free downloadable butterfly wing stencil available here. Don’t have a printer? Draw the butterfly wing freehand.
Step 2
Cut out the printed wing stencil, and, if desired, the inner detailing. Trace its outline and detailing onto the plywood with a pencil, then flip the stencil and repeat to create a pair of wings that are mirror images of each other.
Step 3
Using a jigsaw, cut out the butterfly wings. Lightly sand the wings until smooth.
Step 4
Prep bowling pin by drilling two holes for antennae on either side of the top using a drill bit slightly larger than the diameter of the wire to be used as antennae.
Step 5
Prime the bowling pin or use a spray paint with primer. Spray paint bowling pin in color of choice, then let dry.
For more creative ideas, make a bowling ball garden art ladybug.
Step 6
Paint your wing design using acrylic paint in colors of choice. Let dry.
Step 7
Drill holes into bowling pin for affixing wings. Screw wings to bowling pin using two L-brackets per wing and accompanying screws.
Step 8
Center and affix a screw to the back of the bowling pin for hanging. Wrap wire around the head of the screw and form a hanging loop using needle-nose pliers.

Step 9
Cut wire antennae to length desired, then use pliers to twist ends, forming a small decorative loop on each. Drop small amounts of super glue into antenna holes, then insert wire antennae. Leave butterfly standing upright until glue dries.
Step 10
Spray butterfly with several coats of exterior-grade spray varnish. Once dry, hang and properly secure butterfly to a gardening shed or tree.
Next, learn how to make a DIY license plate dragonfly project.
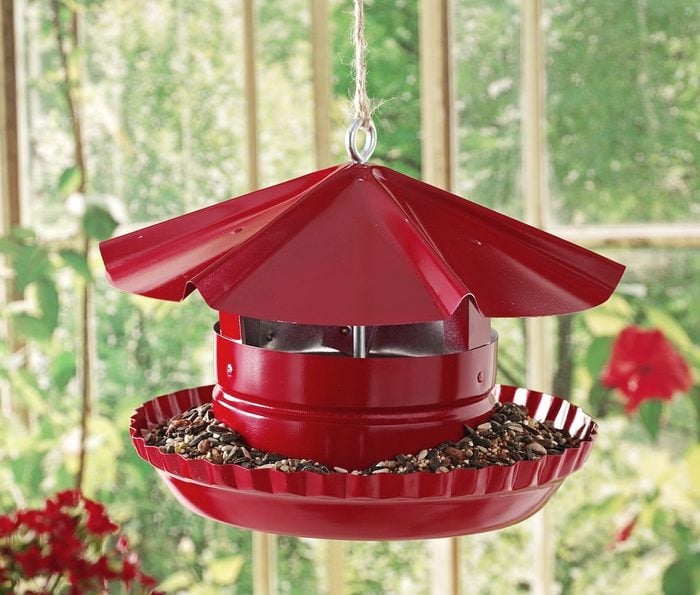
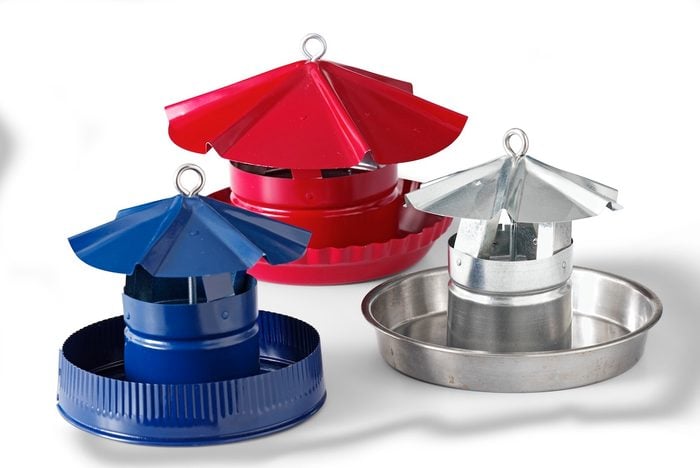
Looking for a sturdy, attractive bird feeder you can make yourself? Pick up an old pie pan at a yard sale, then hit the hardware store for a few basic supplies. Also look for vintage pie plates and cake pans at yard sales and resale shops. Then each feeder you make will be unique. Paint it a vibrant color to match your décor, or leave it plain for a vintage chic look. This DIY pie pan bird feeder is so easy, you may want to pick up some extra pie plates or cake pans to make a few for friends.
If you’re looking for a bird feeder will stand the test of time, this is the project for you. A vent (shanty cap) protects the food while a pie pan provides a picnic for your backyard birds.
Learn how to make a DIY muffin tin bird feeder.
Materials:
- Vent (shanty) cap
- Aluminum pie plate
- ¼-in. eyebolt
- ¼-in. hex head cap screw
- ¼-in. coupling nut
- Exterior primer and paint (optional)
- Superglue
- Twine or wire for hanging
- Drill with 5/16-in. bit
Tip: Choose an eyebolt and cap screw that have a combined height of 1/8 in. to ¾ in. less than the height of the vent cap. That way, there will be just enough room for the coupling nut to hold the two together tightly.
Here’s how to make a DIY bird feeder for peanuts.
Step-By-Step Instructions:
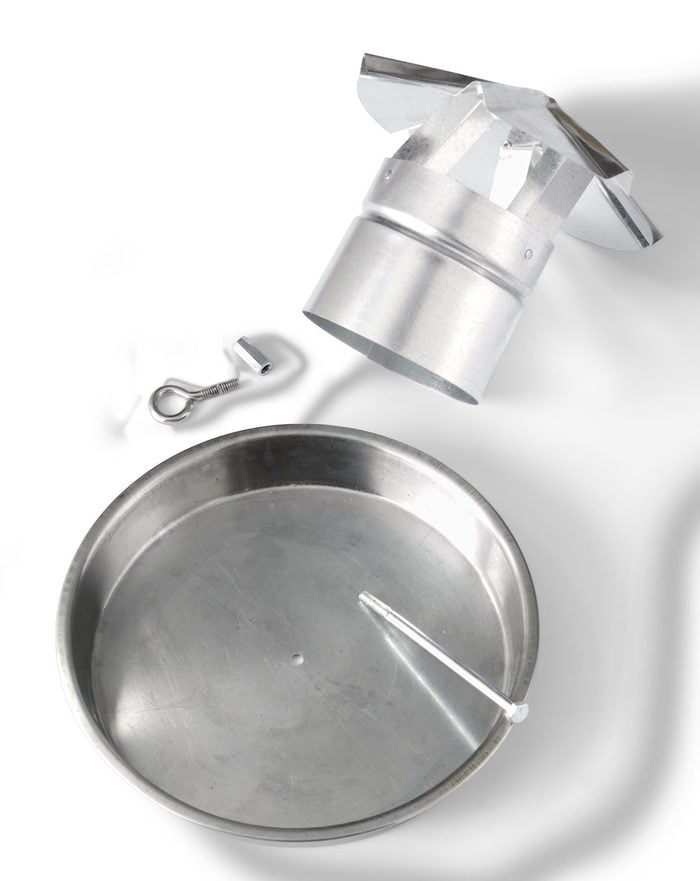
Step 1
Wearing safety glasses, drill a 5/16-in. hole through the center of the vent cap and the pie plate. While you’re at it, drill a few small holes through the bottom of the pie plate to allow for water drainage.
Leave the vent cap and pie plate bare for an industrial look, or paint them to add a pop of color. I find that a latex-based exterior paint on top of primer adheres best to galvanized metal. Paint the vent cap and pie plate separately before assembling your feeder. Be sure to follow the instructions on your paint can and allow adequate drying time.
Step 2
Place the cap screw through the center hole in the pie plate with the threads facing upward. Give the coupling nut about 3 or 4 turns onto the threads of the cap screw to hold it in place.
Step 3
Next, center the vent cap over the pie plate while holding the cap screw in place.Place the eyebolt through the center hole of the vent cap and turn the eyebolt into the other end of the coupling nut. Using a wrench, hold the nut steady while hand-tightening the eyebolt. Seal the coupling with a few drops of superglue for extra holding power.
Step 4
To hang, slip twine or wire through the eyehole and tie. Hang from a tree branch. Then fill the platform with your favorite type of birdseed and watch the birds gather to enjoy your backyard masterpiece!
Next learn how to make a DIY simple platform bird feeder.
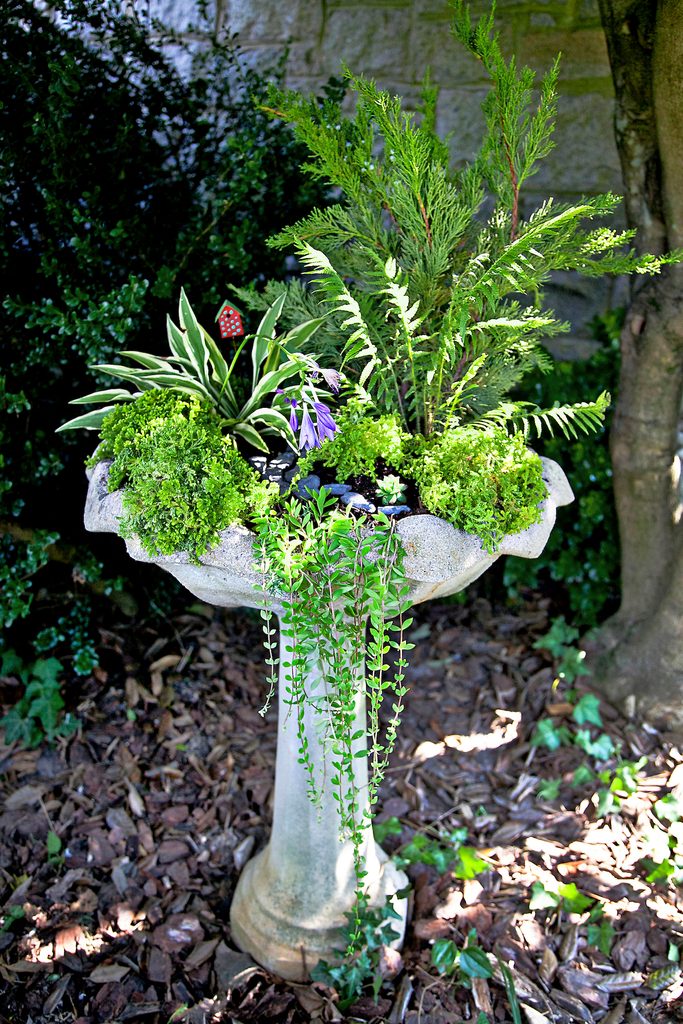
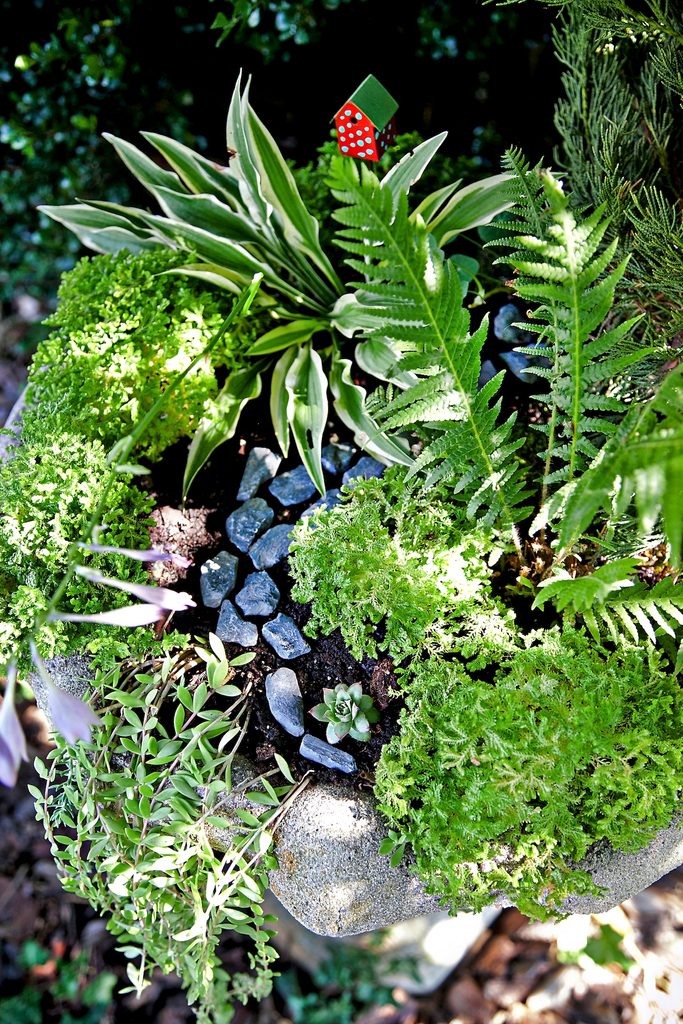
Transform an old birdbath into a planter with this easy idea. If you have a birdbath that’s had its day, give it new life as a planter for a miniature fairy garden. Add a little magic with a stone pathway or a few fairy garden accents. We’ve listed our favorite plants for this project, as well as landscaping tips.
Learn how to repair a cracked birdbath.
Miniature Plants for Your Birdbath Planter:
Succulents
Use succulents for accent plants or “shrubs.”
- Stonecrop sedum
- Limelight sedum
- Blue Spruce sedum
- Silver Onion echeve
Ground Covers
Use ground cover plants to create a mat of green in the miniature garden, and a “waterfall” over the birdbath planter.
- Golden club moss (Selaginella kraussiana ‘Aurea’)
- Scotch moss (Sagina subulata ‘Aurea’)
- Blue Star creeper
- Pink cranesbill (Erodium x variabile)
Conifers
Provide woodland “shade” and a layer of realism with dwarf conifers.
- Jervis dwarf Canadian hemlock
- Dwarf Pagoda Japanese holly
- Mont Bruno boxwood
- Fernspray false cypress
- Lime Glow juniper
Materials for a Birdbath Planter:
- Old birdbath or other container
- Bagged potting mix
- Planting material
- Small stones, gravel or pine bark nuggets
- Fairy garden accessories (optional)
Birdbath Planter Instructions:
Step 1
Place a birdbath or other container, like a terra-cotta pot or wooden box, where it will stay permanently before planting in it. It will be too heavy to move later. Play around with the landscape design with the plants still in their pots to make things easier on you and the plants.
Step 2
Fill the planter about two-thirds full with soil.
Step 3
Remove plants from their pots one at a time, knock off soil, and loosen and spread out roots. If roots are matted, spray with a hose to detangle them, then gently pull them apart.
Step 4
Position the plants in the soil by spreading the roots of each as widely as you can, while leaving room for neighboring plants. This step is especially important if you are using a birdbath or similarly shallow planter. Once you’re satisfied, add as much soil as possible to cover the roots, but not so much that watering will wash it away.
Step 5
Gently water all plants with a watering can or by holding your thumb over a hose nozzle to make a fine spray.
Step 6
Add decorative features. Try using everyday items in a new way. Gravel can be a tiny stone path; tumbled glass transforms into a shimmering pond. Fairy garden decorations range from minuscule arbors and bridges to tiny houses and animal figurines.
Next learn how to clean a birdbath the right way.
Why Trust Us
For nearly 30 years, Birds & Blooms, a Trusted Media Brand, has been inspiring readers to have a lifelong love of birding, gardening and nature. We are the #1 bird and garden magazine in North America and a trusted online resource for over 15 million outdoor enthusiasts annually. Our library of thousands of informative articles and how-tos has been written by trusted journalists and fact-checked by bird and garden experts for accuracy. In addition to our staff of experienced gardeners and bird-watchers, we hire individuals who have years of education and hands-on experience with birding, bird feeding, gardening, butterflies, bugs and more. Learn more about Birds & Blooms, our field editor program, and our submission guidelines.
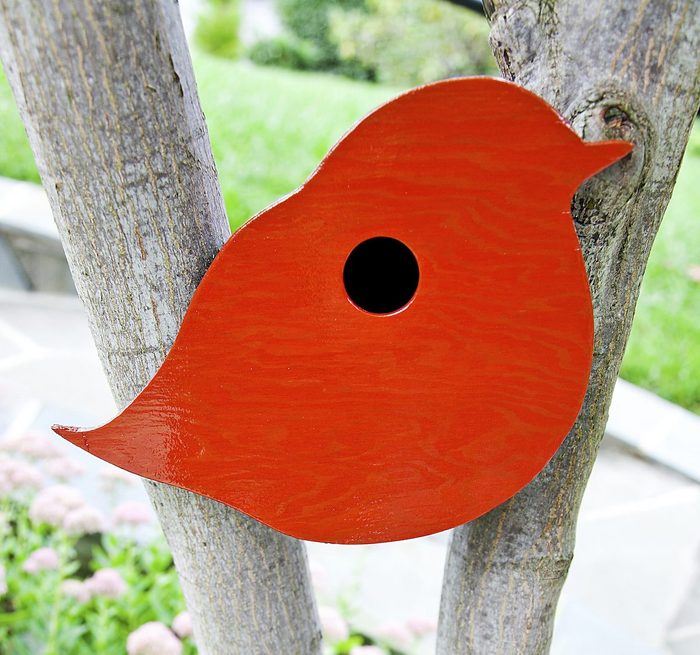
This little bird-shaped birdhouse is simple, sweet and versatile! If you already have a nest box that matches the dimensions needed, then you’ll be able to make this creative birdhouse almost before you can say “black-capped chickadee!”
Don’t forget to check this birdhouse hole size chart.
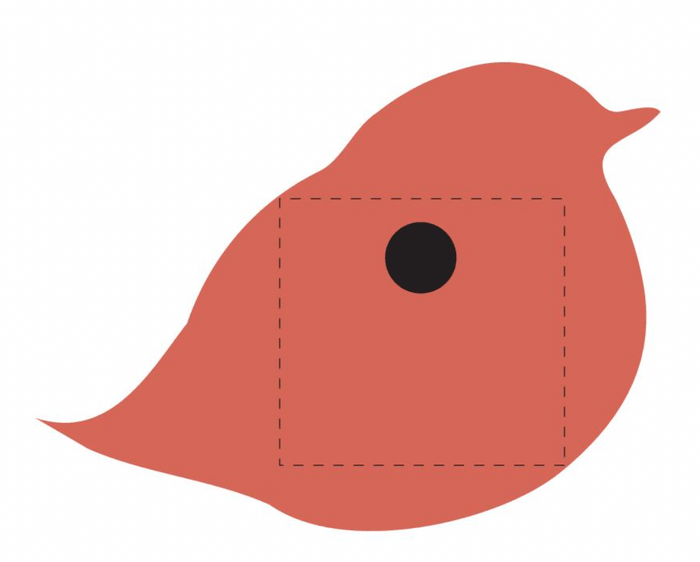
Bird-Shaped Birdhouse Materials:
- 5-in.-square box (built, reclaimed or purchased)
- Lauan plywood for “bird” shape
- Small finish nails
- Picture-hanging hardware or wire and 2 screws
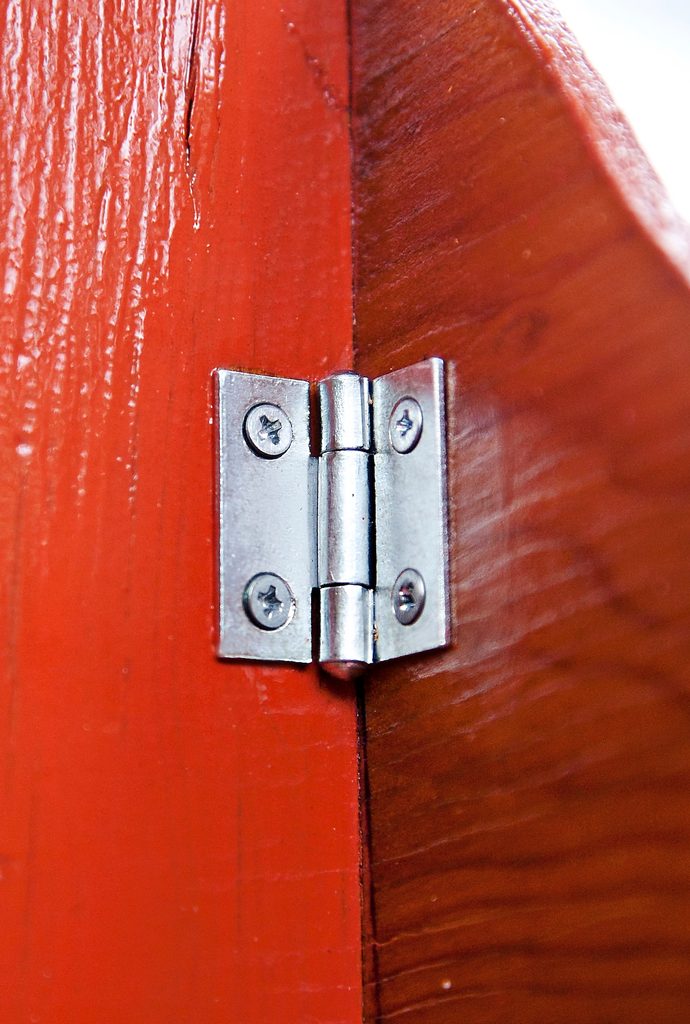
- 1-in. butt hinge
- Screen door hook and eye
- Glue
- Exterior latex primer and paint
- Shellac or other outdoor varnish
- Bird template
- Jigsaw
- Screw gun or drill
- 1¼-in. to 1½-in. hole saw
- Clamps
- Hammer
- Fine-grit sandpaper
Step-By-Step Instructions:
Editor’s note: If you are building the box, follow the instructions from step 1. If you already have a box, begin with step 6.
Step 1
Cut one 5×5-in. square, two 5×4¾-in. rectangles and two 4¾x4½-in. rectangles out of ¼-in. plywood, clear pine, shelf board, barn board or similar.
Step 2
Step 3
Step 4
Step 5
Step 7
Step 8
Step 9
Paint and Assemble
Step 10
Step 11
Step 12
Step 13
Seal the outside of birdhouse with several coats of shellac.
Step 14
Attach picture-hanging hardware to the back of the box and display in your backyard!
Next, learn how to make a simple one-board DIY birdhouse and a DIY bluebird house.
Why Trust Us
For nearly 30 years, Birds & Blooms, a Trusted Media Brand, has been inspiring readers to have a lifelong love of birding, gardening and nature. We are the #1 bird and garden magazine in North America and a trusted online resource for over 15 million outdoor enthusiasts annually. Our library of thousands of informative articles and how-tos has been written by trusted journalists and fact-checked by bird and garden experts for accuracy. In addition to our staff of experienced gardeners and bird-watchers, we hire individuals who have years of education and hands-on experience with birding, bird feeding, gardening, butterflies, bugs and more. Learn more about Birds & Blooms, our field editor program, and our submission guidelines.
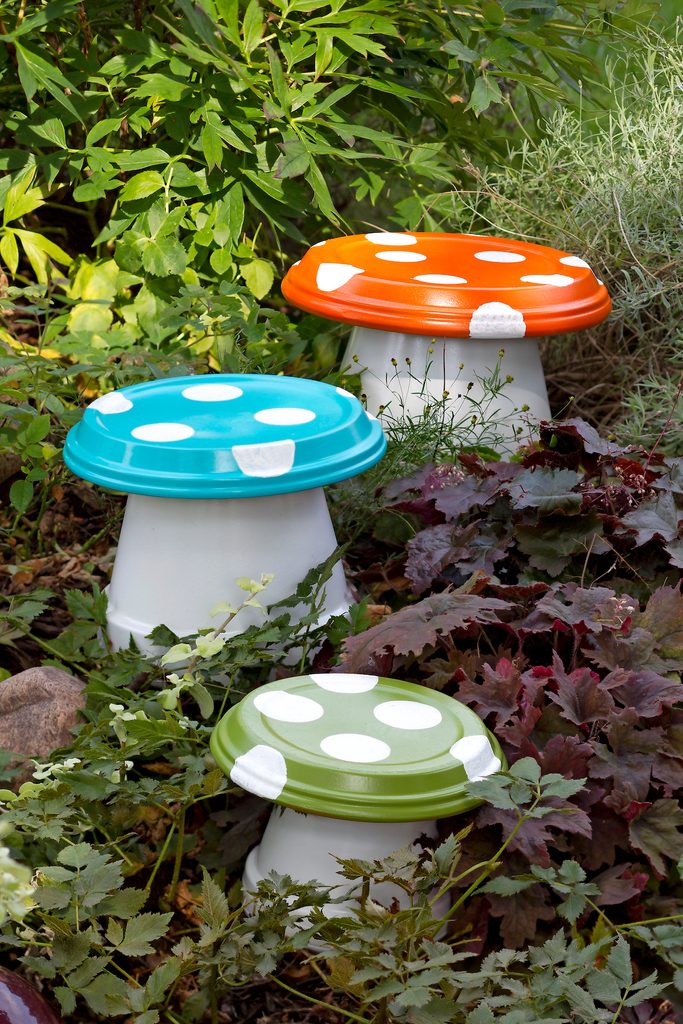
Dress up your garden or porch with these DIY garden mushrooms. They’re quick and easy to make, and lightweight so you can move them to different parts of your yard. Use any old pots you have on hand or, for a faster project, buy pre-painted pots and add the painted dots. This project is great for kids, too!
Learn how to make a bowling ball garden art ladybug.
DIY Garden Mushrooms Materials:
- 2 to 3 round terra cotta pots in various sizes
- 2 to 3 round terra cotta drain plates (each 3 to 5 inches wider than the bottom of matching pot)
- Spray paint, in white, and in choice of colors for mushroom tops
- White acrylic craft paint
- Waterproof clear paint- on or spray sealer
- 2-inch-wide round sponge or spouncer
- Small paintbrush
- Epoxy or waterproof outdoor glue (optional)
Step-By-Step Instructions:
Step 1
Step 2
Step 3
Step 4
Step 5
Step 6
Find a good spot to display your DIY garden mushrooms. They’re lightweight and they can be moved to add color to different parts of your yard.
Backyard Tip: Want even taller mushrooms? Paint more pots in various sizes and stack them. Place a drain plate on top of each stack.
If you like to give old items new life, you’ll love to learn how to make a DIY garden license plate dragonfly.
Why Trust Us
For nearly 30 years, Birds & Blooms, a Trusted Media Brand, has been inspiring readers to have a lifelong love of birding, gardening and nature. We are the #1 bird and garden magazine in North America and a trusted online resource for over 15 million outdoor enthusiasts annually. Our library of thousands of informative articles and how-tos has been written by trusted journalists and fact-checked by bird and garden experts for accuracy. In addition to our staff of experienced gardeners and bird-watchers, we hire individuals who have years of education and hands-on experience with birding, bird feeding, gardening, butterflies, bugs and more. Learn more about Birds & Blooms, our field editor program, and our submission guidelines.
On This Page
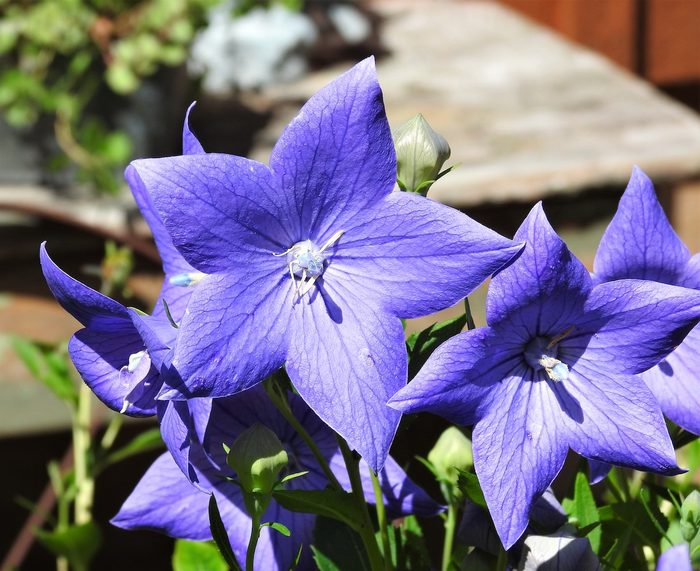
How to Grow Balloon Flower
- Common name: Balloon flower, Chinese bellflower, Japanese bellflower
- Scientific name: Platycodon grandiflorus
- Hardiness zones: 3 to 8
- Light needs: Full sun to part shade
- Watering needs: Consistently moist, not wet
- Preferred soil: Well-draining, moist soil
- Size: 1 to 2 feet tall, 1 to 1 1/2 feet wide
- Pollinators: Bees and butterflies
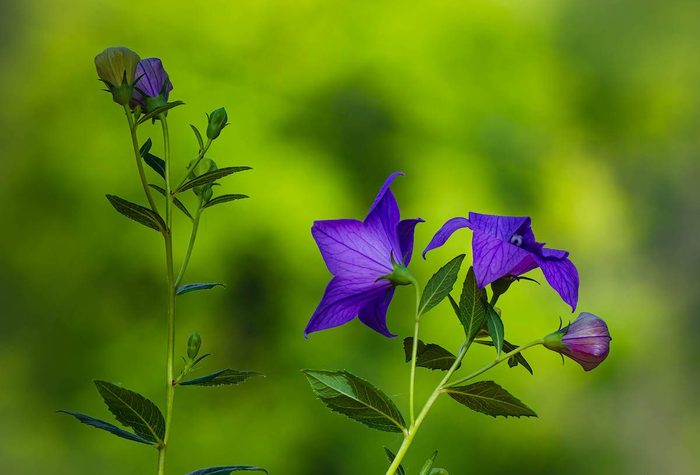
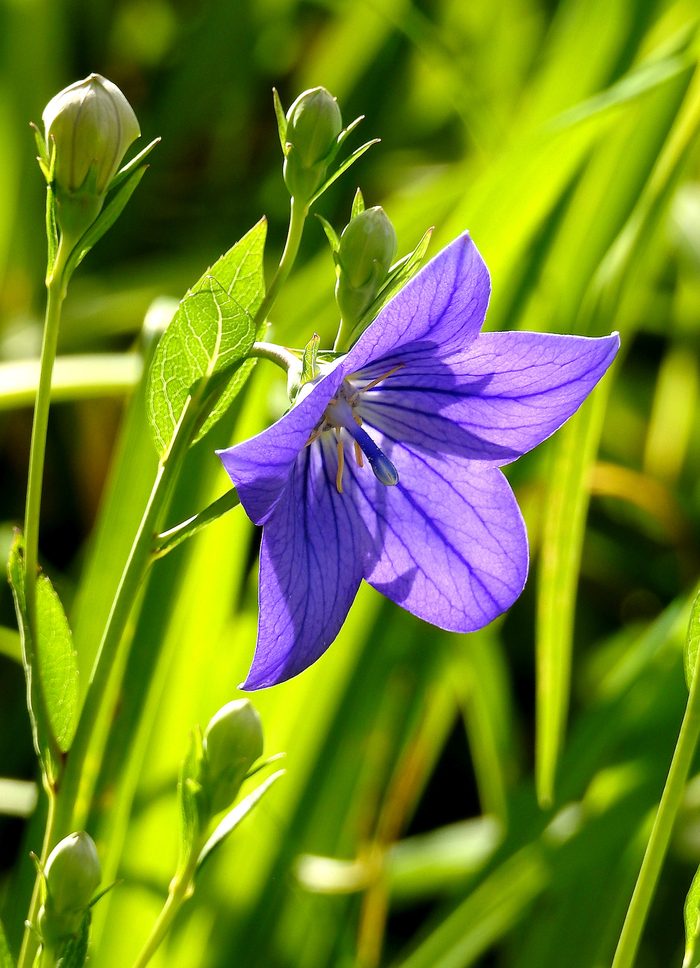
Although the Latin botanical names are the best way to talk about flowers, since common names vary so widely, some common names are still a lot of fun and definitely worth knowing. Balloon flower (Platycodon grandiflorus) is a great example. Once you see one of these plants covered in balloon-shaped buds and getting ready to burst into bloom, you’ll know exactly where the common name came from. These plants are a great choice for your cottage garden.
Are Balloon Flowers Perennials?
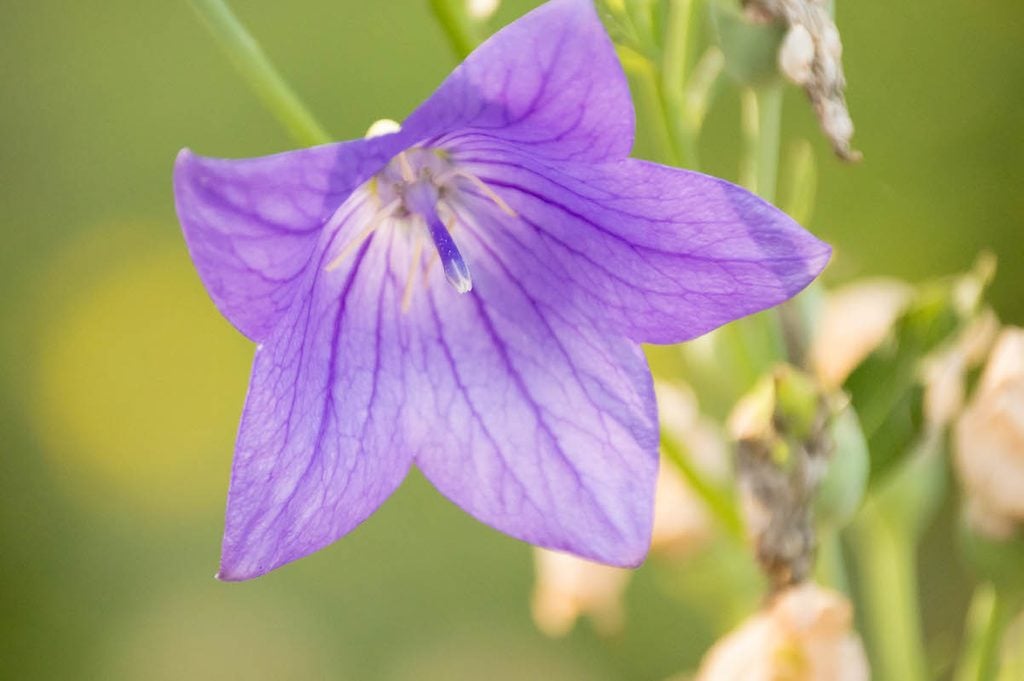
These clump-forming perennials are members of the low-maintenance bellflower family of plants. Growing balloon flower is really quite easy; it will thrive in almost any garden and is hardy down to zone 3.
Where to Plant Balloon Flower
For the most blooms, plant balloon flower in locations with part to full sun with proper drainage says Jen McGuinness, author of Bird-Friendly Gardening: Guidance and Projects for Supporting Birds in Your Landscape. “I grow pink balloon flower in my front garden in soil that drains quickly after it rains. It is interplanted with bearded irises and daylilies in a part sun location.”
A bit of afternoon shade can help the plant withstand the hottest summer weather.
In colder zones, the plant dies back to the ground in the winter. It’s often one of the later perennials to emerge in the spring, so you probably will want to mark the spot somehow so you don’t plant over it or accidentally weed it out. And choose that spot wisely—balloon flower doesn’t like to be transplanted or divided due to its fragile fleshy root system.
“The plant is slow to emerge in the spring, so be sure not to accidentally remove it when the garden season kicks off. It does best in a spot where it won’t be moved. I’ve had mine for several years!” Jen says.
For more blue beauty, grow delphinium in your flower garden.
When to Plant Balloon Flower
If you want to start with a packet of seeds, remember that you might not get blooms the first year. Some varieties and those started early enough indoors may flower the same year. It’s easier if you start with plants from your local garden center. Add them to your flower beds in spring after the threat of frost has passed.
They should begin blooming in mid- to late summer, and will continue producing flowers with regular deadheading. That’s basically all the care they’ll need, though. Deadheading will also prevent the plants from self-seeding and spreading.
If you want to save the seeds, wait until the pods turn brown and dry completely, then pop them open into a paper bag. Direct sow the seeds into your garden the following spring.
Watering Needs
New plants need regular watering while getting established in the garden, but then they are fairly drought tolerant and disease resistant.
Can You Grow Balloon Flower in Containers?
The plants grow well in large containers as long as the pot is deep enough to accommodate the plant’s long fleshy roots; 10 to 12 inches is usually deep enough. Make sure the container you choose has a drainage hole so the potting mix doesn’t get soggy.
Best Varieties to Grow
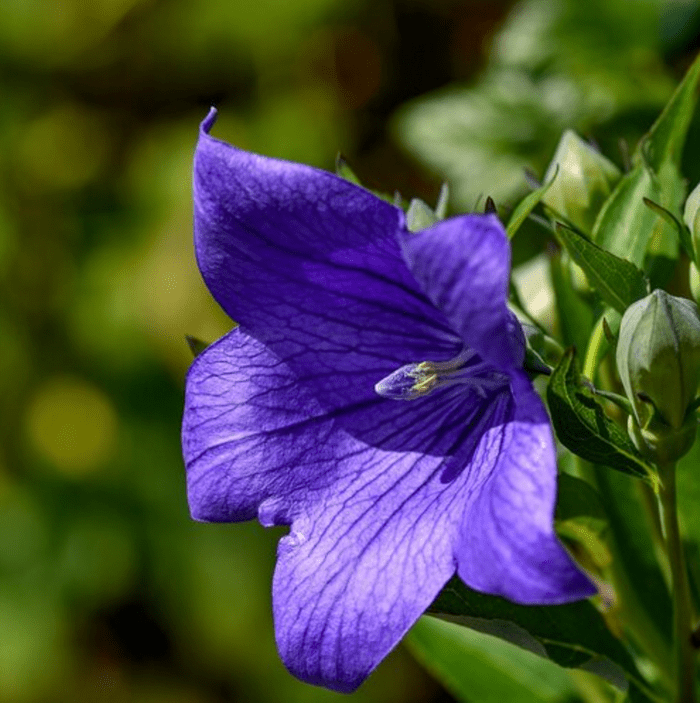
The most common blooms are in shades of blue, but pink and white flowering varieties are available, too. Recommended blue-violet blooming varieties include ‘Astra Blue,’, ‘Fuji Blue,’ and ‘Sentimental Blue.’
In most conditions, balloon flower will grow up to 2 feet tall; look for dwarf varieties for smaller gardens and containers.
“The pink balloon flower is shorter in size than some of the blue varieties, so it does well along the garden path as an edging plant. It starts to bloom in early summer,” says Jen.
Wildlife Benefits
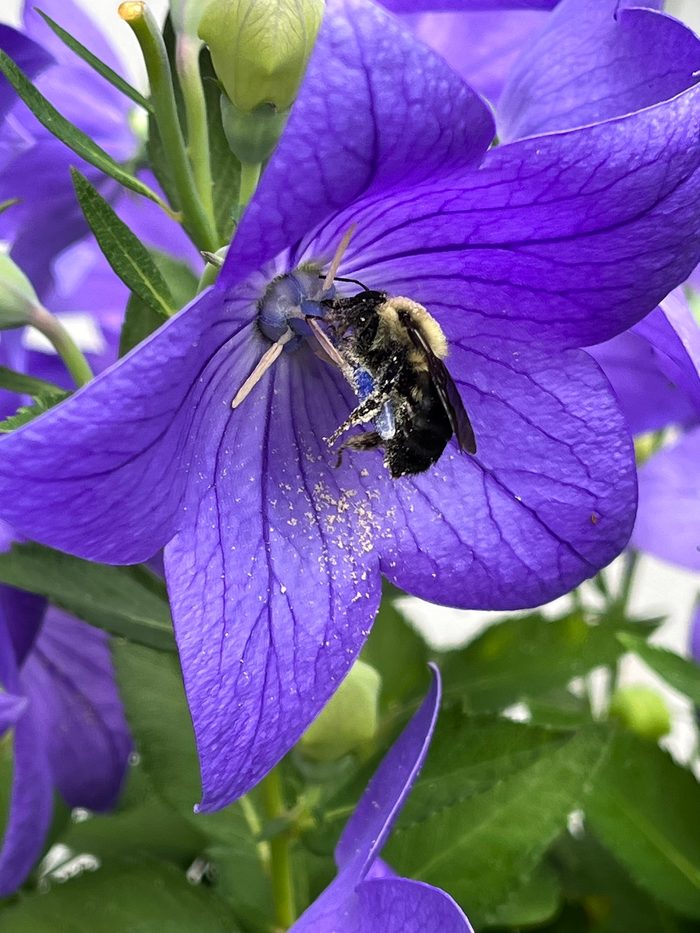
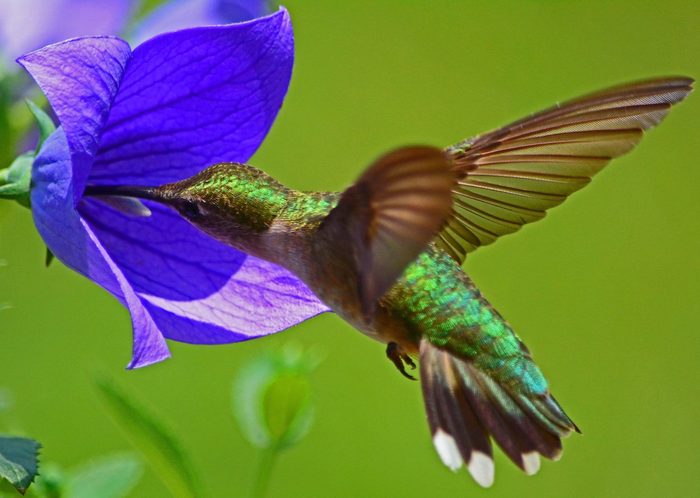
The colorful flowers attract bees and butterflies and other pollinators, including hummingbirds, but deer typically leave these plants alone.
“Balloon flower is a perennial favorite of mine. Bees love it, and it deadheads easily. Plus, it will bloom nearly all summer and into a warm fall,” says Birds & Blooms reader Susan Steele of Livonia, Michigan.
About the Expert
Jen McGuiness is the author of the recently released gardening book, “Bird Friendly Gardening: Guidance and Projects for Supporting Birds in Your Landscape,” published by Cool Springs Press/Quarto Knows.
Sources
- White Flower Farm – Balloon flower
- Drought-Tolerant Plants for the Conscientious Gardener – Research Guides at New York Botanical Garden
- Proven Winners
- Monrovia
- Walters Gardens
- University of Illinois-Extension – Balloon flower
Why Trust Us
For nearly 30 years, Birds & Blooms, a Trusted Media Brand, has been inspiring readers to have a lifelong love of birding, gardening and nature. We are the #1 bird and garden magazine in North America and a trusted online resource for over 15 million outdoor enthusiasts annually. Our library of thousands of informative articles and how-tos has been written by trusted journalists and fact-checked by bird and garden experts for accuracy. In addition to our staff of experienced gardeners and bird-watchers, we hire individuals who have years of education and hands-on experience with birding, bird feeding, gardening, butterflies, bugs and more. Learn more about Birds & Blooms, our field editor program, and our submission guidelines.
On This Page
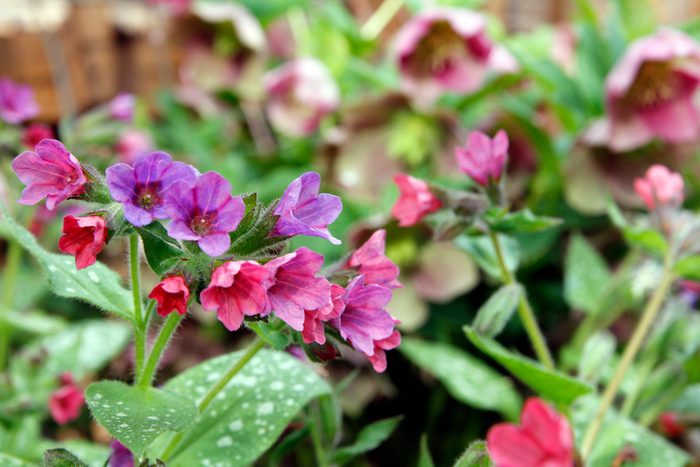
How to Grow Lungwort Flowers
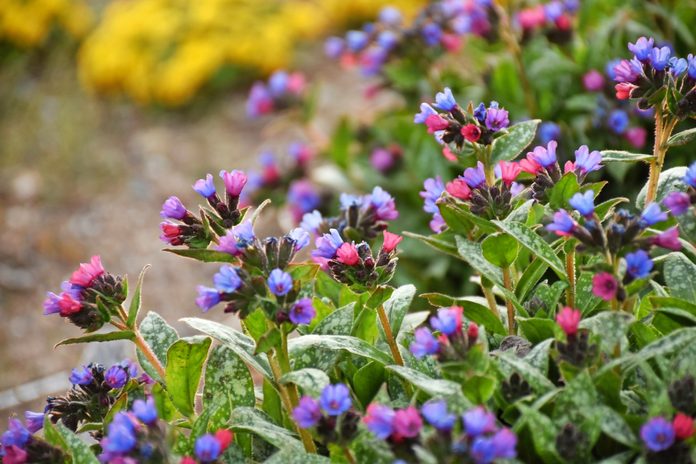
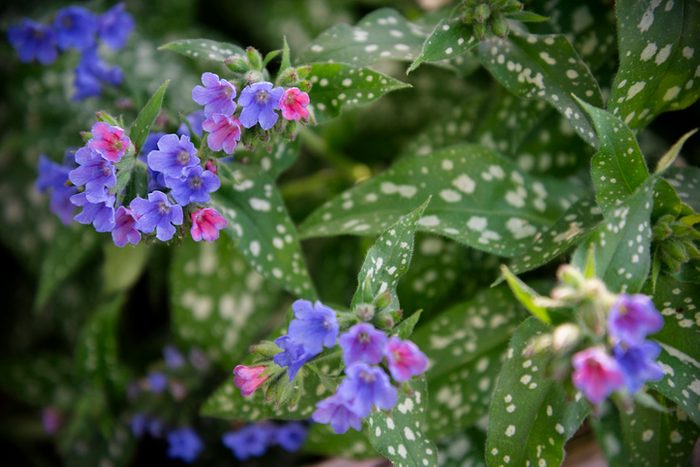
- Common name: Lungwort, spotted dog, Bethlehem sage
- Scientific name: Pulmonaria spp.
- Hardiness zones: 3 to 8
- Light needs: partial shade, shade
- Watering needs: moderate
- Preferred soil: consistently moist, well-draining, nutrient rich
- Size: clumps 6 to 12 inches tall and 12 to 24 inches high
- Attracts: hummingbirds, bees, butterflies
An energetic plant with a tragically unpleasant name, lungworts and their delicate multicolored flowers are coveted by gardeners for their ability to thrive in shady spaces.
“Colorful choices for a shade garden can be limiting, so any splash of color is a welcome addition,” says Spencer Campbell, Arboretum Plant Clinic Manager at The Morton Arboretum. “They can also be planted as ground cover to fill in areas of the garden where other plants may have a hard time getting established.”
Lungwort is one of the best shade garden plants for your shady areas.
Lungwort Foliage and Flowers
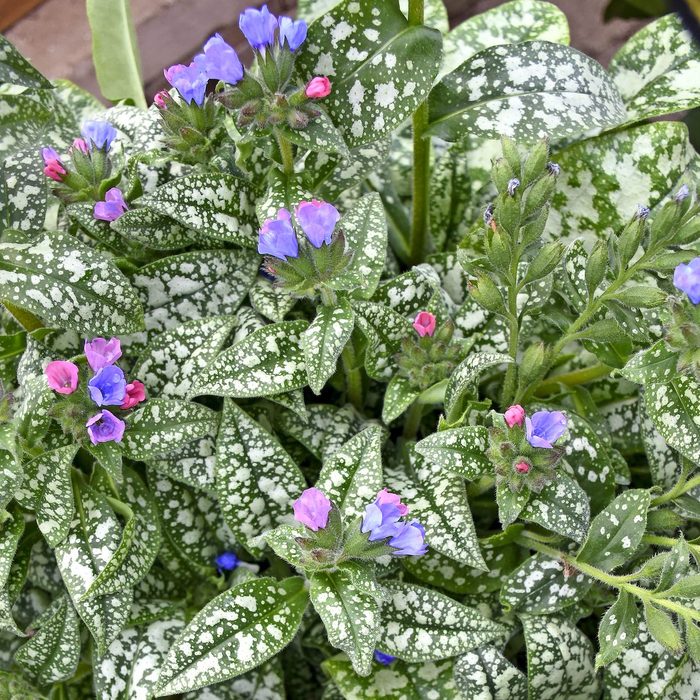
While pollinators love their flowers — which bloom early in the season and vary from blue and pink to purple, red and white — gardeners often choose them for their bushy, decorative leaves.
“Lungwort’s foliage is often adorned with white or silver spots once thought to resemble human lungs,” says Laura Root, a horticulturist at Park Seed. “This led to their historical use in treating respiratory ailments and earned it the name Pulmonaria.”
Grow hese fabulous foliage plants for garden pizzazz
Where to Plant Lungwort
When planted in the right conditions, Pulmonaria are a low-maintenance perennial — but finding that perfect happy place can be a bit of a task.
Their forever home should be in a shady area or one with dappled sunlight. They’re also particular about having moist, well-draining (but not soggy) soil. They love being under the shade of a tree canopy, but sometimes trees outcompete them for moisture, so in that case they may need supplemental water.
“Also, be mindful if you are planning to plant them around trees so you do not disturb their established surface roots,” says Spencer.
Psst—we found the perfect ground cover plants for every landscape.
How and When to Plant Lungwort
Most people plant Pulmonaria from potted plants or plugs, as they’re both difficult and slow to germinate by seed. While that raises the upfront costs a bit, they make up for it with value down the road.
“They are a great plant for division, making it valuable to the money saving gardener,” says Laura. “The best time to divide is after flowering. But they are slow spreaders so it is not advised to do this every year.”
Once you find your perfect Pulmonaria location, plant them in the spring, after the last frost. Early autumn is also a good time, as it allows the roots to get established before winter. Make sure to also fertilize them lightly with compost each spring.
Learn how to grow and care for hostas.
Lungwort Wildlife Benefits
While Pulmonaria is not native to North America, it is often considered a good addition to pollinator gardens anyway. As an early bloomer, it provides an important spring food source for bumblebees, plus its clump-forming growth creates habitat for beneficial insects like beetles and spiders, says Laura. It’s also rare to find a shade plant that’s good for attracting hummingbirds and butterflies.
Brunnera Jack Frost is another good choice for a shady spot.
Lungwort Cultivars to Grow
Pulmonaria comes in a wide variety of cultivars and hybrids. An especially noteworthy variety is Raspberry Splash, which is highly resistant to slugs and mildew infections, plus known for its vivid, large pink-and-purple bloom clusters.
Lungwort Pitfalls, Pests and Problems
One of the biggest complaints about Pulmonaria is that it wilts and dies back in hot weather. But, they usually perk up once the weather cools. To help them bounce back, trim off dead sections and keep them watered, but not soggy. Once they are done flowering, it’s also helpful to prune off the stems and tattered leaves to encourage new growth.
Other common problems and concerns include:
- Planting areas that are too wet, or soil that remains soggy for a prolonged period, both of which can cause leaf spots and crown and root rot.
- Planting areas that are too dry, which can cause dormancy.
- Soils that are too alkaline or too acidic. Lungwort does best within the 7.0 to 8.0 pH range.
- Slugs, which can damage foliage.
- Powdery mildew, which can affect aesthetics.
- Toxicity to humans and pets, which occurs in some, but not all, species of Pulmonaria.
Next, learn how to grow foolproof ferns in your shade garden.
About the Experts
Laura Root is a horticulturist at Park Seed. She earned her degree in environmental horticulture from Virginia Tech and loves helping gardeners of all experience levels create vibrant, sustainable landscapes.
Spencer Campbell is the Arboretum Plant Clinic Manager at The Morton Arboretum in Lisle, Illinois. The Plant Clinic is a free nationwide service providing home gardeners and green professionals with plant and growing advice.
Why Trust Us
For nearly 30 years, Birds & Blooms, a Trusted Media Brand, has been inspiring readers to have a lifelong love of birding, gardening and nature. We are the #1 bird and garden magazine in North America and a trusted online resource for over 15 million outdoor enthusiasts annually. Our library of thousands of informative articles and how-tos has been written by trusted journalists and fact-checked by bird and garden experts for accuracy. In addition to our staff of experienced gardeners and bird-watchers, we hire individuals who have years of education and hands-on experience with birding, bird feeding, gardening, butterflies, bugs and more. Learn more about Birds & Blooms, our field editor program, and our submission guidelines.