
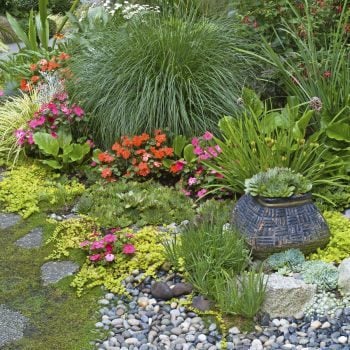
Rock gardens expand a gardener’s planting palette and offer creative challenges to gardening enthusiasts. Ideally suited to hot spots and difficult-to-tame slopes, they take their inspiration from wild flora that sprouts along gravelly mountain peaks and sandy desert floors. Building a rock garden allows gardeners to play with an array of small plant varieties that would likely be lost if planted in traditional perennial borders.
Ed Glover, a member of the Wisconsin-Illinois chapter of the North American Rock Garden Society, has been rock gardening for more than 25 years. He tends his own 120-by-15-foot rock garden at his home and acts as a volunteer rock-garden caretaker at the University of Wisconsin-Madison.
“I like rock gardening because it’s challenging,” Ed says. “It allows me to try to grow plants I’ve seen in the mountains out west. Since the plants are small, you can put in lots of different ones in smaller areas. They supply pretty foliage when not in bloom, and the rocks are interesting, even in winter. I always tell people to start with a small rock garden. If they like it, they can expand it a little at a time.”
 Kim Zoss, a horticulturist at the Chicago Botanic Garden, also encourages gardeners to start small. “Beginners might try cultivating a rock garden in a trough, in a nook, atop a small berm or around a water feature,” Kim says. “Rock gardens should look like a natural part of the landscape, so a gardener needs to look at the whole yard to see how a rock garden will fit in. It’s best to place the gardens where you can see them easily and often.”
Rock Garden Location and Construction
As a rule, rock gardens require sunny sites and quick-draining soil. Ed recommends planting alpine-type gardens on sunny, south-facing slopes; xeric-type rock gardens planted with drought-tolerant plants do well where conditions are hot and dry.
“When constructing a rock garden, always build up for good drainage,” Ed advises. “Instead of digging up existing soil, mound new soil atop the ground. I use a soil mix that’s equal parts compost, sharp sand and pea gravel. Dig into the mix to place your rocks, and bury the bottom third of each rock, so it doesn’t look like you just tossed the rocks in.”
Burying portions of the rocks not only provides a natural overall appearance but also encourages plants to stretch their roots to the soil beneath the rocks, which results in healthier plants. Ed suggests spacing rocks to create crevices for tucking in cushion-forming plants or creeping cultivars that will wander over nearby stones. Situate larger rocks so they create microclimates that offer shaded planting sites on one side and sunny spots on the other. Tilt flat rocks to direct rainwater into the soil.
Select a single type of native rock in different sizes and shapes for a cohesive, natural-looking garden. If you’re planting alpine gardens, opt for porous rocks such as limestone, sandstone, shale or tufa; nonporous rocks like marble, basalt and granite work well in desert-inspired gardens.
Rock Garden Plants
Common landscape-design principles – such as including zone-hardy varieties with varying heights, forms, textures and bloom times – apply when creating rock gardens. But, since rock gardening focuses on individual plants, it’s important to not crowd plants and to choose nonaggressive plants that won’t overgrow their designated spots. If you’re including evergreens for winter interest, select miniature varieties with a very slow growth rate.
Ed plants an array of alpine and subalpine perennials, many with cushionlike profiles. Draba aizoides, a mat-forming perennial with yellow flowers, and saxifrage, a silvery-foliaged plant with white, yellow or pink blooms, kick off the flower show in early spring. Creeping phlox and rock cress will blossom next and are followed by summer-blooming dianthus and blue-flowering campanula.
Desert rock gardens supply a good foundation for penstemons, sedums, cacti, low-growing yarrow and hens-and-chicks. The Chicago Botanic Garden’s rock garden combines alpine and xeric perennials, such as ice plant, small sedums, ground-cover potentilla, pulsatilla, moss phlox and dwarf iris with miniature evergreens, such as Teddy arborvitae. Other good rock-garden options include Tom Thumb cotoneaster and blue rug juniper, Kim says.
Perennials are the mainstay of rock gardens, but some gardeners incorporate heat-loving annuals, such as moss rose or creeping zinnia, into their design for season-long color. Kim also recommends tucking miniature spring bulbs amid the rocks for early spring color.
Rock gardening is becoming increasingly popular, and local nurseries are responding to the growing demand for rock-garden plants. Ed and Kim recommend checking local nurseries first—you’ll often find plants larger than those available through mail-order catalogs and varieties specifically suited to your planting zone.
Rock Garden Maintenance
After the plants are in, mulch the entire garden with at least an inch of gravel that matches your rocks and stones. The mulch conserves moisture, keeps weeds down and fashions a suitably stony backdrop for both boulders and plants. Limit fertilizer applications to once a year to keep plants from growing too large. Educate yourself about each plant’s water requirements—too much moisture may cause root rot; too little water may stress out plants. Instead of using a sprinkler, Kim suggests spot-watering each plant to meet its individual water needs adequately.
Try your hand at birdscaping, and you’ll quickly learn that landscaping is for the birds — literally! Planting with birds in mind pays off fast, attracting birds in greater numbers with more variety and longer visits from your feathered friends. It’s easy, too. All it takes is looking at your yard from a bird’s point of view.
You’ll have greater success at attracting your favorites when you realize two things – finding food and not getting eaten – are the two biggest issues for birds. Sure, you can just put out a tempting spread at the feeders, and birds will come. But to get them to linger, and maybe grace your place with a nest come spring, you’ll need to make them feel safe, both while they’re eating and while they’re moving about the yard. This is the backbone of birdscaping.
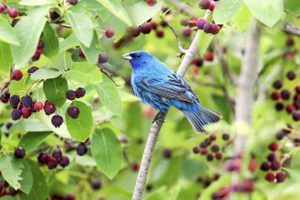
“The more plants, the better” is my motto. A yard that’s chock-full of different trees, shrubs, grasses and vines, plus the usual flower beds, is what brings in the birds. One that’s mostly lawn won’t get many customers at all. You might think food is the best for attracting birds to your yard, and you’re right. Food is exactly what they’re after on all those plants, including insects in incredible numbers and any tempting berries or fruit. But surprisingly, seed probably comes last when it comes to attracting birds.
You can learn a lot about planning for birds just by watching them in their natural surroundings. Observe them in your yard, and you’ll see that very few of them spend time out in the open. Most birds move from one clump of plants to another. They alight in trees, gather in bushes or scoot through the garden looking for food. The sheltering branches or stems protect them from the hungry eyes of hawks, prowling cats and any of the other critters that are only too happy to dine on a dove, sparrow or chickadee.
So think like a wary bird and set up stepping-stones of shrubs, trees, grasses and flower beds. Go horizontal with corridors of plants so birds can move easily about your yard. A hedge of mixed berry bushes is irresistible to bluebirds, thrashers, catbirds and other friends. Groups of shrubs with just a hop, skip and jump between them are also great.
But think vertically, too, because birds move up and down as well as sideways. You can shoehorn in a surprising amount of cover by layering small trees, shrubs, ferns and ground covers near big trees, and by adding an arbor or trellises for vines and roses. Thinking like a bird instantly reveals the benefit of including ornamental grasses, roses and other shrubs, as well as small trees, to your flower beds. Your backyard will soon look like an oasis, especially from the air.
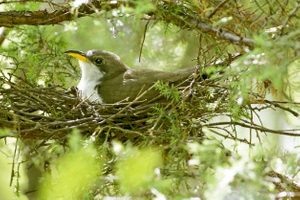
While most gardeners strive for neatness, birds like messy surroundings, so birdscaping focuses on finding a happy medium—a natural look that will coax birds into lingering and possibly even nesting. Let perennials, shrubs and other plants knit together, instead of keeping bare space around every plant. Allow the dead leaves to lie beneath shrubs and hedges as an insect-rich mulch for gray catbirds, thrashers, wrens and other friends to investigate.
Hold off on cutting back flower beds until spring so goldfinches, titmice, doves, quail and other birds can shelter in them when searching for seeds and insects in winter. Instead of getting out the clippers every few months, learn to love the natural look of a free-form hedge. Birds will appreciate it. And you’ll appreciate the birds bringing life to your yard, every season of the year.
Save Money While Attracting Birds
- Dig suckers from lilacs, forsythia, weigela, serviceberry, shrub roses and other multiple-stemmed plants and transplant them to new homes.
- Trees and shrubs cost less at garden centers than nurseries. Selection is limited, and plants may not be as nicely shaped or as big, but the savings may get you three or four plants instead of just one.
- Look for free or cheap plants on craigslist.com or freecycle.com. Early birds get the worm.
- Scour the bulletin boards at supermarkets and other places, and post your own notice for “Free Plants Wanted.”
- Bare-root shrubs are a bargain. Look for bramble fruits, forsythia, hedge plants, and roses in bags rather than pots.
- Shop end-of-season sales to save a bundle.
- Scout the “sad sack” section of your nursery and garden center for damaged but salvageable plants at cut-rate prices.
- Treasure every bird-planted tree seedling you find in your yard; transplant while still small.
Plastic bottle crafts are a great way to reuse those ubiquitous water bottles. With a few easy steps, you can create these colorful garden flower decorations.
Materials:
- 2 or 3 same-size plastic soda bottles
- Waterproof permanent adhesive
- Gloss spray paint for plastics
- Small scrap of Styrofoam block
- Scrap of colored foam for backing
- 3/8-in.-wide x 24-in.-long wooden dowel rod
- Opaque permanent paint markers
- Paper-backed duct tape sheets (optional)
- Scissors or craft knife for bottle trimming
- Flexible ruler
Step-By-Step Instructions:
Step 1
Wash the bottles and let dry. Use a flexible ruler and permanent marker to make an even circular line as a cutting guide about 1/3 of the way down from the tops. Cut and discard top portion of bottles, keeping the bottoms to make the flowers.
Step 2
Place bottles upside down on scraps of cardboard or newspaper in a well-ventilated area. Stand the dowel rod in the Styrofoam block to make it easier to paint. Following manufacturer’s instructions, spray-paint exterior of bottles and dowel rod. Apply as many coats as needed for complete coverage. Let dry and remove the rod from the Styrofoam.
Step 3
Using a permanent marker and flexible ruler, lightly mark sections evenly around perimeter of each bottle for flower petals. For small bottles, mark about every 1 in.; for larger bottles, mark about every 2-1/2 to 3 in. Use scissors or a craft knife to cut vertical slits on marks, making several flower petals. Stop cutting each slit at the ridged base of bottle bottom. If desired, trim ends of petals into rounded shapes.
Step 4
Bend the petals forward so they’re at right angles to the center of the flower (the bottle bottom), creasing each one at the ridged base of the bottom. If needed, bend and press firmly several times until the petals stay in place.
Step 5
Using permanent adhesive, attach the bottles by stacking bottoms with petals outward. Stagger the placement of petals. For inner bottles, bottoms may have to bend slightly to fit inside outer bottle. Let adhesive dry.
Step 6
If desired, cut a 1-1/2- to 2-in. strip of duct tape to fit the perimeter of the top flower’s center. Decorate the center of the flower using the paint markers.
Step 7
Attach the dowel rod. For larger stacked bottles, cut small crisscross slits through the side of the middle bottle. For smaller stacked bottles, cut a small V-shape slit from the back edge of the last bottle. Put one end of dowel rod through slit, running it across the width of the bottle bottom until it meets the opposite inner side. Use permanent adhesive to glue dowel rod in place at both sides. Let adhesive dry.
Step 8
Cut a circular piece of colored foam slightly larger than the opening on back of flower and secure it with glue around the edges. Let it dry.
Stick your soda bottle flower a few inches into the dirt, indoors or out. No need to water it!
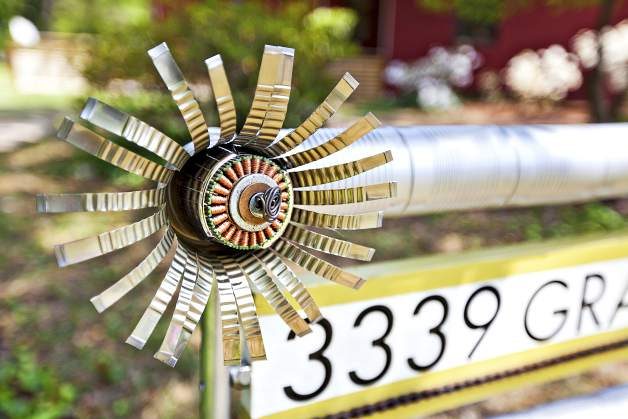
My husband and I are just finishing up a (very long!) renovation of a rustic 1950s rancher. I enjoy cranking up the volume on these outdated midcentury homes. So when it came time to design an estate sign for the property, I knew I wanted something with a clean, sleek feel that also reflected the home’s humble roots. I hope you agree that this tin can and conduit pipe recycled garden sign fits the bill.
Materials:
- 3-ft. x 6-in. wooden board (or desired size)
- 20 or more opened 16-oz. (or other same-size) tin cans with labels removed
- Two sections of ¾-in.-wide galvanized conduit for sign sides (desired sign height plus a couple of feet extra)
- Two 2-ft. sections of slightly wider galvanized conduit to secure in the ground 7-ft. or longer piece of 3/8-in.-wide threaded galvanized steel rod for the can rails
- Several nuts to fit threaded rod (enough to attach cans)
- Exterior-grade vinyl letters and numbers to fit board
- Cardboard scrap
- Sandpaper
- Paint and paintbrush
- Exterior non-yellowing spray sealer
- Cabinet knobs (optional)
- Bike chain (optional)
- Silver- or chrome-colored spray paint (optional)
- Colored plastic can or bottle top
- Wire tools
- Bolt cutters
- Nail punch and hammer
- Metal snips
- Drill press or vise and hand drill
- Electric drill with drill bits
- Plumber’s pipe cutter
Step-By-Step Instructions:
Step 1
Use bolt cutters to cut two pieces of threaded steel rod to fit the sign. Measure the length of your board (mine was 3 ft.) and then add 3 in. to each rod end. For instance, I cut two 3-ft.-6-in. rods to make the can rails for my sign.
Step 2
Trace the open end of a can onto scrap cardboard and cut out. Mark the center of the cardboard circle and punch a hole. Use this as a template to mark the center on the closed end of all the cans with a marker. Then use a nail punch and hammer to make a hole on each marked spot. The hole should be wide enough to fit the threaded steel rod.
Step 3
From the other rod end, slide on a can, closed end first, until it rests in the open end of the first can. Thread a nut until it reaches the bottom of the previously placed can. Align cans and tighten the nut. Repeat until all cans are secured together. I used about 8 cans on each rail. Use enough cans so that 3 in. of rod remains at both ends when done.
Step 4
To cover the open end of the rail, use metal snips to cut 2 in. up the sides of the can’s perimeter. Then squeeze the can’s slit sides, open end first, into the last can on the rod. Thread a nut against the bottom of the can to secure.

Step 5
Repeat Steps 3-5 to make the second rail of cans using your other steel rod piece.
If desired, spray-paint the tin can rails and conduit sections.
Step 6
Sand the board and paint it in your choice of color(s). Let dry completely. Then apply vinyl letters and numbers as desired to the board.
Step 7
On a flat surface, lay the can rails and the board so they are spaced exactly as you want them to be in the finished sign. I used a couple of blocks of wood to raise the board to the same level as the rails.
Step 8
Cut the two sections of conduit to your desired sign height plus a couple of feet. Then lay the equal sections on each side of the rails and board. Mark holes on the conduit sections where you want to attach the rails and board. Be sure to mark both sides the same. I used one screw centered on each side to attach the board, but you may want to use two equally spaced screws for stability.
Step 9
Using a drill press or vise and hand drill, make holes in the conduit sections where marked. For the rail holes, don’t drill all the way through. For the board sign marks, go all the way through the conduit section. I used 2-½-in. drywall screws and made my drill holes slightly larger than that for the sign.
Step 10
After drilling, lay the conduit sections beside the rails and board again. Insert the threaded rods on the rails into the appropriate holes. Then attach the board, using a nut as a spacer between the board and conduit section.

Step 11
For a more finished look, attach cabinet knobs to the top of each conduit section. You can also add a bike chain under the address.
For the flower, punch a hole in the bottom center of a can. Use metal snips to cut slits about 3/8 in. wide, ending about 1 in. from the bottom, all around the can. Curve slits outward like flower petals. Drill a hole in the top center of a colored plastic cap (like that on a spray-paint can). Use recycled materials like colored wires and washers to decorate the top. Curl the end of the wires through the cap hole. Use a length of wire to attach the decorated plastic cap to the can bottom with cut petals. Then secure it to the sign.
Step 12
Coat the entire sign with spray sealer and let dry.
To secure the sign in the ground, hammer two 2-ft. lengths of wider conduit into the ground and slide the sign conduit sides down into them.
If you’re going to grow containers, you might as well grow containers. You know, go all out – make a statement – create a living piece of art! I’m not talking about those little baskets from the garden center filled with the standard petunias, geraniums, impatiens and pansies. Not that there’s anything wrong with those—my kids get me a lovely hanging basket of petunias every Mother’s Day. But if you’re going to invest in good soil, cool pots and unique plants, then you might as well be distinctive, daring and dramatic. In short, it’s time to go big or go home. We’ve got tips to make all your container garden ideas amazing!

Find the Right Base. To anchor everything, you need the right container. You’ll certainly have plenty to choose from. Just go to the garden center, and chances are you’ll find rows and rows of them in every size, shape and color imaginable. Before you even start looking at plants, find a container that inspires you. A short, stocky container would be just the thing for a small conifer. A bold turquoise container would be the perfect backdrop for various shades of pink. A big, tall container is a nice option for trailing plants.
A good pot or other planter can be expensive, but go ahead and splurge a little if you find one you really like. Chances are you’ll have it for years. Oh, and remember that containers are like shoes—they’re better when you buy them in pairs!
Celebrate Height. One of the easiest ways to make an impact with a container is tall plants. Cannas, purple millet and ornamental corn all have big, interesting leaves—and you can’t beat the wow factor of a cultivar that’s 4 to 6 feet tall. Another easy way to get height is with ornamental grasses. They not only grow several feet tall in a single season, they also give containers nice texture. You can find some colorful annuals (purple fountaingrass, for instance, is an annual in most zones), but don’t overlook perennials like switchgrass and zebragrass. Just because you’re growing in a container doesn’t mean you have to dump the plants out each year. Offer the perennials good protection in a weatherproof pot over the winter, and you’ll have a jump on next year.
Include Trailing Plants. Trailing plants are a must-have for hanging baskets, but they’re also a showstopper for other containers. Garden centers often have a whole section of trailing plants. Use blooms like trailing begonias, petunias and geraniums, or try foliage plants like sweet potato vine and licorice vine. You’ll probably want to stick to a single type of trailing plant per container, but it can be fun to mix in a couple of varieties within a single family. Plant a couple of sweet potato vines, a standard one and a variegated one. They’ll complement one another while offering some extra variety.
Choose Bold Colors. You don’t necessarily want to pair bright red flowers with a bright red container. But with a little bit of planning, you can use color to your advantage. It starts with your pot of choice. How colorful is it? If you love bright orange, yellow or blue pots, what’ll work well as accents? Another option is to choose a more subdued, neutral pot that maybe has an interesting shape or lines. Then use plants to make an impact. One advantage to this is that you can change the plants from one year to the next. If you have a brown or terra-cotta pot, you could have a red, white and blue theme one year and a yellow theme the next.
The More the Merrier. If you read the label on most cultivars, it’s going to say you should space plants 12 to 24 inches apart. But container gardening doesn’t abide by those rules. It’s better to throw a few extras into the mix, which results in a fuller, bigger, bolder container. Of course, you can go overboard, so use your discretion when planting. If it feels too crowded, it probably is. But if you have lots of soil space, fill it up.
Don’t Forget About Presentation. So you have your height and your trailing plants. You’ve chosen an inspiring container. And you’ve used color to your advantage. Now you just need to make sure that everything works together. Where will your container live? What do you have planted around it? If it’s in a solitary location, is it big enough to fill up the space? The planning and placement of your container are the deciding factors in its success. Give it an outstanding display, and all your hard work will be worthwhile.
Now that you know the basics, use these container garden ideas as inspiration.
Orange Surprise, by Ball Horticultural
Container Size: 14 inches, Exposure: Sun
- New Day™ Clear Orange gazania (2)
- Emerald Falls dichondra (2)
- Silver Falls™ dichondra
- Pony Tails Mexican feather grass
Container size: 14 inches
Exposure: sun
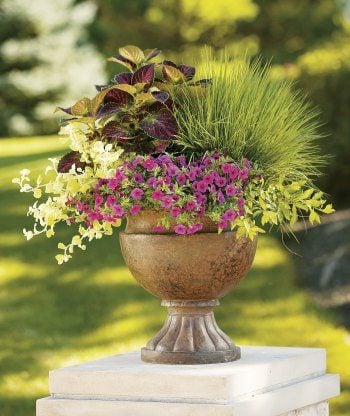
Party of Five, by Proven Winners
Container Size: 24 inches, Exposure: Sun
- Superbells® Pink calibrachoa
- Northern Lights tufted hairgrass
- Gold Mound duranta
- Lemon Licorice licorice plant
- ColorBlaze® Kingswood Torch coleus
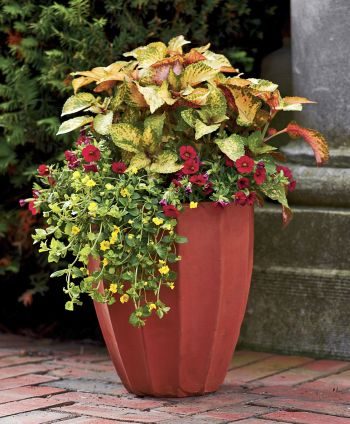
Bands of Gold, by Proven Winners
Container Size: 14 inches, Exposure: Sun
- Superbells® Red calibrachoa
- GoldDust™ mecardonia
- Amora coleus
When we think of health care, we often look within the walls of hospitals and clinics. But what grows just outside some of those walls promotes healing, too. We’re talking about roses that restore, hydrangeas that bloom with hope and salvia that smell of solace. These natural aids to wellness grow in the healing garden plants that many medical facilities today are growing and tending.
Marni Barnes, a landscape architect who designs and consults on the creation of such landscapes, puts healing gardens in two categories: restorative and enabling. “Restorative gardens are designed to provide benefits to people who are simply in the space or able to look out at the space,” says Marni, author of the book Healing Gardens: Therapeutic Benefits and Design Recommendations. “These gardens provide respite, which bolsters our internal healing mechanisms. Enabling gardens provide therapeutic benefit to people who are actively engaged in tending or harvesting the plants that grow there.”
A dose of nature: Why birding will boost your mental health.
Ronald McDonald House Secret Garden
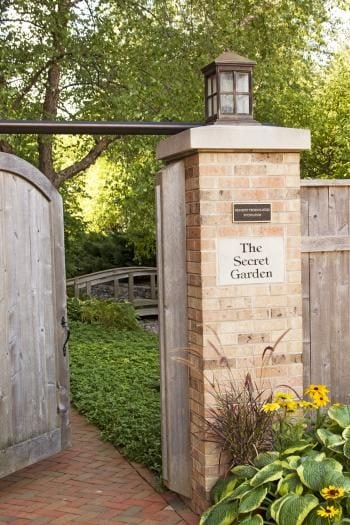
Designing a healing garden means recognizing the physical, psychological, social and spiritual needs of different kinds of patients, such as children or the elderly. Take the Ronald McDonald House of Eastern Wisconsin, which offers short- and long-term residence to families with children seeking treatment for injuries or illness at nearby hospitals. For these families, the house literally becomes a home away from home. And the lush Secret Garden, appropriately named after the children’s book, tucked just behind the building? That’s their backyard.
Planted in 2002, this half-acre organic garden features hundreds of labeled plants that stimulate the senses in some way. Visitors to the four-season garden can play board games in the pagoda, climb on the big wooden play set, meander through the colorful Alphabet Garden or stumble upon the miniature Fairy Garden. “It’s a place for parents to go and reflect, re-energize and meditate,” says staffer Jacquelyn Wahlberg. “For the children, it provides an outlet for their energy, smiles and laughs, and a sense of normalcy.”
Other features are pathways paved with wheelchair- and stroller-friendly crushed gravel. There’s a council circle surrounded by fragrant roses, where families can gather to pray or talk. A large water feature is shallow enough for small children to safely play near. Also look for a produce garden where sun-kissed Japanese eggplant, cherry tomatoes and a variety of fresh herbs grow in raised beds.
“When you come through the garden gate, you’re greeted with a sense of harmony and peace,” says Ann Philips, lead gardener and one of the 16 volunteer University of Wisconsin Extension Master Gardeners who help tend the garden. “We purposely repeated several plant families to give the garden continuity, but also provided some surprises to stimulate the imagination. As I always say to our families, ‘Whatever you’re looking for, you’ll find it in the Secret Garden.’ ”
The garden is also a certified National Wildlife Federation Backyard Habitat. It welcomes butterflies and birds and emphasizes native plants, such as butterfly weed, columbine, purple coneflower and river birch.
Alzheimer’s Gardens
Children and their families aren’t the only ones who are able to reconnect with their roots in a healing garden. More and more, therapy gardens are being incorporated into landscapes that support an aging population, such as retirement homes or facilities that specialize in Alzheimer’s or dementia care.
“In Alzheimer’s facilities, enhancing memory and supporting visits from family and friends are the main goals,” says Marni. “Plants that are familiar, especially fragrant ones, are helpful in triggering memories. Signs with interesting information or literary quotes can stimulate conversation, and a path for residents to pace is important during the middle stages of dementia.”
Alzheimer’s gardens are often enclosed to provide a sense of security. They feature wide, level pathways or labyrinths, nonglare surfaces, social spaces, benches where patients can rest and familiar features like wind chimes, clotheslines and bird baths.
How to Choose Healing Garden Plants
When starting a healing garden, plant selection is key. But the options can be overwhelming.
“Choose healing garden plants that command awareness, either through their own characteristics or because they attract wildlife,” suggests Marni. “The best plants are ones that stimulate the senses and lift a person out of their worries and into the present moment.”
Marni’s personal favorites are ornamental grasses that sway in the wind, bringing attention to a soft breeze. Or tall bamboo — its foliage becomes iridescent when backlit and can bring light into a shady courtyardy. It also makes a soft clacking sound in the wind.
“Try plants that have an intricate or delicate flower, such as fuchsia or snapdragon,” says Marni. “They can draw one into their miniature world. Salvia and sage have great color, their foliage is pungent when crushed, and they attract hummingbirds and butterflies. And trees with interesting bark can prompt one to reach out and touch it.”
Especially in an Alzheimer’s garden, choose plants that trigger positive emotions from a person’s past, such as old-fashioned hollyhocks, lavender or lilacs. Even herbs may help elicit memories of Sunday dinners gone by.
Healing gardens prove that one should never underestimate the restorative power of nature. It connects us, it heals us, and it awakens memories or provides new and happier ones in times of trouble.
Ready to create personalized gift baskets for the nature lovers in your life? Use our tips to build perfect presents for everyone on your list!
Know Your Recipient. It sounds like obvious advice, but it really is essential. Do a little digging and ask the special people on your gift list a few questions so you can really customize their presents. Knowing that someone loves gardening isn’t quite enough. Does he prefer annuals or perennials? Does she do a lot of container gardening? Are they trying to attract hummingbirds and butterflies? Finding out what they’re most interested in will help you dig around and create something sure to please.
Include a Book. Once you have a clear angle or theme for your gift basket, let a good book take it from there. Look at the gardening and nature section at any bookstore, and you’ll find dozens of options. For gardeners, you might find books on planting in containers or attracting -butterflies. For birders, you may discover books on photography or feeding the birds. Once you have the book, take a peek inside for tips and ideas. You might find ideas that you never would’ve thought to put in the basket. Or if the book happens to include projects, you may be able to buy your recipient the supplies needed to make one.
Find Your Basket. You can go with a traditional gift basket if you want (you can often find one for next to nothing at Goodwill), but challenge yourself to think outside the box. While we used a large terra-cotta pot to hold our Garden Guru package, you might want to try a garden apron, a hat or some other imaginative, decorative container. Aim to make everything in the package useful in some way. If you plan thoughtfully, you can make sure your recipient will be able to use or reuse everything in the gift.
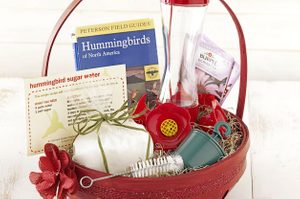
Mix Essentials with Extras. If you’re going to put together a Hummingbird Fan package, a sugar-water feeder of some sort is a basic. But be sure to include some extras, too—a brush to clean the feeder or even a bag of sugar. We like to add seed packets to our gift packs because they’re inexpensive yet useful. Do a little research on what seeds are best for feeding birds, attracting butterflies and so on.
Make It Interactive. This is the fun part—figuring out something that will get your recipient really involved. For all the packages here, we include a recipe of some sort, whether it’s for suet, sugar water, butterfly nectar or something else. But be as inventive as you want. If you’re putting together a gift for a crafty person, find a cool DIY project to make on his or her own. For creative gardeners, find a beautiful container recipe they can plant in spring. Another idea: If you’re giving the gift to someone you’re close to, offer to help out. You could include a coupon for weeding, planting or just shopping together at the garden center. What a special way for the recipient to get even more out of the present.
Make It Personal. Anything you can do to personalize your gift will mean a lot to the recipient. Use exterior paint to add a name to a garden container or bird feeder. If your recipient really likes owls, cardinals or monarch butterflies, look for stickers or stencils to embellish the present. Are you good at embroidery or other kinds of sewing? Add a name or monogram to a pair of gardening gloves or garden towel. Even if you don’t have the skills yourself, ask a friend, or pay someone on etsy.com to help out.
Dress It Up. Here’s your final task: Make it pretty! You’ve taken the time and effort to gather wonderful items, so now add the finishing touches. For instance, packaging birdseed in -attractive bags will go a long way in presentation. If the decorations can be reused, that’s even better. Brighten up the hummingbird package with a red bow that can hang on the sugar-water feeder later; to a hummingbird, the more red, the better. Or find decorative pins, buttons or magnets to dress up the garden or butterfly pack. These little personal touches make a huge difference! Now you’re ready to get started. Here are some of our favorite DIY gift basket ideas and options to use for inspiration. We pulled in our ultra-talented craft editor, Shalana Frisby, to turn our ideas into gorgeous results, and offer you some tips along the way!
 The Bird Lover:
- Safflower seed
- Sunflower seed
- Thistle seed
- Peanuts
- Suet recipe
- Suet feeder
- Log feeder
- Seed feeder
- Game
- T-shirt
- The Bird Watching Answer Book, or another of your choice
TIP: If your items are large or oddly shaped, use an extra-wide wired ribbon to hold items in place and visually tie everything together.
 The Herb Grower
- Clay pots
- Wooden tray
- Herbs
- Herb seeds
- Watering can
- Soil recipe
- Grow light
- Soil
- Herb cutting shears
- Plant markers
- Herb recipes
- Book – We love The Edible Balcony
TIP: Customize these plant markers any way you like by changing their shape and color. Try a heart, star, moon or other simple shape from a cookie cutter.
 The Garden Guru
- Personalized pot
- Soil
- Seeds
- Book (Try Handmade Garden Projects)
- Gardening gloves
- Tools
- Garden shoes and hat
- Coupons
- Garden catalog
- Garden planner
- Magazine subscription
- Container recipe
TIP: Make decorating easy by using premade chipboard letters, stickers, papers or even stamps. Coat your finished creation with a clear waterproof sealer to make it last.
 The Hummingbird Fan
- Sugar-water feeder
- Sugar
- Cleaning brush
- Ant guard
- Flower seeds
- Sugar-water recipe
- Calendar
- Note cards
- Book (We used A Field Guide to Hummingbirds of North America)
TIP: This basket was originally light pink, but we painted it a deep red. Easily change wood and wicker baskets with acrylic paint or spray paint.
 The Butterfly Enthusiast
- Feeder
- Gardening book
- Sugar-water recipe
- Seeds
- Butterfly net
- Viewing jar
- Magnets
- Guidebook, like Kaufman Field Guide to Butterflies of North America
TIP: This metal bucket will make the perfect leaf- and bug-gathering container for little hands. Throw in a magnifying glass and this DIY net, and you have an excellent gift for a kid.
Looking for a rustic way to mark plants in your garden, or want to create a personalized DIY garden sign? These tree cookie plant marker signs are easy to do, cost very little, and look great in any garden!

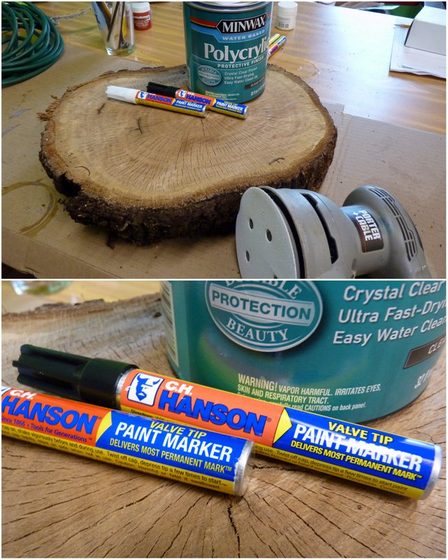
What You Need:
- Tree cookies (see below)
- Medium-Grit Sandpaper
- Paint pen(s) in desired color(s)
- Polycrylic protective finish (or any sealer for use on wood)
- Paintbrush
What are Tree Cookies?
Tree cookies are simply flat rounds of wood cut from tree branches or trunks. There’s no need to cut down a living tree – use one that has fallen naturally, or save some branches from pruning. Avoid very resinous trees like pine; birch or oak is best. You can also buy tree cookies at craft stores and online; just do a search for “tree cookies”.
What to Do:
- Begin by sanding the surface of your tree cookie. There’s no need sand both sides unless you plan to decorate both. If you have a power sander available, this process will go much more quickly, especially if you’re doing multiple cookies. Wipe the surface free of debris after sanding.
- If you’re great at lettering or drawing, you can just pick up the paint pen(s) and go to work now, but most of us probably feel better sketching out the text or design first with a pencil and tracing over it with the paint pen. You can also use paint and paintbrushes if you like, but the nice thing about paint pens is that they’re easy enough for anyone to use.
- Once the painted design dries, use a paintbrush to apply two thin coats of polycrylic sealer, allowing it to dry between coats. Allow to dry according to the directions on the can, and you’re done!
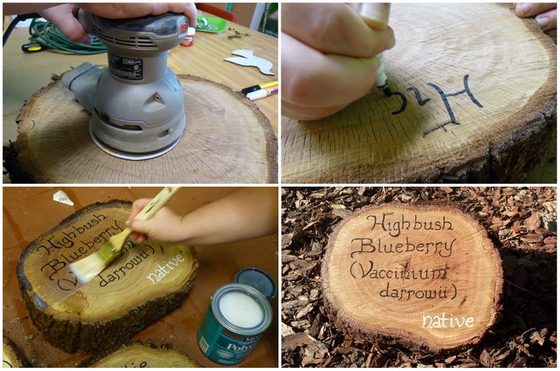
We’re using these tree cookies in the gardens where I work to mark plantings, but you can do just about anything with them. Ours are around 8 inches in diameter and 2 inches thick, but you can cut yours to any size that works for you, including smaller ones to mark seed beds or decorate potted plants. TIP: Smaller ones make great DIY garden gifts and even Christmas tree ornaments!
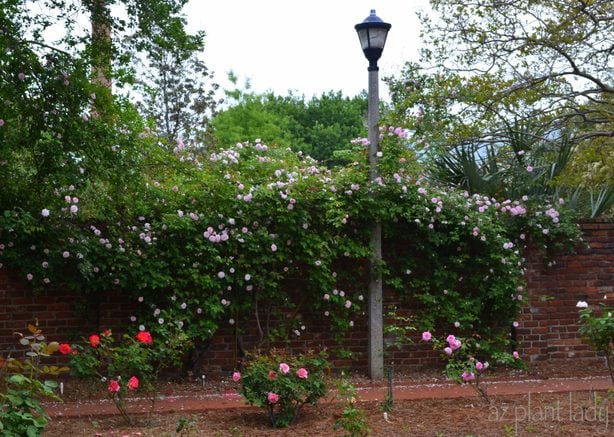
Is the view out your window looking rather barren to you? Dress up your bare wall or fence with beautiful plants! This old, brick wall gorgeous with these roses climbing on it. Unfortunately, not all garden fences or walls are attractive to look at. This is why it good for gardeners to know the best plants to grow against a fence.
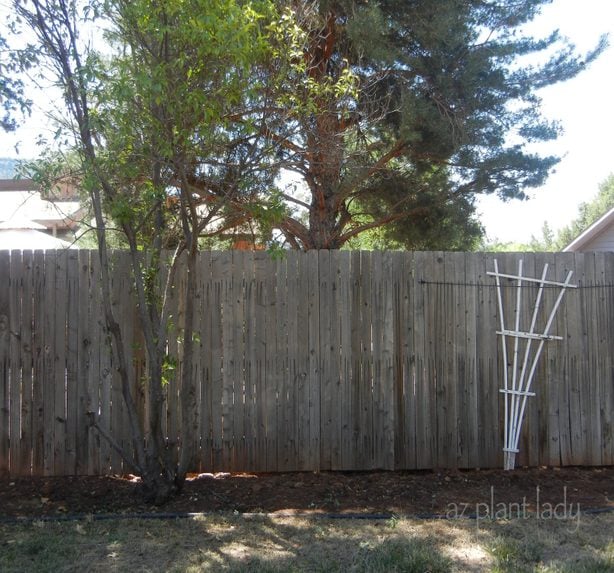
Maybe you have a bare wall that you view from your window. Or maybe your garden is surrounded by a wooden fence. Whether you have a wall or fence, you don’t have to settle for viewing a rather boring expanse. It is quite simple to dress up these bare spaces using plants planted in the ground or in containers. Painting a fence or wall is also great way to add color to your garden.
Best Plants to Grow Against a Fence
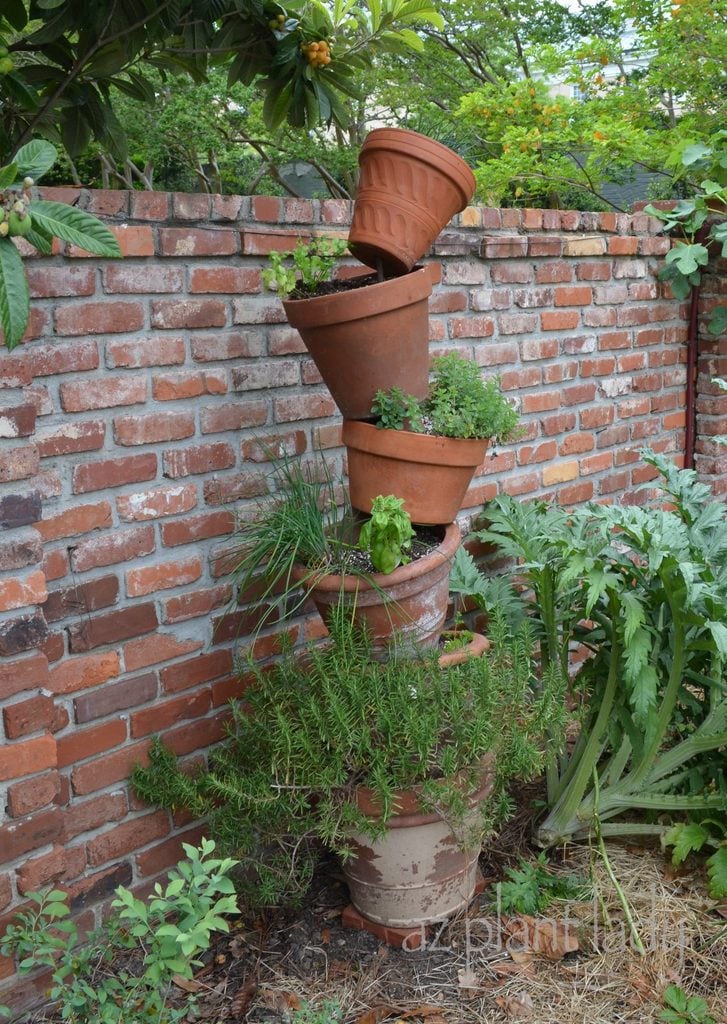
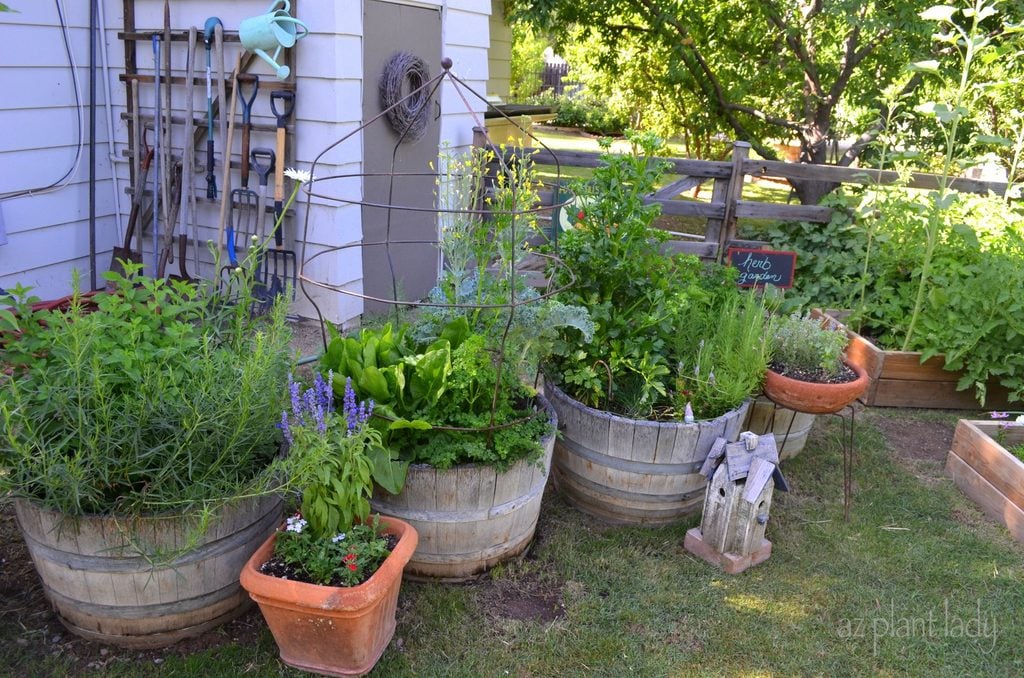
This simple ‘tipsy pot plant tower‘, located at the University of South Carolina is filled with herbs. Next to it is an artichoke plant, which not only produces delicious artichokes—it is also often grown as an ornamental plant.
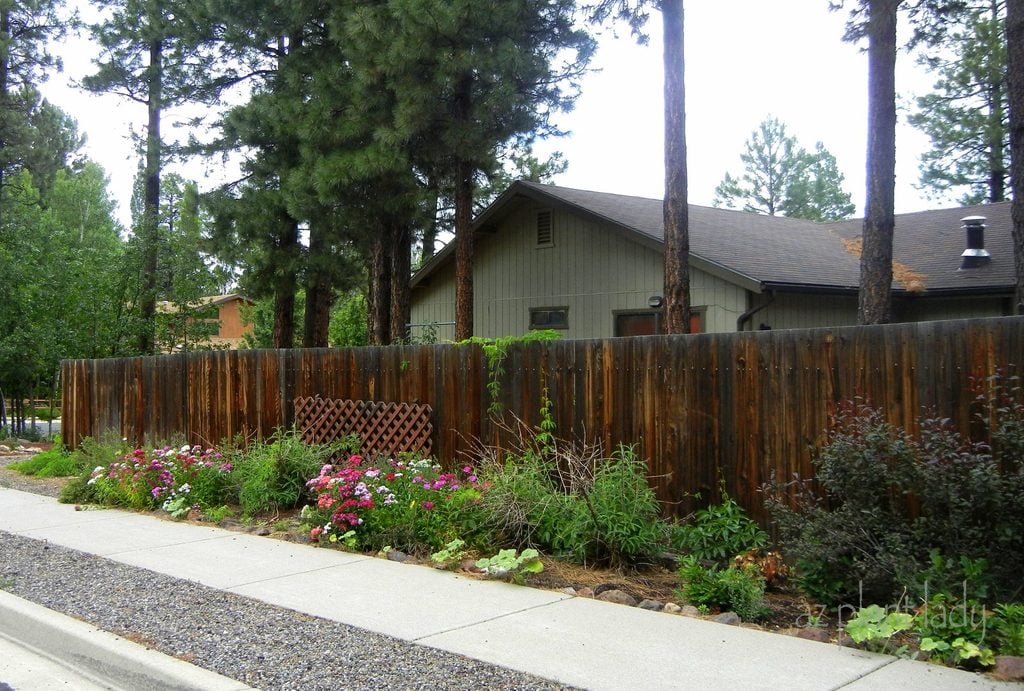
Perennials are a great way to beautify a bare fence, like this garden in Flagstaff, Arizona. Select perennials that do well in your area and pair with ornamental grass and plants that will provide fall color.
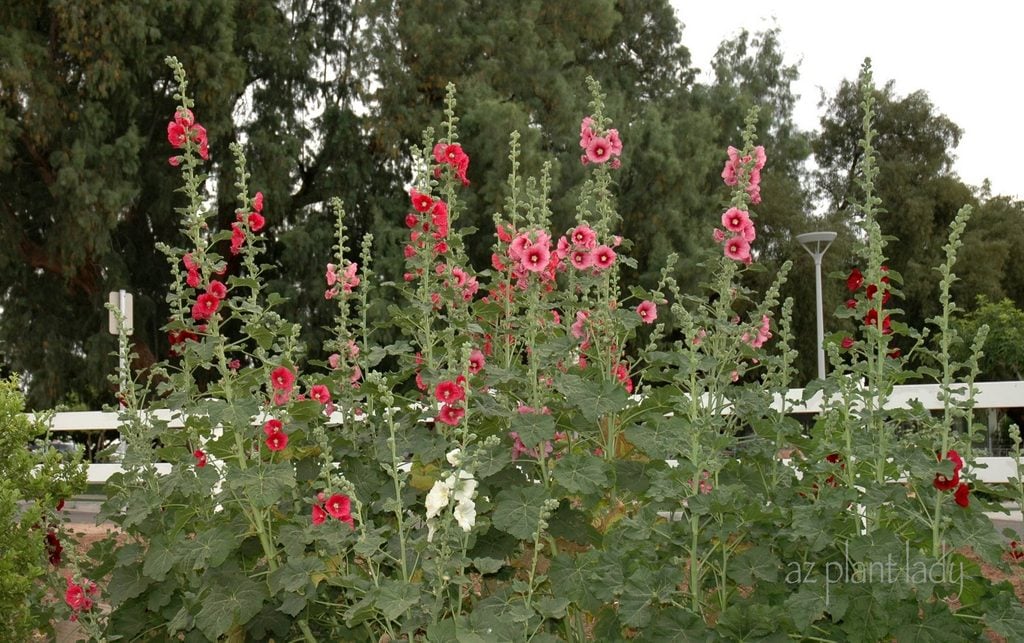
Tall-growing biennials like hollyhocks provide a colorful screen against a fence all summer long.
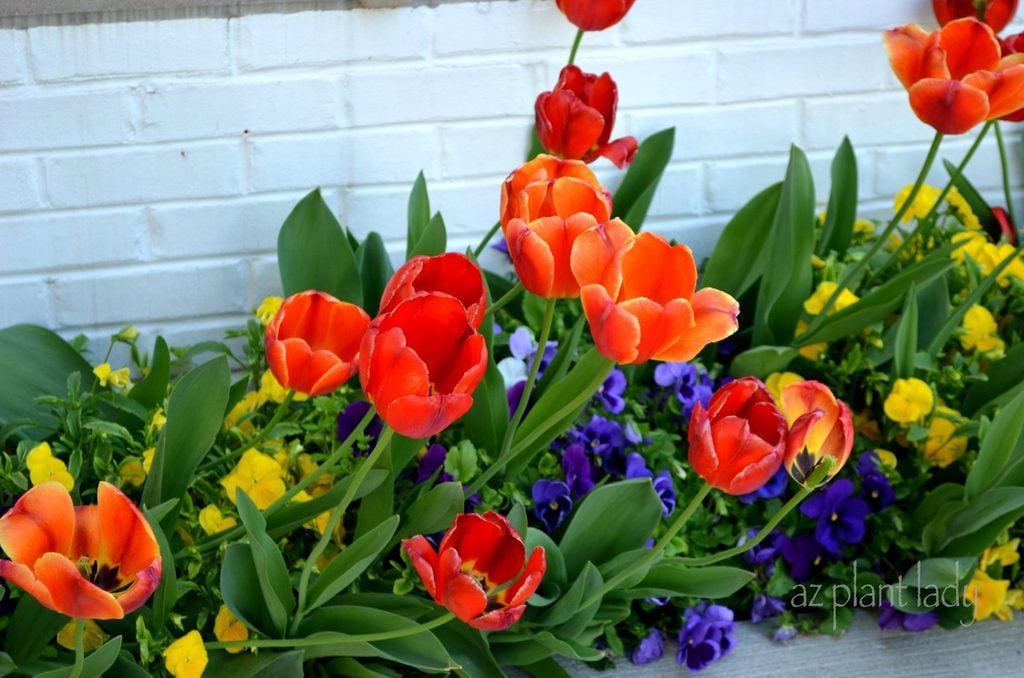
This colorful planting against a bare wall creates a colorful spring display in Berea, Kentucky. Include tulips, violas and pansies.
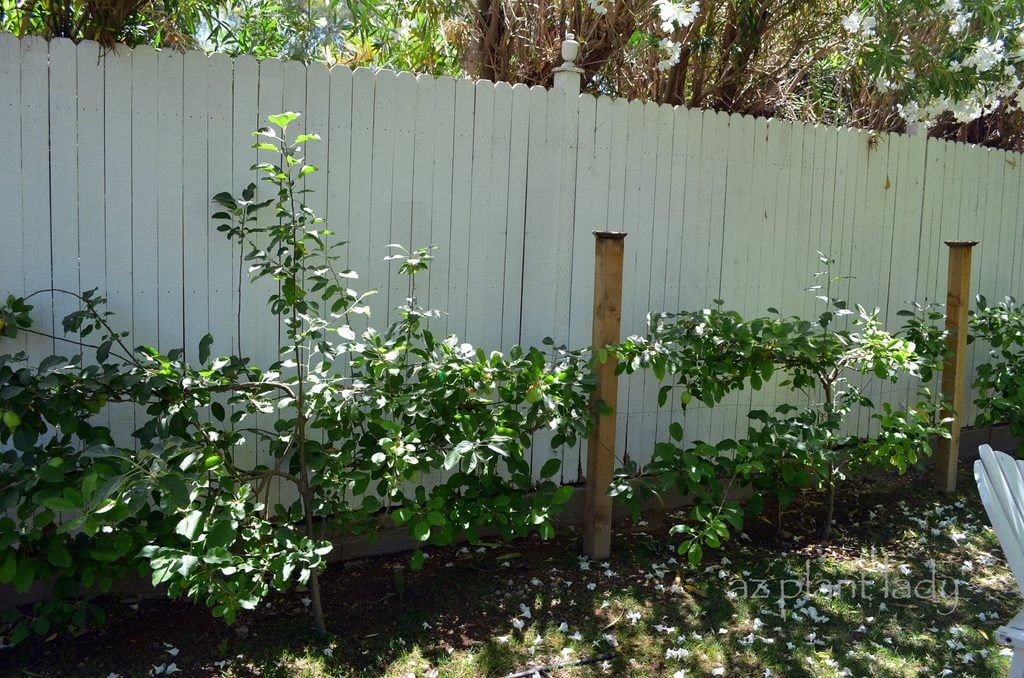
Espaliered fruit trees, like this apple tree, not only look great growing against a fence—they also produce delicious fruit!

Vines to Grow Against a Fence
Flowering vines are a great choice for bare walls such as this Queen’s Wreath Vine (Antigonon leptopus) at Arizona State University. There are many different types of flowering vines and you are sure to find one that will grow in your climate.
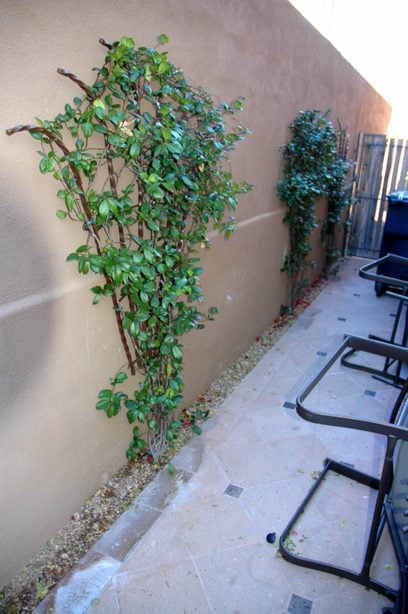
Vines are also a great choice for narrow spots like these star jasmine (Trachelospermum jasminoides) growing up on decorative trellises made up of rebar.
Shrubs to Grow Against a Fence
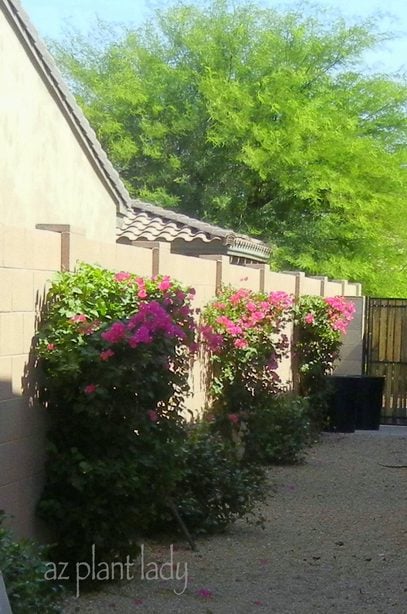
Side yards are often used for storage and utility. This can be quite a depressing view from a window that faces out into this area. An easy solution is to plant a flowering shrub, centered across from each window, like the bougainvillea, above.
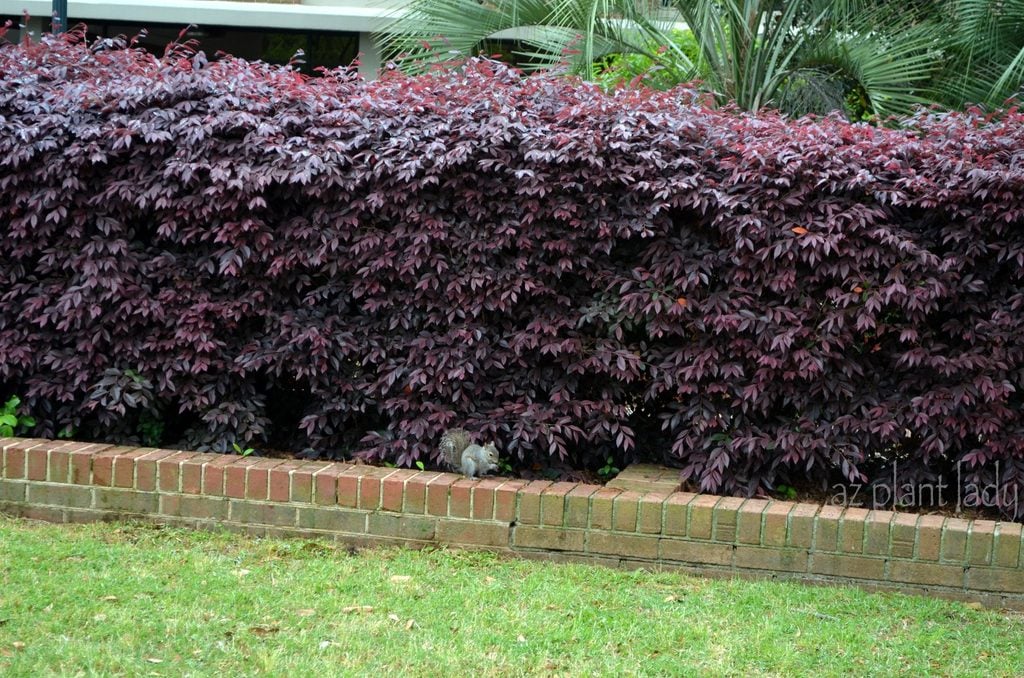
Shrubs with colorful foliage are also a great choice for covering bare walls or fences, like this one at the University of South Carolina.
Container Plants to Place Against a Fence
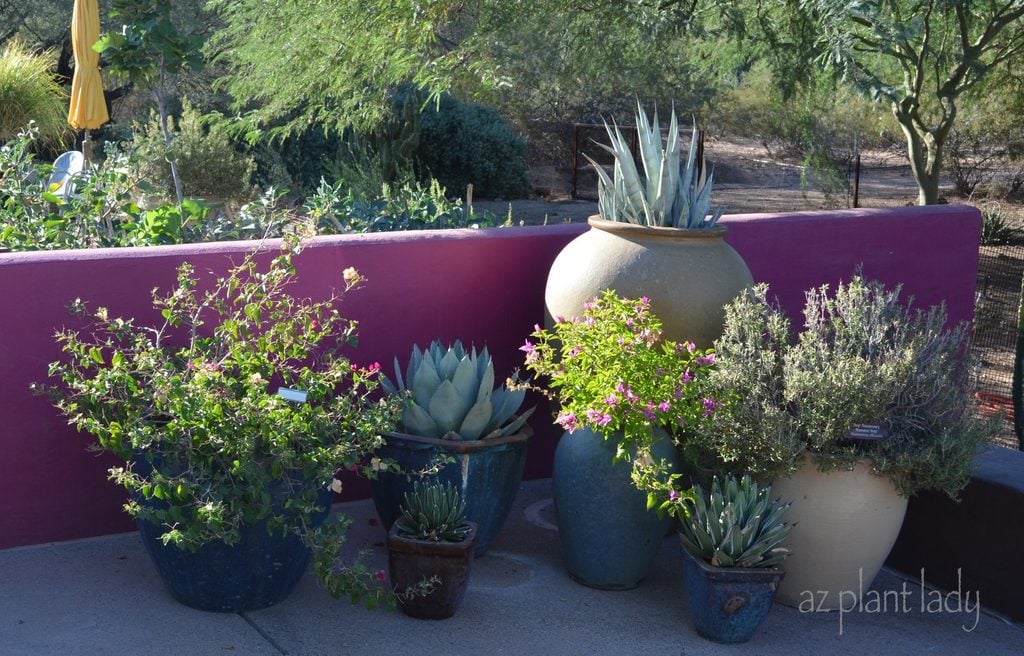
Don’t have soil in which to add plants? Then containers are your best choice. Select a variety of pots and plants for added texture and interest.
Containers mask an unsightly item or block a view. A group of stout containers can hide low-lying items like utilities and hose reels, while taller containers will cover even larger items. Check out 10 dwarf flowering shrubs for containers.
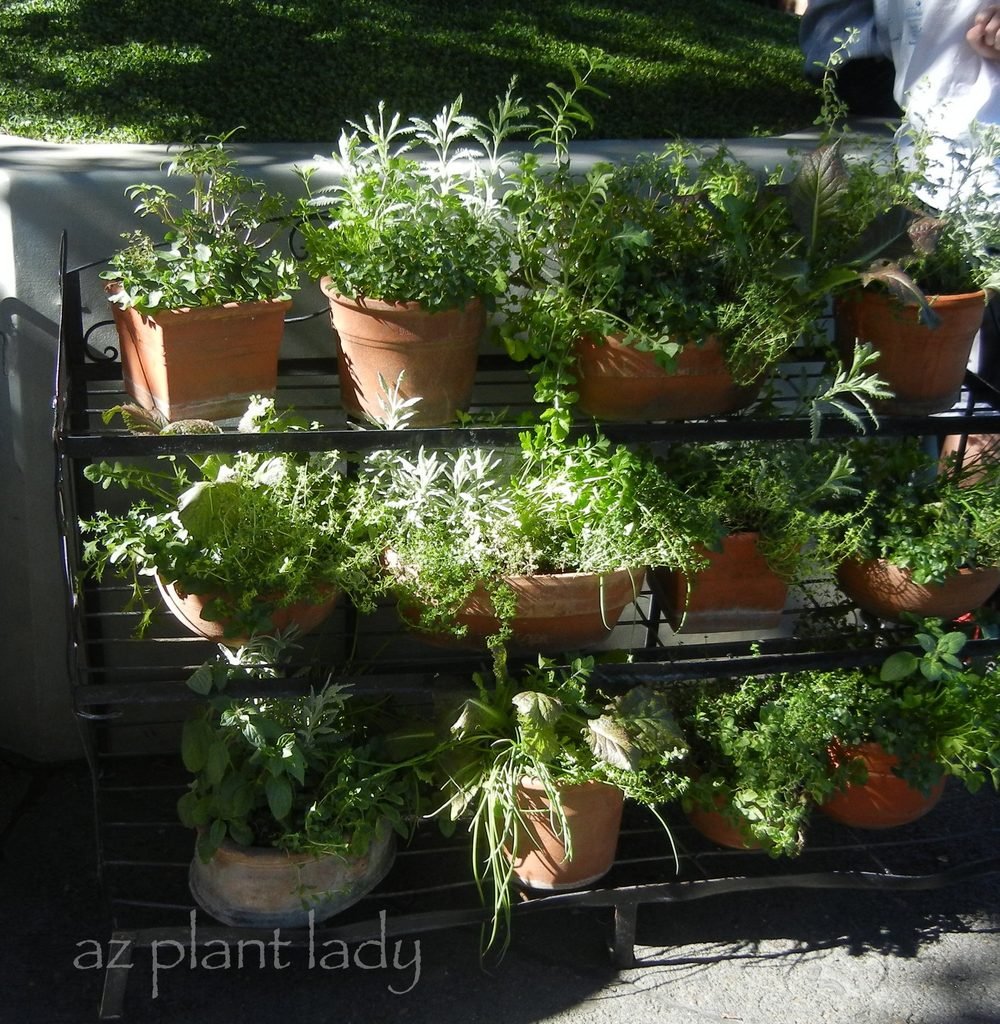
A plant shelf is a wonderful way to decorate a bare wall, like this one filled with potted herbs at Disneyland.
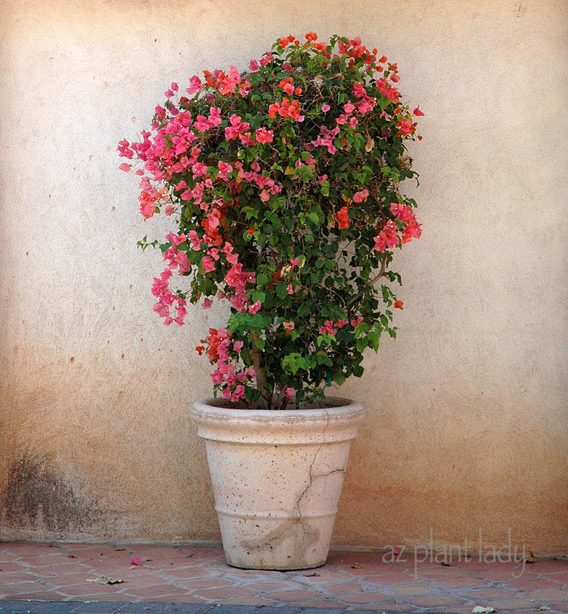
You can grow shrubs against a bare wall, even without soil to plant it in – just use a container instead.
Edible Plants to Grow Against a Fence
Dress up a bare fence with whiskey barrels and fill with edible plants such as herbs and vegetables.
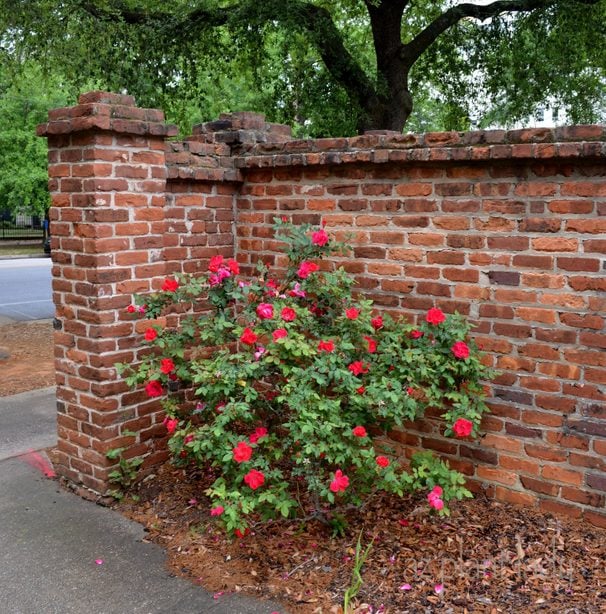
Never underestimate the ability of a single rose bush to dress up a bare corner. Plant a climbing rose to beautify a fence. Or lean a trellis against a structure to create a wall of blooms. Learn how to choose the best roses for your garden.