
Pinecone Hummingbird Craft Project
Updated: Apr. 24, 2020
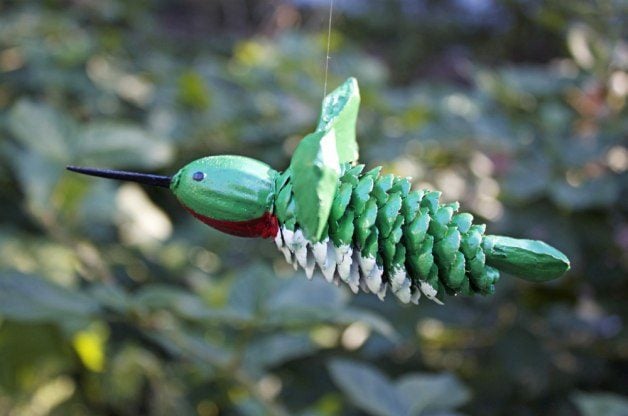
Using objects found in nature, this pinecone hummingbird craft is a great fall project for adults or kids.
If you’re looking for crafts projects perfect for adults or kids, try this pinecone hummingbird craft. They’re perfect for hanging on the Christmas tree, or make a collection and hang them up year-round.
Materials:
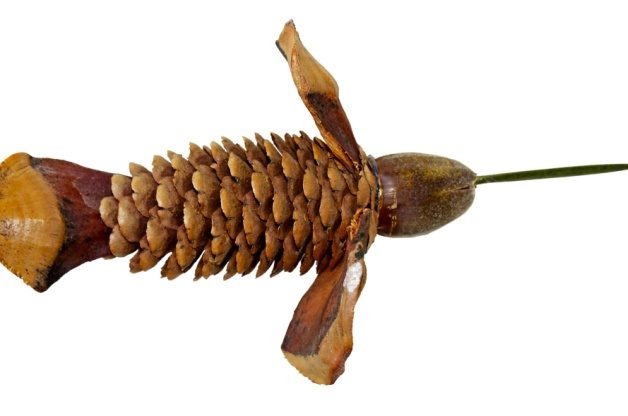
- Acorns
- Pinecones (variety of sizes)
- Long thorns
- Clippers, knife
- Hot glue gun and glue sticks
- Outdoor craft paint
- Small paintbrushes
- Red glitter
- Thread
Step-By-Step Instructions:
Step 1
Begin to assemble the head by removing the acorn cap. Use some clippers to trim a slice of the acorn from the top to get a flat surface to join the pinecone body.
Step 2
For the bill, clip off a thorn near its base. You might want to slightly dull the end of your thorn by rubbing it with a piece of sandpaper.
Trim off the tiny pointed tip of the acorn. Then carefully use a knife to make a small cut in the tip of your acorn. Put a bead of hot glue on the thorn you just cut and insert it into the cut to form the bill.
Hot glue the acorn head to the cone body (I used a spruce cone here), trimming if necessary. Allow to cool.
Step 3
Using scales from larger pinecones, cut to a wing shape. Insert the wings between the scales of the cone body just behind the neck. Tuck a smaller scale into the end of the cone for a tail. Secure both the wings and tail with hot glue.
Step 4
Paint, covering both sides of the cone scales. Allow one paint color to dry before laying on another. I used a green with a white underside for the bodies and top of the head. Then I used a ruby-colored paint for the throat and black for the bill. If you like, you can dust the throat with a bit of red glitter while the paint is still a little wet.
Step 5
With a detail paintbrush, add eyes and other small accents. Finally, when the bird is dry, tie a length of invisible sewing thread around the neck. Hang as if it’s in flight.