
Plastic Bottle Crafts: Garden Flowers

Updated: Mar. 21, 2024
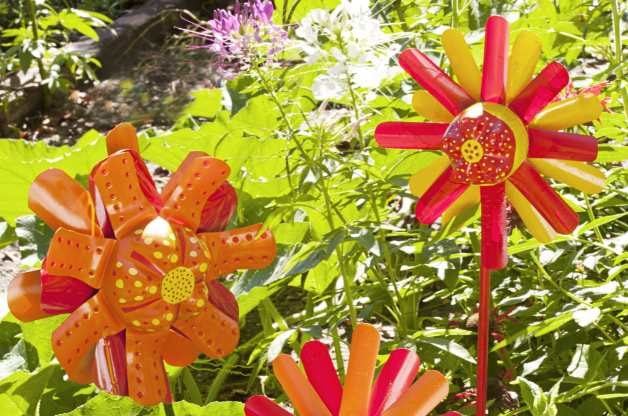
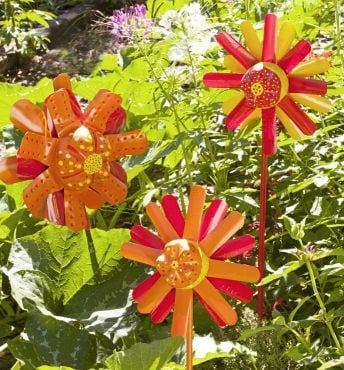
Pull a few plastic bottles out of the recycling bin, and create these easy garden flowers!
Plastic bottle crafts are a great way to reuse those ubiquitous water bottles. With a few easy steps, you can create these colorful garden flower decorations.
Materials:
- 2 or 3 same-size plastic soda bottles
- Waterproof permanent adhesive
- Gloss spray paint for plastics
- Small scrap of Styrofoam block
- Scrap of colored foam for backing
- 3/8-in.-wide x 24-in.-long wooden dowel rod
- Opaque permanent paint markers
- Paper-backed duct tape sheets (optional)
- Scissors or craft knife for bottle trimming
- Flexible ruler
Step-By-Step Instructions:
Step 1
Wash the bottles and let dry. Use a flexible ruler and permanent marker to make an even circular line as a cutting guide about 1/3 of the way down from the tops. Cut and discard top portion of bottles, keeping the bottoms to make the flowers.
Step 2
Place bottles upside down on scraps of cardboard or newspaper in a well-ventilated area. Stand the dowel rod in the Styrofoam block to make it easier to paint. Following manufacturer’s instructions, spray-paint exterior of bottles and dowel rod. Apply as many coats as needed for complete coverage. Let dry and remove the rod from the Styrofoam.
Step 3
Using a permanent marker and flexible ruler, lightly mark sections evenly around perimeter of each bottle for flower petals. For small bottles, mark about every 1 in.; for larger bottles, mark about every 2-1/2 to 3 in. Use scissors or a craft knife to cut vertical slits on marks, making several flower petals. Stop cutting each slit at the ridged base of bottle bottom. If desired, trim ends of petals into rounded shapes.
Step 4
Bend the petals forward so they’re at right angles to the center of the flower (the bottle bottom), creasing each one at the ridged base of the bottom. If needed, bend and press firmly several times until the petals stay in place.
Step 5
Using permanent adhesive, attach the bottles by stacking bottoms with petals outward. Stagger the placement of petals. For inner bottles, bottoms may have to bend slightly to fit inside outer bottle. Let adhesive dry.
Step 6
If desired, cut a 1-1/2- to 2-in. strip of duct tape to fit the perimeter of the top flower’s center. Decorate the center of the flower using the paint markers.
Step 7
Attach the dowel rod. For larger stacked bottles, cut small crisscross slits through the side of the middle bottle. For smaller stacked bottles, cut a small V-shape slit from the back edge of the last bottle. Put one end of dowel rod through slit, running it across the width of the bottle bottom until it meets the opposite inner side. Use permanent adhesive to glue dowel rod in place at both sides. Let adhesive dry.
Step 8
Cut a circular piece of colored foam slightly larger than the opening on back of flower and secure it with glue around the edges. Let it dry.
Stick your soda bottle flower a few inches into the dirt, indoors or out. No need to water it!
Originally Published: December 12, 2013