Cowboy Boot Birdhouse
Updated: Mar. 21, 2024
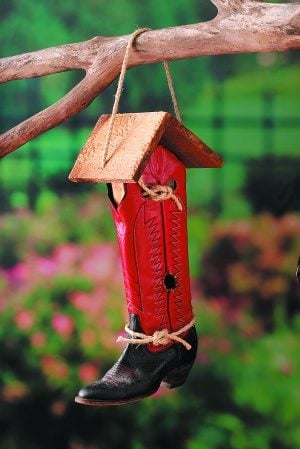
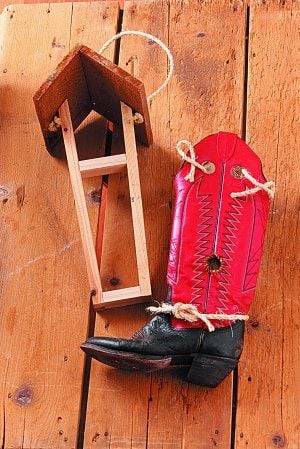
Little birds like wrens will love this DIY birdhouse made from an old cowboy boot!
Are you a little bit country? Then this DIY bird house project will be right at home on the range! Linda Lancaster of Ada, Oklahoma designed this cowboy boot birdhouse at the request of many Birds & Blooms readers over the years. Pick up a pair of boots at a rummage sale and make two of these – one for yourself, and one for a boot-scootin’ neighbor or friend!
Materials:
- One cowboy boot
- One 1- x 2-inch 8-foot pine board
- One 1- x 6-inch 8-foot rough cedar board
- 3 to 5 feet of sisal rope
- One pair of leather bootlaces or 3 feet of leather lacing (from a craft store)
- 20 to 30 1- to 1-1/2-inch nails
- Two 5/8-inch brass wood screws
- Saw
- Screwdriver
- Scissors
- Hammer
- Drill
- Drill bits (1/16-inch and 5/16-inch)
- 1/4-inch hole punch
Step-By-Step Instructions:
Step 1
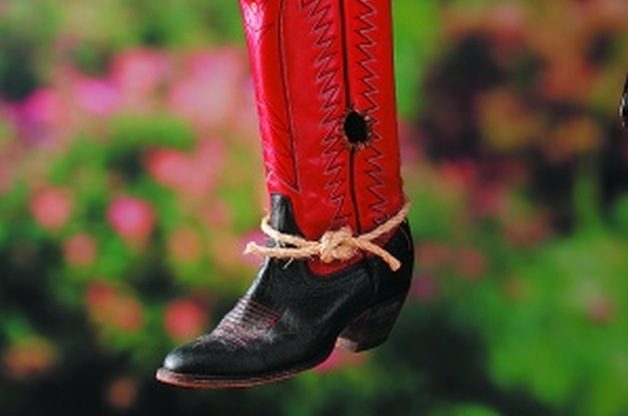
Cut a 1-inch hole midway up the boot. One way to do this is to trace around a quarter. (This will create the perfect-sized hole for a wren.)
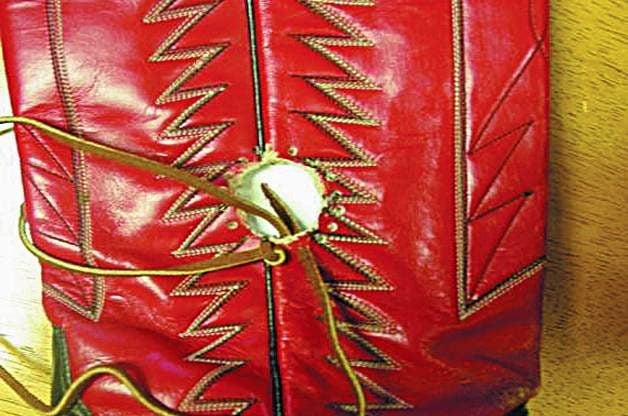
Using the hole punch, punch holes all around the opening. Make sure your holes are at least 1/8 inch away from the entrance hole to avoid tearing. Use a piece of leather lacing at least 2 feet long, and lace around the hole. To finish it, tie a double knot on the inside of the boot.
Step 2
Using the hole punch, make two holes on the front and back of the boot at the top. You’ll use these later.
Using a 5/16-inch drill bit, drill two to three holes in the boot’s sole for drainage. Set the boot aside while you build the frame.
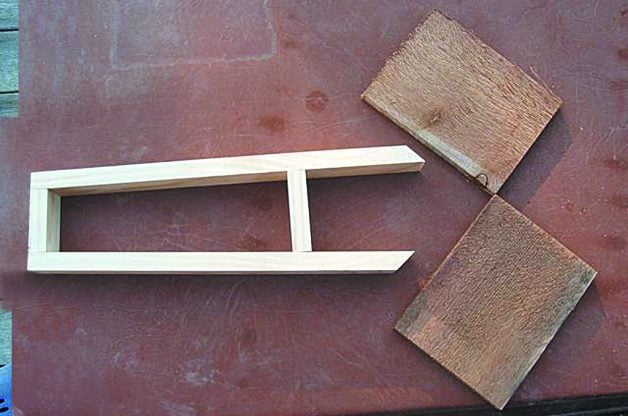
Step 3
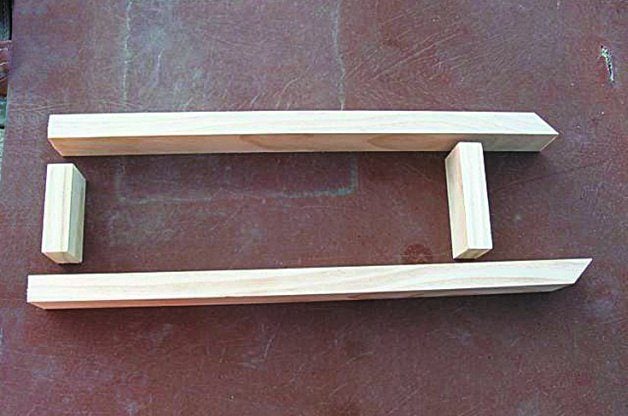
To determine the correct length for your frame boards, place the pine board inside the front part of the boot. Add roughly 2 inches and cut two pieces of that length. Cut a 45-degree angle on one end of each of these boards. (This is the hardest cut of the whole project, so if you can do this, the rest should be easy!)
From the original pine board, cut another two lengths, one 2-1/8 inch and the other 3-1/4 inch. (These will be your spacers, and you might need to adjust them for boots with wider shafts.)
Step 4
Cut two 6-inch lengths of cedar from the fence board for the roof. To assemble the frame, the 45-degree angles will face away from each other. The 2-1/8-inch piece of wood will connect the bottom, while the 3-1/4 inch spacer is roughly 8 inches above that.
To keep the boards from splitting, drill pilot holes with a 1/16-inch drill bit. Nail boards in place, using two or three nails at each connection.
Place the two cedar roof lengths at right angles. Drill and nail the two pieces together using at least six nails. Then place the roof over the frame and drill and nail into place, using at least three nails on each side.
Step 5
Using the 5/16-inch drill bit, drill two holes in the roof eaves and attach a 2-foot length of sisal rope for hanging.
Slide the wooden frame into the boot. Use brass wood screws to attach the boot to the wooden frame (through the holes you punched earlier). These screws won’t rust, and you can easily remove them for cleaning.
Step 6
Decorate any way you like. I added a bit of extra rope to mine. To attract house wrens, hang the boot from a tree or other support about 6 to 10 feet above the ground.